Docker: Difference between revisions
| (20 intermediate revisions by the same user not shown) | |||
| Line 1: | Line 1: | ||
== | =Introduction= | ||
This all started with VMWare where the total resource could be divided up to run more than one application on difference virtual machines. But VMWare required an OS on every machine and licenses in the case of Windows. They also needed managing, e.g. patching, Anti-virus and patching. Along came containers which shared the OS. | |||
<br> | |||
[[File:Containers Overview.png|500px]] | |||
<br> | |||
Docker Inc. Docker is a company which gave the word technology for containers. They are now a company which provides services around the company. | |||
<br> | |||
<br> | |||
Docker is Open source and known as Community Edition (CE). The company Docker releases an Enterprise Edition (EE). | |||
<br> | |||
The general approach is to | |||
*Create an image (docker build) | |||
*Store it in a registry (docker image push) | |||
*Start a container from it (docker container run) | |||
The differences between EE and CE are shown below | |||
[[File:Docker Diffs.png|500px]] | |||
=Architecture= | |||
Docker is made up of a docker engine and containers which are comprised of namespaces and control groups. Wiki defines namespaces as '''Namespaces are a feature of the Linux kernel that partitions kernel resources such that one set of processes sees one set of resources while another set of processes sees a different set of resources.''' | |||
<br> | |||
==Docker Engine== | |||
Here are the core elements of the docker engine. | |||
<br> | |||
[[File:Docker engine.png|400px]] | |||
<br> | |||
*dockerd: The Docker daemon is where all of your Docker communications take place. It manages the state of your containers and images, as well as connections with the outside world, and controls access to Docker on your machine. | |||
*containerd: This is a daemon process that manages and runs containers. It pushes and pulls images, manages storage and networking, and supervises the running of containers. | |||
*runc: This is the low-level container runtime (the thing that actually creates and runs containers). It includes libcontainer, a native Go-based implementation for creating containers | |||
When we create a container, this is the workflow. It is the runc which actually the part which creates the container. The components containerd and runc standardized and it is easily possible to swap runc out for any oci compliant runtime. | |||
[[File:DockerEngine Workflow.png|400px]] | |||
==Namespace Types== | |||
Within the Linux kernel, there are different types of namespaces. Each namespace has its own unique properties: | |||
[[File:Docker namespace arch.png|400px]] | |||
*A user namespace has its own set of user IDs and group IDs for assignment to processes. In particular, this means that a process can have root privilege within its user namespace without having it in other user namespaces. | |||
*A process ID (PID) namespace assigns a set of PIDs to processes that are independent from the set of PIDs in other namespaces. The first process created in a new namespace has PID 1 and child processes are assigned subsequent PIDs. If a child process is created with its own PID namespace, it has PID 1 in that namespace as well as its PID in the parent process’ namespace. See below for an example. | |||
*A network namespace has an independent network stack: its own private routing table, set of IP addresses, socket listing, connection tracking table, firewall, and other network‑related resources. | |||
*A mount namespace has an independent list of mount points seen by the processes in the namespace. This means that you can mount and unmount filesystems in a mount namespace without affecting the host filesystem. | |||
*An interprocess communication (IPC) namespace has its own IPC resources, for example POSIX message queues. | |||
*A UNIX Time‑Sharing (UTS) namespace allows a single system to appear to have different host and domain names to different processes. | |||
==Control Groups== | |||
A control group (cgroup) is a Linux kernel feature that limits, accounts for, and isolates the resource usage (CPU, memory, disk I/O, network, and so on) of a collection of processes. | |||
<br> | |||
Now we have namespace we need a way to control the resources across the namespaces. This is where cgroups come in. | |||
<br> | |||
[[File:Docker CGroup arch.png|400px]] | |||
*Resource limits – You can configure a cgroup to limit how much of a particular resource (memory or CPU, for example) a process can use. | |||
*Prioritization – You can control how much of a resource (CPU, disk, or network) a process can use compared to processes in another cgroup when there is resource contention. | |||
*Accounting – Resource limits are monitored and reported at the cgroup level. | |||
*Control – You can change the status (frozen, stopped, or restarted) of all processes in a cgroup with a single command. | |||
==Docker on Windwos== | |||
Finally a quick image to demonstrate the difference between native and hyper-v containers on windows. They made me do it gov. | |||
<br> | |||
[[File:Docker on Windows.png|400px]] | |||
=Images= | |||
Image a made up of a manifest and layers. | |||
==Getting Images== | |||
We can get images using the pull command. The command is two step. It reads the manifests and then pulls the layers checking that the hashes pulled match the manifest hashes. | |||
<syntaxhighlight lang="bash"> | |||
docker image pull redis | |||
>Using default tag: latest | |||
>latest: Pulling from library/redis | |||
>33847f680f63: Pull complete | |||
>26a746039521: Pull complete | |||
>18d87da94363: Pull complete | |||
>5e118a708802: Pull complete | |||
>ecf0dbe7c357: Pull complete | |||
>46f280ba52da: Pull complete | |||
>Digest: sha256:cd0c68c5479f2db4b9e2c5fbfdb7a8acb77625322dd5b474578515422d3ddb59 | |||
>Status: Downloaded newer image for redis:latest | |||
>docker.io/library/redis:latest | |||
#To get the digest | |||
docker image ls --digests | |||
REPOSITORY TAG DIGEST IMAGE ID CREATED SIZE | |||
redis latest sha256:cd0c68c5479f2db4b9e2c5fbfdb7a8acb77625322dd5b474578515422d3ddb59 aa4d65e670d6 3 weeks ago 105MB | |||
</syntaxhighlight> | |||
==The Layers== | |||
We can find where our layers are by using | |||
<syntaxhighlight lang="bash"> | |||
docker system info | |||
>Client: | |||
> Context: default | |||
> Debug Mode: false | |||
> | |||
>Server: | |||
> Containers: 2 | |||
> Running: 0 | |||
> Paused: 0 | |||
> Stopped: 2 | |||
> Images: 3 | |||
> Server Version: 20.10.7 | |||
> Storage Driver: overlay2 | |||
> Backing Filesystem: extfs | |||
> Supports d_type: true | |||
> Native Overlay Diff: true | |||
> userxattr: false | |||
> Logging Driver: json-file | |||
> Cgroup Driver: cgroupfs | |||
> Cgroup Version: 1 | |||
... | |||
> Docker Root Dir: /var/lib/docker | |||
> Debug Mode: false | |||
> Registry: https://index.docker.io/v1/ | |||
> Labels: | |||
> Experimental: false | |||
> Insecure Registries: | |||
> 127.0.0.0/8 | |||
> Live Restore Enabled: false | |||
</syntaxhighlight> | |||
We can see it is using overlay2 storage driver and the root is /var/lib/docker so the layers are stored in /var/lib/docker/overlay2. | |||
<br> | |||
We can look at the history of the image and the commands used to make it with | |||
<syntaxhighlight lang="bash"> | |||
docker history redis | |||
>IMAGE CREATED CREATED BY SIZE >COMMENT | |||
>aa4d65e670d6 3 weeks ago /bin/sh -c #(nop) CMD ["redis-server"] 0B | |||
><missing> 3 weeks ago /bin/sh -c #(nop) EXPOSE 6379 0B | |||
><missing> 3 weeks ago /bin/sh -c #(nop) ENTRYPOINT ["docker-entry… 0B | |||
><missing> 3 weeks ago /bin/sh -c #(nop) COPY file:df205a0ef6e6df89… 374B | |||
><missing> 3 weeks ago /bin/sh -c #(nop) WORKDIR /data 0B | |||
><missing> 3 weeks ago /bin/sh -c #(nop) VOLUME [/data] 0B | |||
><missing> 3 weeks ago /bin/sh -c mkdir /data && chown redis:redis … 0B | |||
><missing> 3 weeks ago /bin/sh -c set -eux; savedAptMark="$(apt-m… 31.7MB | |||
><missing> 3 weeks ago /bin/sh -c #(nop) ENV REDIS_DOWNLOAD_SHA=4b… 0B | |||
><missing> 3 weeks ago /bin/sh -c #(nop) ENV REDIS_DOWNLOAD_URL=ht… 0B | |||
><missing> 3 weeks ago /bin/sh -c #(nop) ENV REDIS_VERSION=6.2.5 0B | |||
><missing> 3 weeks ago /bin/sh -c set -eux; savedAptMark="$(apt-ma… 4.15MB | |||
><missing> 3 weeks ago /bin/sh -c #(nop) ENV GOSU_VERSION=1.12 0B | |||
><missing> 3 weeks ago /bin/sh -c groupadd -r -g 999 redis && usera… 329kB | |||
><missing> 3 weeks ago /bin/sh -c #(nop) CMD ["bash"] 0B | |||
><missing> 3 weeks ago /bin/sh -c #(nop) ADD file:45f5dfa135c848a34… 69.3MB | |||
</syntaxhighlight> | |||
The non-zero size changes are generally a layer. | |||
<br> | |||
For even more information run inspect | |||
<syntaxhighlight lang="bash"> | |||
docker image inspect redis | |||
</syntaxhighlight> | |||
==Registries== | |||
Where images live. By default Docker uses docker hub but you can use your own or other peoples. Docker divides registries between official and unofficial. Official images live at top of the namespace e.g docker.io/redis docker.lo/mysql. It is important to understand when pulling an image there are three components. | |||
*Registry - e.g. dockerio | |||
*Repo - e.g. redis | |||
*Image (or Tag) - e.g. latest | |||
It is just that Docker has defaults for registry and image so docker pull redis works but it is really doing docker pull docker.io/redis/latest | |||
<br> | |||
<br> | |||
It was mentioned that the hashes on the file system for an image are referred to as '''content hashes''' and when images are pushed to the registry, before sending the layers are compressed and these hashes are referred to as '''distribution hashes'''. | |||
===Best Practice=== | |||
*Use Official images | |||
*Use Small images | |||
*Be explicit referencing images (:latest noooo!) | |||
=Containers Detail= | |||
==Copy on Write== | |||
As we know the container is a bunch of layers and the images are read-only. Only the read/write layer is writeable. When we change values in a running container we actually copy the original file and put it in the read/write layer. This is known as '''copy on write'''<br> | |||
[[File:Docket Detail.png|500px]] | |||
==Microservices== | |||
Perhaps the current buzz-word. Previously we built our apps to have all of the components on one server. With containers we can break these down into individual containers. The old way is referred to as a monolith. The new way is to separate services and connect them with well documented APIs. | |||
<br> | |||
[[File:Docker monolith.png|600px]] | |||
==Helpful Commands== | |||
Some useful bits | |||
<syntaxhighlight lang="bash"> | <syntaxhighlight lang="bash"> | ||
# General Commands for Docker | |||
#Show the current docker image running | #Show the current docker image running | ||
sudo docker ps | sudo docker ps | ||
| Line 7: | Line 175: | ||
#Show the images available | #Show the images available | ||
sudo docker images | sudo docker images | ||
# Remember you only need the best match for container in commands | |||
docker container ls | |||
>49978c1c8547 redis "docker-entrypoint.s…" 19 seconds ago Up 18 seconds 6379/tcp, 0.0.0.0:8088->8088/tcp, :::8088->8088/tcp test | |||
# Get the ports using part of the container name | |||
docker port 499 | |||
>8088/tcp -> 0.0.0.0:8088 | |||
>8088/tcp -> :::8088 | |||
#Stop a container id | #Stop a container id | ||
| Line 31: | Line 208: | ||
#This will remove all stopped containers | #This will remove all stopped containers | ||
docker container prune | docker container prune | ||
# Get IP of container | |||
docker inspect -f "{{ .NetworkSettings.Networks.bridge.IPAddress }}" 499 | |||
# This works the same as inspect where you get all of the setting. the .NetowrkSettings is a filter | |||
This | |||
# Clean up containers | |||
docker container rm $(docker container ls -aq) -f | |||
= | # Example run Note the --net=host allows the host to talk to the container | ||
docker run --name <name> --net=host -d -p 8000:5000 --rm -e MAIL_USERNAME=iwiseman -e ENVIRONMENT2=env2 | |||
= | </syntaxhighlight> | ||
=Container Logging= | |||
We can set the logging driver in daemon.json (alternatives Gelf, Splunk, Fluentd...) and override for a container by passing --log-driver and --log-opts. | |||
<br> | |||
The standard way to view the logs is | |||
<syntaxhighlight lang="bash"> | <syntaxhighlight lang="bash"> | ||
docker logs <container> | |||
</syntaxhighlight> | </syntaxhighlight> | ||
== | |||
=Docker Swarm= | |||
==Introduction== | |||
Swarm has two parts, the orchestrator and the secure cluster. The orchestrator does the start stop elements of running containers, the secure cluster is a way to run a group of containers with mutual authentication and encryption between them. | |||
==Swarm mode== | |||
With docker you can run containers as Single-engine mode or in something called Swarm mode. Whilst there a some notes on the options here I will leave detail for another day. This is just for awareness. | |||
<syntaxhighlight lang="bash"> | <syntaxhighlight lang="bash"> | ||
docker | # To create a swarm | ||
docker swarm init | |||
</syntaxhighlight> | </syntaxhighlight> | ||
When we do this | |||
*The first node becomes the manager/leader | |||
*They becomes the root CA (overrideable) | |||
*They get a client certificate | |||
*It builds a secure cluster store (which is etcd) | |||
*This is distributed to every manager in store automatically | |||
*Create cryptographic tokens, one for managers and one for workers | |||
<br> | <br> | ||
To join a new manager we pass the manager token and | |||
<syntaxhighlight lang="bash"> | <syntaxhighlight lang="bash"> | ||
docker | docker swarm join-token manager | ||
docker swarm join --token blarblarblar | |||
</syntaxhighlight> | |||
To join a new worker we pass the worker token and | |||
<syntaxhighlight lang="bash"> | |||
docker swarm join-token manager | |||
docker swarm join --token blarblarblar | |||
</syntaxhighlight> | </syntaxhighlight> | ||
You can see the nodes with | |||
<syntaxhighlight lang="bash"> | <syntaxhighlight lang="bash"> | ||
docker | docker node ls | ||
</syntaxhighlight> | </syntaxhighlight> | ||
We can rotate the worker token with | |||
We can | |||
<syntaxhighlight lang="bash"> | <syntaxhighlight lang="bash"> | ||
docker | docker swarm join-token --rotate worker | ||
</syntaxhighlight> | </syntaxhighlight> | ||
We can lock/unlock swarms so they cannot be restarted without authentication with. | |||
<syntaxhighlight lang="bash"> | <syntaxhighlight lang="bash"> | ||
docker swarm lock | |||
docker swarm unlock | |||
</syntaxhighlight> | |||
networks: | =Docker Networking= | ||
==OSI Layers== | |||
Just a brief reminder of the OSI Layers | |||
<br> | |||
[[File:OSI Layers.png|400px]] | |||
*Physical Layer | |||
The lowest layer of the OSI Model is concerned with electrically or optically transmitting raw unstructured data bits across the network from the physical layer of the sending device to the physical layer of the receiving device. It can include specifications such as voltages, pin layout, cabling, and radio frequencies. At the physical layer, one might find “physical” resources such as network hubs, cabling, repeaters, network adapters or modems. | |||
<br> | |||
*Data Link Layer | |||
At the data link layer, directly connected nodes are used to perform node-to-node data transfer where data is packaged into frames. The data link layer also corrects errors that may have occurred at the physical layer. | |||
<br> | |||
<br> | |||
The data link layer encompasses two sub-layers of its own. The first, media access control (MAC), provides flow control and multiplexing for device transmissions over a network. The second, the logical link control (LLC), provides flow and error control over the physical medium as well as identifies line protocols. | |||
<br> | |||
<br> | |||
*Network Layer | |||
The network layer is responsible for receiving frames from the data link layer, and delivering them to their intended destinations among based on the addresses contained inside the frame. The network layer finds the destination by using logical addresses, such as IP (internet protocol). At this layer, routers are a crucial component used to quite literally route information where it needs to go between networks. | |||
<br> | |||
*Transport Layer | |||
The transport layer manages the delivery and error checking of data packets. It regulates the size, sequencing, and ultimately the transfer of data between systems and hosts. One of the most common examples of the transport layer is TCP or the Transmission Control Protocol. | |||
<br> | |||
*Session Layer | |||
The session layer controls the conversations between different computers. A session or connection between machines is set up, managed, and termined at layer 5. Session layer services also include authentication and reconnections. | |||
<br> | |||
*Presentation Layer | |||
The presentation layer formats or translates data for the application layer based on the syntax or semantics that the application accepts. Because of this, it at times also called the syntax layer. This layer can also handle the encryption and decryption required by the application layer. | |||
<br> | |||
*Application Layer | |||
At this layer, both the end user and the application layer interact directly with the software application. This layer sees network services provided to end-user applications such as a web browser or Office 365. The application layer identifies communication partners, resource availability, and synchronizes communication. | |||
==Bridge Network== | |||
There are four importance concepts about bridged networking: | |||
*Docker0 Bridge | |||
*Network Namespace | |||
*Veth Pair | |||
*External Communication | |||
When we create a container a veth pair is created. Here is a diagram to help | |||
<br> | |||
[[File:Docker Veth Pair.png|400px]] | |||
<br> | |||
This is the network which docker uses by default. We can see this with the command ls or inspect. | |||
<syntaxhighlight lang="bash"> | |||
docker network ls | |||
NETWORK ID NAME DRIVER SCOPE | |||
6960786ad2f8 bridge bridge local | |||
d40bd7769843 host host local | |||
e9a4e7e98aa1 none null local | |||
docker network inspect bridge | |||
>[ | |||
> { | |||
> "Name": "bridge", | |||
> "Id": "6960786ad2f80a1a309e8b9bf773ad73b5bc7c2f68ee36f545fd464619969461", | |||
> "Created": "2021-08-15T17:27:07.794617822+12:00", | |||
> "Scope": "local", | |||
> "Driver": "bridge", | |||
> "EnableIPv6": false, | |||
> "IPAM": { | |||
> "Driver": "default", | |||
> "Options": null, | |||
> "Config": [ | |||
> { | |||
> "Subnet": "172.17.0.0/16", | |||
> "Gateway": "172.17.0.1" | |||
> } | |||
> ] | |||
> }, | |||
> "Internal": false, | |||
> "Attachable": false, | |||
> "Ingress": false, | |||
> "ConfigFrom": { | |||
> "Network": "" | |||
> }, | |||
> "ConfigOnly": false, | |||
> "Containers": {}, | |||
> "Options": { | |||
> "com.docker.network.bridge.default_bridge": "true", | |||
> "com.docker.network.bridge.enable_icc": "true", | |||
> "com.docker.network.bridge.enable_ip_masquerade": "true", | |||
> "com.docker.network.bridge.host_binding_ipv4": "0.0.0.0", | |||
> "com.docker.network.bridge.name": "docker0", | |||
> "com.docker.network.driver.mtu": "1500" | |||
> }, | |||
> "Labels": {} | |||
> } | |||
>] | |||
</syntaxhighlight> | </syntaxhighlight> | ||
<br> | |||
The only way to talk to other containers on a different bridge network is IP/Port to IP/Port. | |||
<br> | |||
[[File:Docker Bridge Network.png|400px]] | |||
<br> | |||
To create a network and add a container | |||
<syntaxhighlight lang="bash"> | <syntaxhighlight lang="bash"> | ||
docker network create -d bridge too-far | |||
docker container run --rm -d --network toofar alpine sleep 1d | |||
</syntaxhighlight> | </syntaxhighlight> | ||
== | ==Overlay Network== | ||
This command | With an overlay network containers can talk to each other on the same network and on different machines. This can be created with a single command on docker along with encryption. With built in overlay is container only. Note overlay is multiple host so any device on the network will be available. | ||
<syntaxhighlight lang=" | <syntaxhighlight lang="bash"> | ||
docker network create overlay overnet -o encrypted | |||
docker service create -d -name pinger --replicas 2 --network overnet alpine sleep 1d | |||
</syntaxhighlight> | </syntaxhighlight> | ||
If you want to talk to physical boxes or vlans you can use MACVLAN. | |||
=Network Services= | |||
*Discovery Make every service in the swarm discoverable via built-in DNS | |||
*Ingress/Internal Load Balancing Every node in the swarm knows about every service | |||
=Volumes and Persistent Data= | |||
==Introduction== | |||
Here for completeness | |||
<syntaxhighlight lang="bash"> | |||
docker volume create myvol | |||
docker volume ls | |||
docker volume inspect | |||
docker volume rm myvol | |||
</syntaxhighlight> | </syntaxhighlight> | ||
== | ==Using Volumes== | ||
This mounts a volume on the container at /vol and creates a volume if it does not exist. | |||
<syntaxhighlight lang="bash"> | <syntaxhighlight lang="bash"> | ||
docker container run -dit -name myvol --mount source=ubervol, target=/vol alpine:latest | |||
</syntaxhighlight> | </syntaxhighlight> | ||
== | |||
==Docker Secrets== | |||
<syntaxhighlight lang=" | A docker secret is a blob up to 500k. It needs swarm mode with services because it use the security components. We create a secret and send it to the swarm manager with the following command. | ||
<syntaxhighlight lang="bash"> | |||
docker secret create mysec-v1 .\myfileondisk | |||
docker secret ls | |||
docker secret inspect | |||
#Create a service | |||
docker service create -d --name my-service --secret mysec-v1 alpine sleep 1d | |||
#We can see the secret config | |||
docker service inspect my-service | |||
#On the node we can see /run/secrets | |||
cat /run/secrets | |||
#You cannot delete a secret in use to you need to delete the service first. | |||
docker service rm my-service | |||
</syntaxhighlight> | </syntaxhighlight> | ||
=== | =Stacks= | ||
==Introduction== | |||
<syntaxhighlight lang=" | This is a way to defined deployment for multi container solutions and an alternative to kubernetes. | ||
version: | <br> | ||
services: | [[File:Docker stacks.png|500px]] | ||
==Example Docker Stack File== | |||
Here is an example stack file with four key levels | |||
*version | |||
*services | |||
*networks | |||
ports: | *volumes | ||
- | <syntaxhighlight lang="yaml"> | ||
version: "3" | |||
- | services: | ||
redis: | |||
image: redis:alpine | |||
networks: | |||
- frontend | |||
deploy: | |||
replicas: 1 | |||
update_config: | |||
parallelism: 2 | |||
delay: 10s | |||
restart_policy: | |||
condition: on-failure | |||
db: | |||
image: postgres:9.4 | |||
environment: | |||
POSTGRES_USER: "postgres" | |||
POSTGRES_PASSWORD: "postgres" | |||
volumes: | |||
- db-data:/var/lib/postgresql/data | |||
networks: | |||
- backend | |||
deploy: | |||
placement: | |||
constraints: [node.role == manager] | |||
vote: | |||
image: dockersamples/examplevotingapp_vote:before | |||
ports: | |||
- 5000:80 | |||
networks: | |||
- frontend | |||
depends_on: | depends_on: | ||
- | - redis | ||
deploy: | |||
replicas: 2 | |||
update_config: | |||
parallelism: 2 | |||
restart_policy: | |||
condition: on-failure | |||
result: | |||
image: dockersamples/examplevotingapp_result:before | |||
ports: | |||
- 5001:80 | |||
networks: | networks: | ||
- backend | |||
depends_on: | depends_on: | ||
- db | - db | ||
deploy: | |||
replicas: 1 | |||
update_config: | |||
parallelism: 2 | |||
delay: 10s | |||
restart_policy: | |||
condition: on-failure | |||
worker: | |||
image: | image: dockersamples/examplevotingapp_worker | ||
networks: | networks: | ||
- frontend | |||
- backend | |||
- | |||
- | |||
depends_on: | depends_on: | ||
- db | - db | ||
- redis | |||
deploy: | |||
... | mode: replicated | ||
replicas: 1 | |||
labels: [APP=VOTING] | |||
restart_policy: | |||
condition: on-failure | |||
delay: 10s | |||
max_attempts: 3 | |||
window: 120s | |||
placement: | |||
constraints: [node.role == manager] | |||
visualizer: | |||
image: dockersamples/visualizer:stable | |||
ports: | |||
- "8080:8080" | |||
stop_grace_period: 1m30s | |||
volumes: | |||
- "/var/run/docker.sock:/var/run/docker.sock" | |||
deploy: | |||
placement: | |||
constraints: [node.role == manager] | |||
networks: | networks: | ||
frontend: | |||
backend: | |||
volumes: | |||
db-data: | |||
</syntaxhighlight> | </syntaxhighlight> | ||
==Deploying Docker Stack File== | |||
== | Again liking kubernetes so here is the short version | ||
<syntaxhighlight lang="bash"> | <syntaxhighlight lang="bash"> | ||
docker | docker stack deploy -c stackfile.yml mydeployment | ||
docker stack ps mydeployment | |||
docker stack services mydeployment | |||
docker ps | |||
#Updating depployment | |||
#Change the stackfile | |||
docker stack deploy -c stackfile.yml mydeployment | |||
</syntaxhighlight> | </syntaxhighlight> | ||
Latest revision as of 20:53, 16 August 2021
Introduction
This all started with VMWare where the total resource could be divided up to run more than one application on difference virtual machines. But VMWare required an OS on every machine and licenses in the case of Windows. They also needed managing, e.g. patching, Anti-virus and patching. Along came containers which shared the OS.
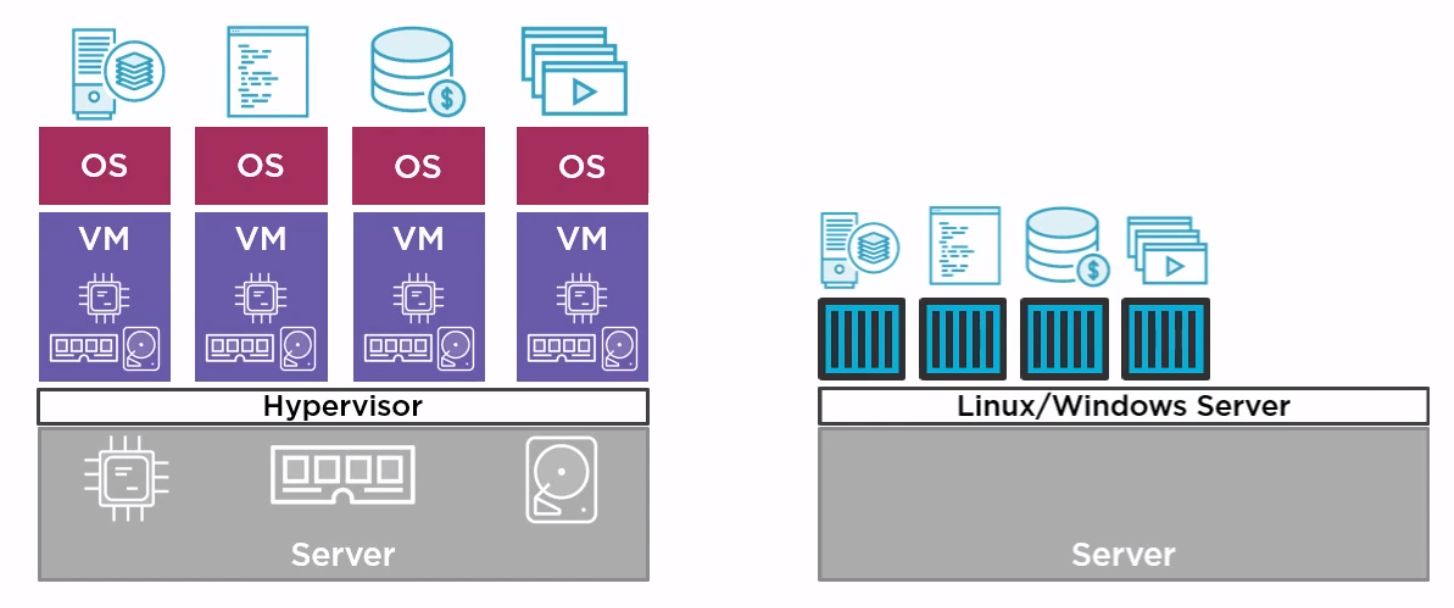
Docker Inc. Docker is a company which gave the word technology for containers. They are now a company which provides services around the company.
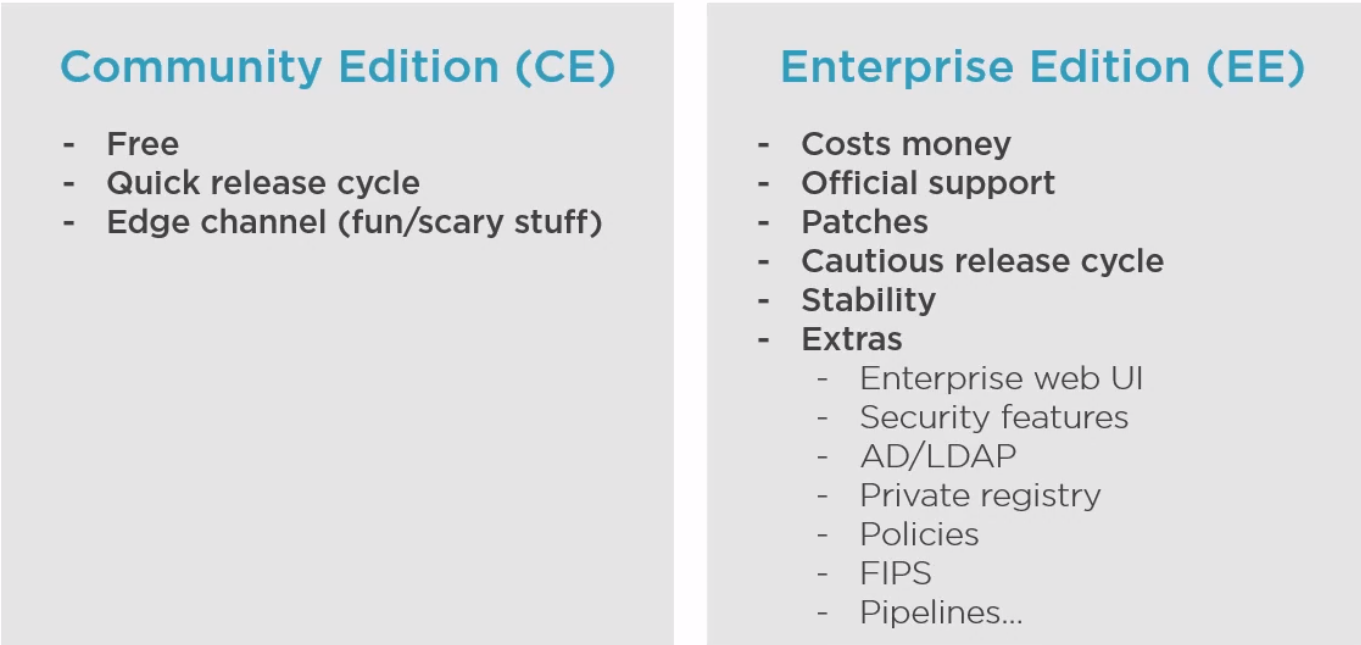
Docker is Open source and known as Community Edition (CE). The company Docker releases an Enterprise Edition (EE).
The general approach is to
- Create an image (docker build)
- Store it in a registry (docker image push)
- Start a container from it (docker container run)
The differences between EE and CE are shown below
Architecture
Docker is made up of a docker engine and containers which are comprised of namespaces and control groups. Wiki defines namespaces as Namespaces are a feature of the Linux kernel that partitions kernel resources such that one set of processes sees one set of resources while another set of processes sees a different set of resources.
Docker Engine
Here are the core elements of the docker engine.
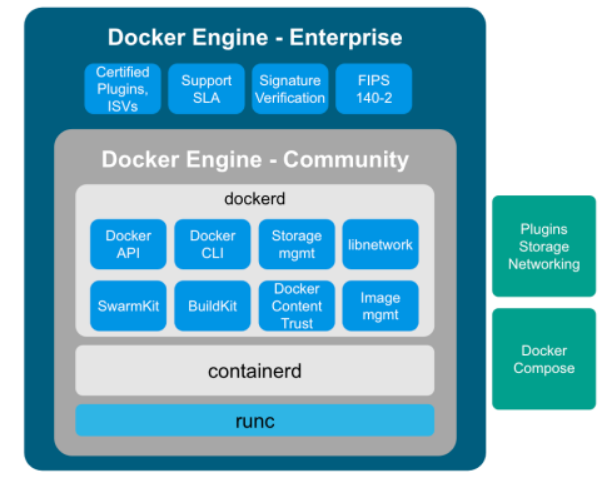
- dockerd: The Docker daemon is where all of your Docker communications take place. It manages the state of your containers and images, as well as connections with the outside world, and controls access to Docker on your machine.
- containerd: This is a daemon process that manages and runs containers. It pushes and pulls images, manages storage and networking, and supervises the running of containers.
- runc: This is the low-level container runtime (the thing that actually creates and runs containers). It includes libcontainer, a native Go-based implementation for creating containers
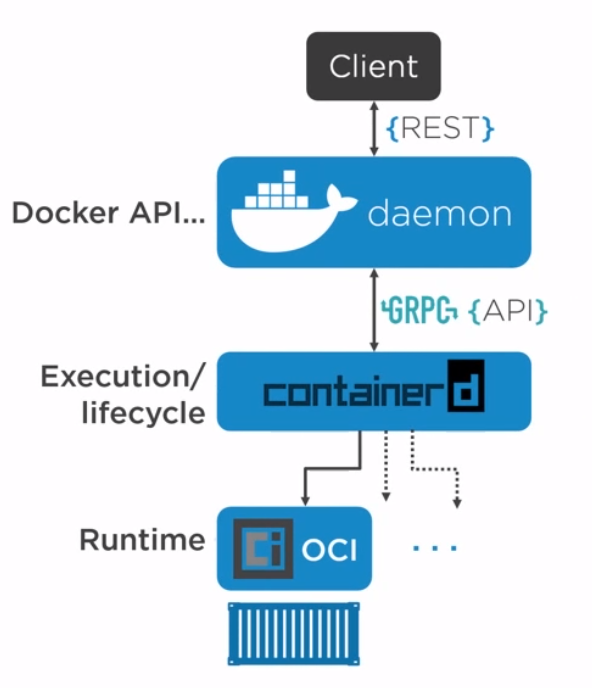
When we create a container, this is the workflow. It is the runc which actually the part which creates the container. The components containerd and runc standardized and it is easily possible to swap runc out for any oci compliant runtime.
Namespace Types
Within the Linux kernel, there are different types of namespaces. Each namespace has its own unique properties:
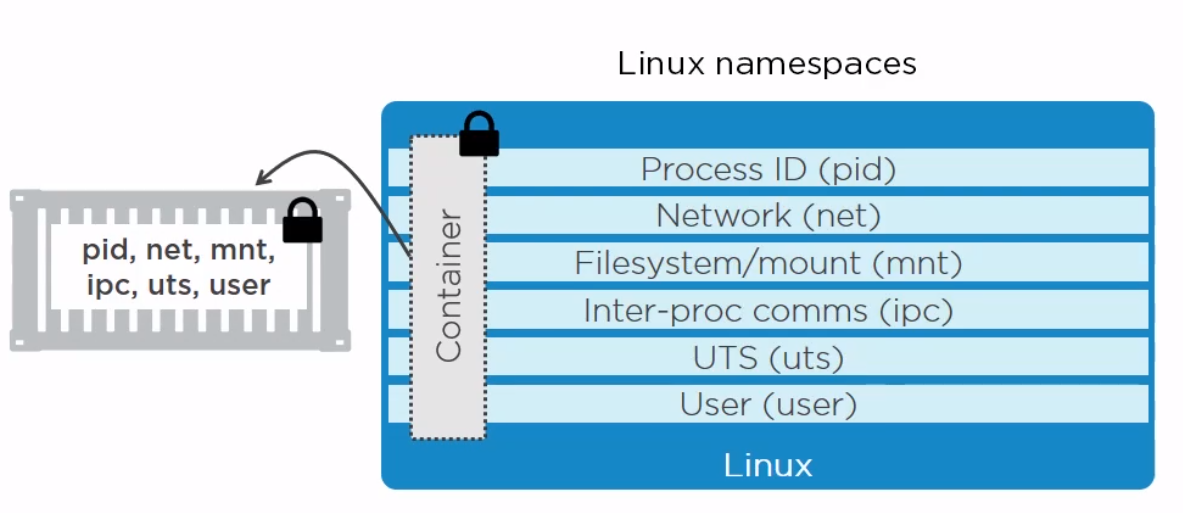
- A user namespace has its own set of user IDs and group IDs for assignment to processes. In particular, this means that a process can have root privilege within its user namespace without having it in other user namespaces.
- A process ID (PID) namespace assigns a set of PIDs to processes that are independent from the set of PIDs in other namespaces. The first process created in a new namespace has PID 1 and child processes are assigned subsequent PIDs. If a child process is created with its own PID namespace, it has PID 1 in that namespace as well as its PID in the parent process’ namespace. See below for an example.
- A network namespace has an independent network stack: its own private routing table, set of IP addresses, socket listing, connection tracking table, firewall, and other network‑related resources.
- A mount namespace has an independent list of mount points seen by the processes in the namespace. This means that you can mount and unmount filesystems in a mount namespace without affecting the host filesystem.
- An interprocess communication (IPC) namespace has its own IPC resources, for example POSIX message queues.
- A UNIX Time‑Sharing (UTS) namespace allows a single system to appear to have different host and domain names to different processes.
Control Groups
A control group (cgroup) is a Linux kernel feature that limits, accounts for, and isolates the resource usage (CPU, memory, disk I/O, network, and so on) of a collection of processes.
Now we have namespace we need a way to control the resources across the namespaces. This is where cgroups come in.
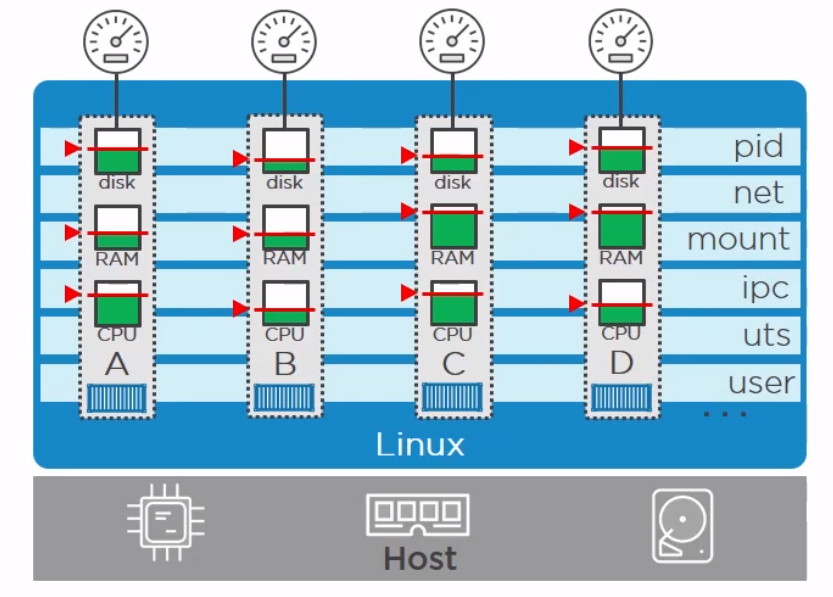
- Resource limits – You can configure a cgroup to limit how much of a particular resource (memory or CPU, for example) a process can use.
- Prioritization – You can control how much of a resource (CPU, disk, or network) a process can use compared to processes in another cgroup when there is resource contention.
- Accounting – Resource limits are monitored and reported at the cgroup level.
- Control – You can change the status (frozen, stopped, or restarted) of all processes in a cgroup with a single command.
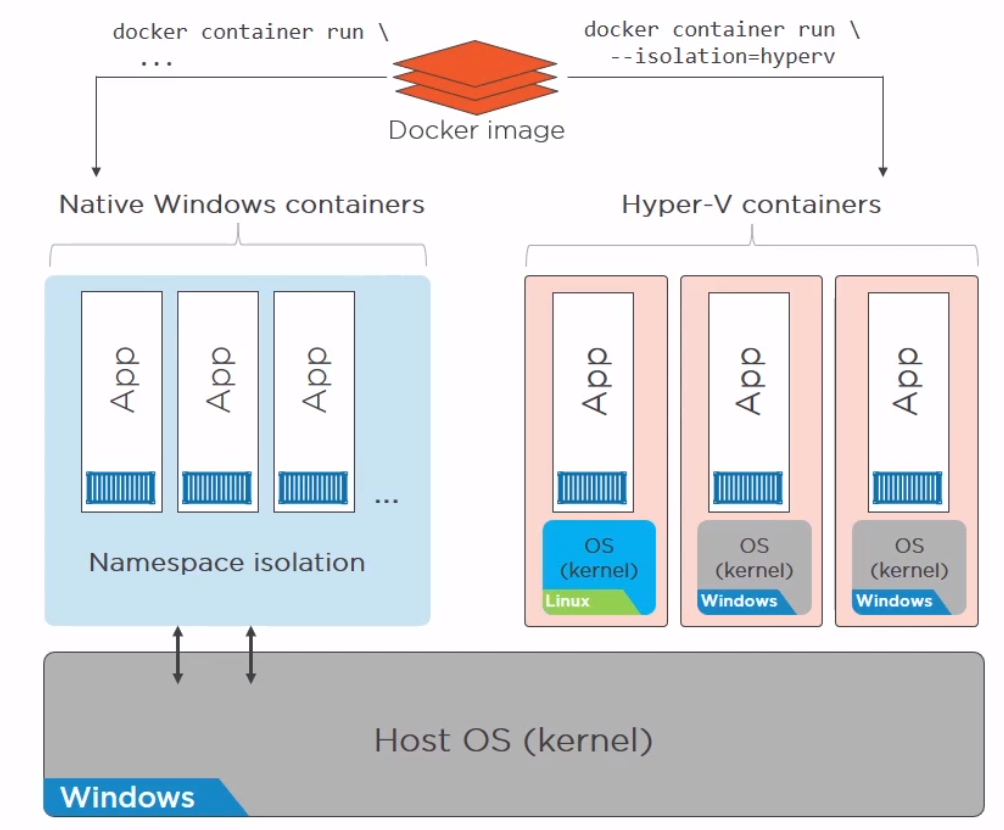
Docker on Windwos
Finally a quick image to demonstrate the difference between native and hyper-v containers on windows. They made me do it gov.
Images
Image a made up of a manifest and layers.
Getting Images
We can get images using the pull command. The command is two step. It reads the manifests and then pulls the layers checking that the hashes pulled match the manifest hashes.
docker image pull redis

>Using default tag: latest
>latest: Pulling from library/redis
>33847f680f63: Pull complete
>26a746039521: Pull complete
>18d87da94363: Pull complete
>5e118a708802: Pull complete
>ecf0dbe7c357: Pull complete
>46f280ba52da: Pull complete
>Digest: sha256:cd0c68c5479f2db4b9e2c5fbfdb7a8acb77625322dd5b474578515422d3ddb59
>Status: Downloaded newer image for redis:latest
>docker.io/library/redis:latest

#To get the digest
docker image ls --digests
REPOSITORY           TAG       DIGEST                                                                    IMAGE ID       CREATED        SIZE
redis                latest    sha256:cd0c68c5479f2db4b9e2c5fbfdb7a8acb77625322dd5b474578515422d3ddb59   aa4d65e670d6   3 weeks ago    105MB
The Layers
We can find where our layers are by using
docker system info

>Client:
> Context:    default
> Debug Mode: false
>
>Server:
> Containers: 2
>  Running: 0
>  Paused: 0
>  Stopped: 2
> Images: 3
> Server Version: 20.10.7
> Storage Driver: overlay2
>  Backing Filesystem: extfs
>  Supports d_type: true
>  Native Overlay Diff: true
>  userxattr: false
> Logging Driver: json-file
> Cgroup Driver: cgroupfs
> Cgroup Version: 1
...
> Docker Root Dir: /var/lib/docker
> Debug Mode: false
> Registry: https://index.docker.io/v1/
> Labels:
> Experimental: false
> Insecure Registries:
>  127.0.0.0/8
> Live Restore Enabled: false
We can see it is using overlay2 storage driver and the root is /var/lib/docker so the layers are stored in /var/lib/docker/overlay2.
We can look at the history of the image and the commands used to make it with
docker history redis

>IMAGE          CREATED       CREATED BY                                      SIZE      >COMMENT
>aa4d65e670d6   3 weeks ago   /bin/sh -c #(nop)  CMD ["redis-server"]         0B
><missing>      3 weeks ago   /bin/sh -c #(nop)  EXPOSE 6379                  0B
><missing>      3 weeks ago   /bin/sh -c #(nop)  ENTRYPOINT ["docker-entry…   0B
><missing>      3 weeks ago   /bin/sh -c #(nop) COPY file:df205a0ef6e6df89…   374B
><missing>      3 weeks ago   /bin/sh -c #(nop) WORKDIR /data                 0B
><missing>      3 weeks ago   /bin/sh -c #(nop)  VOLUME [/data]               0B
><missing>      3 weeks ago   /bin/sh -c mkdir /data && chown redis:redis …   0B
><missing>      3 weeks ago   /bin/sh -c set -eux;   savedAptMark="$(apt-m…   31.7MB
><missing>      3 weeks ago   /bin/sh -c #(nop)  ENV REDIS_DOWNLOAD_SHA=4b…   0B
><missing>      3 weeks ago   /bin/sh -c #(nop)  ENV REDIS_DOWNLOAD_URL=ht…   0B
><missing>      3 weeks ago   /bin/sh -c #(nop)  ENV REDIS_VERSION=6.2.5      0B
><missing>      3 weeks ago   /bin/sh -c set -eux;  savedAptMark="$(apt-ma…   4.15MB
><missing>      3 weeks ago   /bin/sh -c #(nop)  ENV GOSU_VERSION=1.12        0B
><missing>      3 weeks ago   /bin/sh -c groupadd -r -g 999 redis && usera…   329kB
><missing>      3 weeks ago   /bin/sh -c #(nop)  CMD ["bash"]                 0B
><missing>      3 weeks ago   /bin/sh -c #(nop) ADD file:45f5dfa135c848a34…   69.3MB
The non-zero size changes are generally a layer.
For even more information run inspect
docker image inspect redis
Registries
Where images live. By default Docker uses docker hub but you can use your own or other peoples. Docker divides registries between official and unofficial. Official images live at top of the namespace e.g docker.io/redis docker.lo/mysql. It is important to understand when pulling an image there are three components.
- Registry - e.g. dockerio
- Repo - e.g. redis
- Image (or Tag) - e.g. latest
It is just that Docker has defaults for registry and image so docker pull redis works but it is really doing docker pull docker.io/redis/latest
It was mentioned that the hashes on the file system for an image are referred to as content hashes and when images are pushed to the registry, before sending the layers are compressed and these hashes are referred to as distribution hashes.
Best Practice
- Use Official images
- Use Small images
- Be explicit referencing images (:latest noooo!)
Containers Detail
Copy on Write
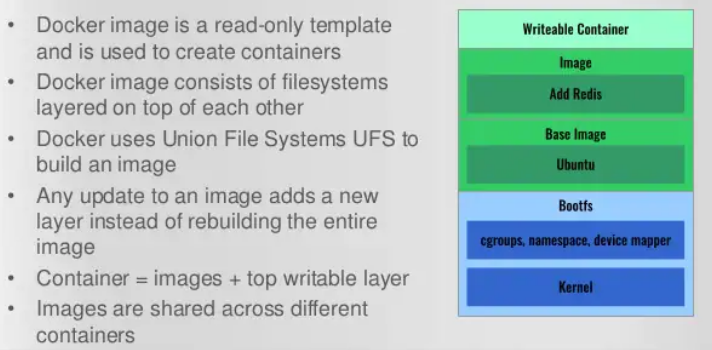
As we know the container is a bunch of layers and the images are read-only. Only the read/write layer is writeable. When we change values in a running container we actually copy the original file and put it in the read/write layer. This is known as copy on write
Microservices
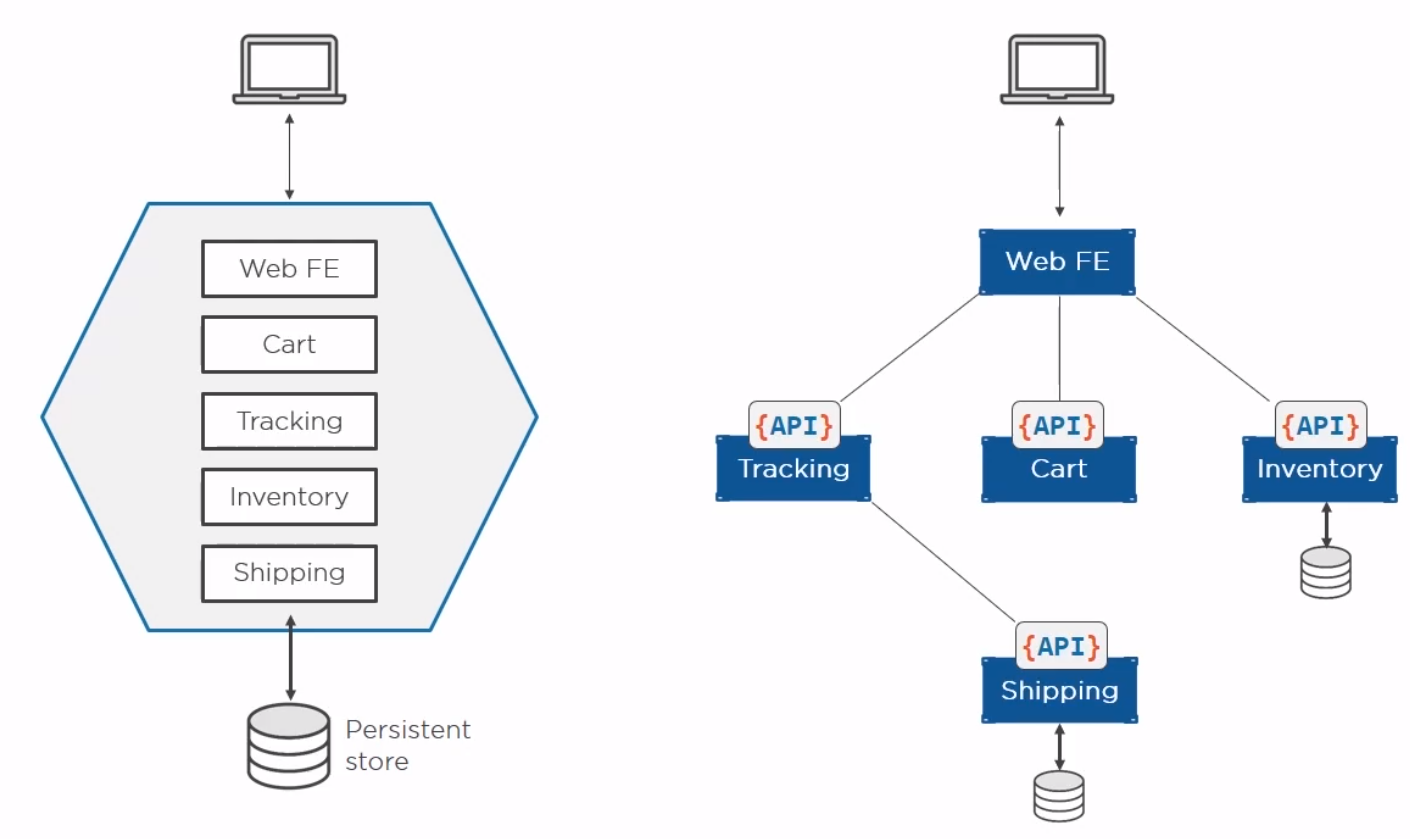
Perhaps the current buzz-word. Previously we built our apps to have all of the components on one server. With containers we can break these down into individual containers. The old way is referred to as a monolith. The new way is to separate services and connect them with well documented APIs.
Helpful Commands
Some useful bits
# General Commands for Docker
#Show the current docker image running
sudo docker ps

#Show the images available
sudo docker images

# Remember you only need the best match for container in commands
docker container ls
>49978c1c8547   redis     "docker-entrypoint.s…"   19 seconds ago   Up 18 seconds   6379/tcp, 0.0.0.0:8088->8088/tcp, :::8088->8088/tcp   test

# Get the ports using part of the container name
docker port 499
>8088/tcp -> 0.0.0.0:8088
>8088/tcp -> :::8088

#Stop a container id
sudo docker stop <container id>

#Start a container id
sudo docker stop <container id>

#Show ports exposed
sudo docker port <container id>

#List current containers
sudo docker container ls -s

#Remove a container
sudo docker container rm <container id>

#Pull a container
sudo docker pull <image name>

#This will remove all images without at least one container associated to them
#docker image prune -a

#This will remove all stopped containers
docker container prune


# Get IP of container
docker inspect -f "{{ .NetworkSettings.Networks.bridge.IPAddress }}" 499

# This works the same as inspect where you get all of the setting. the .NetowrkSettings is a filter

# Clean up containers
docker container rm $(docker container ls -aq) -f

# Example run Note the --net=host allows the host to talk to the container
docker run --name <name> --net=host -d  -p 8000:5000 --rm -e MAIL_USERNAME=iwiseman -e ENVIRONMENT2=env2
Container Logging
We can set the logging driver in daemon.json (alternatives Gelf, Splunk, Fluentd...) and override for a container by passing --log-driver and --log-opts.
The standard way to view the logs is
docker logs <container>
Docker Swarm
Introduction
Swarm has two parts, the orchestrator and the secure cluster. The orchestrator does the start stop elements of running containers, the secure cluster is a way to run a group of containers with mutual authentication and encryption between them.
Swarm mode
With docker you can run containers as Single-engine mode or in something called Swarm mode. Whilst there a some notes on the options here I will leave detail for another day. This is just for awareness.
# To create a swarm
docker swarm init
When we do this
- The first node becomes the manager/leader
- They becomes the root CA (overrideable)
- They get a client certificate
- It builds a secure cluster store (which is etcd)
- This is distributed to every manager in store automatically
- Create cryptographic tokens, one for managers and one for workers
To join a new manager we pass the manager token and
docker swarm join-token manager
docker swarm join --token blarblarblar
To join a new worker we pass the worker token and
docker swarm join-token manager
docker swarm join --token blarblarblar
You can see the nodes with
docker node ls
We can rotate the worker token with
docker swarm join-token --rotate worker
We can lock/unlock swarms so they cannot be restarted without authentication with.
docker swarm lock
docker swarm unlock
Docker Networking
OSI Layers
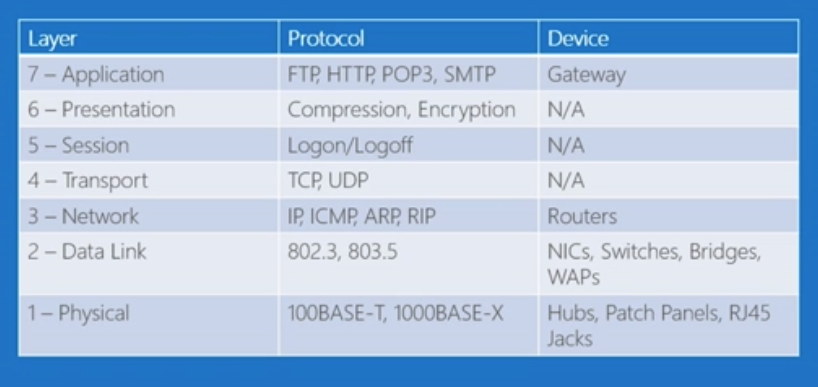
Just a brief reminder of the OSI Layers
- Physical Layer
The lowest layer of the OSI Model is concerned with electrically or optically transmitting raw unstructured data bits across the network from the physical layer of the sending device to the physical layer of the receiving device. It can include specifications such as voltages, pin layout, cabling, and radio frequencies. At the physical layer, one might find “physical” resources such as network hubs, cabling, repeaters, network adapters or modems.
- Data Link Layer
At the data link layer, directly connected nodes are used to perform node-to-node data transfer where data is packaged into frames. The data link layer also corrects errors that may have occurred at the physical layer.
The data link layer encompasses two sub-layers of its own. The first, media access control (MAC), provides flow control and multiplexing for device transmissions over a network. The second, the logical link control (LLC), provides flow and error control over the physical medium as well as identifies line protocols.
- Network Layer
The network layer is responsible for receiving frames from the data link layer, and delivering them to their intended destinations among based on the addresses contained inside the frame. The network layer finds the destination by using logical addresses, such as IP (internet protocol). At this layer, routers are a crucial component used to quite literally route information where it needs to go between networks.
- Transport Layer
The transport layer manages the delivery and error checking of data packets. It regulates the size, sequencing, and ultimately the transfer of data between systems and hosts. One of the most common examples of the transport layer is TCP or the Transmission Control Protocol.
- Session Layer
The session layer controls the conversations between different computers. A session or connection between machines is set up, managed, and termined at layer 5. Session layer services also include authentication and reconnections.
- Presentation Layer
The presentation layer formats or translates data for the application layer based on the syntax or semantics that the application accepts. Because of this, it at times also called the syntax layer. This layer can also handle the encryption and decryption required by the application layer.
- Application Layer
At this layer, both the end user and the application layer interact directly with the software application. This layer sees network services provided to end-user applications such as a web browser or Office 365. The application layer identifies communication partners, resource availability, and synchronizes communication.
Bridge Network
There are four importance concepts about bridged networking:
- Docker0 Bridge
- Network Namespace
- Veth Pair
- External Communication
When we create a container a veth pair is created. Here is a diagram to help
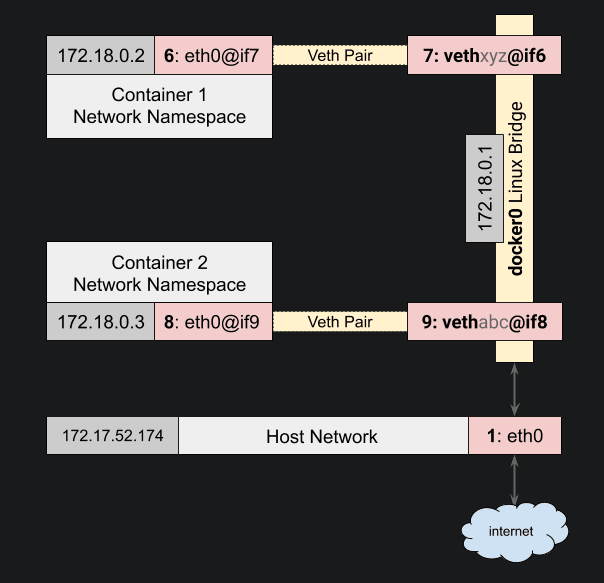
This is the network which docker uses by default. We can see this with the command ls or inspect.
docker network ls
NETWORK ID     NAME      DRIVER    SCOPE
6960786ad2f8   bridge    bridge    local
d40bd7769843   host      host      local
e9a4e7e98aa1   none      null      local

docker network inspect bridge
>[
>    {
>        "Name": "bridge",
>        "Id": "6960786ad2f80a1a309e8b9bf773ad73b5bc7c2f68ee36f545fd464619969461",
>        "Created": "2021-08-15T17:27:07.794617822+12:00",
>        "Scope": "local",
>        "Driver": "bridge",
>        "EnableIPv6": false,
>        "IPAM": {
>            "Driver": "default",
>            "Options": null,
>            "Config": [
>                {
>                    "Subnet": "172.17.0.0/16",
>                    "Gateway": "172.17.0.1"
>                }
>            ]
>        },
>        "Internal": false,
>        "Attachable": false,
>        "Ingress": false,
>        "ConfigFrom": {
>            "Network": ""
>        },
>        "ConfigOnly": false,
>        "Containers": {},
>        "Options": {
>            "com.docker.network.bridge.default_bridge": "true",
>            "com.docker.network.bridge.enable_icc": "true",
>            "com.docker.network.bridge.enable_ip_masquerade": "true",
>            "com.docker.network.bridge.host_binding_ipv4": "0.0.0.0",
>            "com.docker.network.bridge.name": "docker0",
>            "com.docker.network.driver.mtu": "1500"
>        },
>        "Labels": {}
>    }
>]
The only way to talk to other containers on a different bridge network is IP/Port to IP/Port.
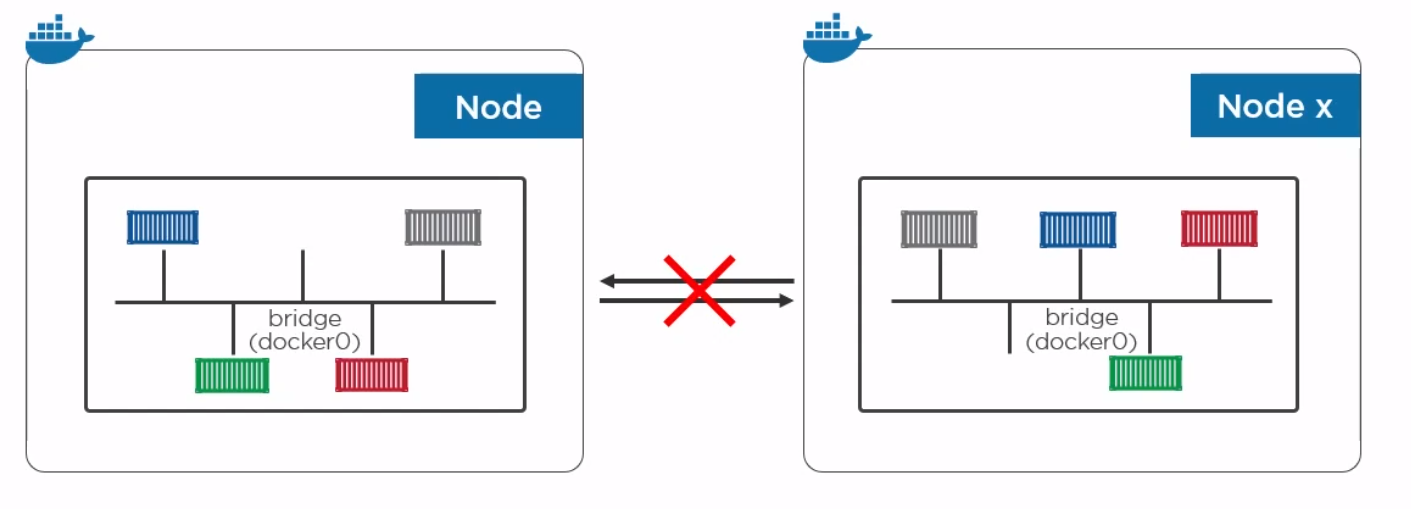
To create a network and add a container
docker network create -d bridge too-far
docker container run --rm -d --network toofar alpine sleep 1d
Overlay Network
With an overlay network containers can talk to each other on the same network and on different machines. This can be created with a single command on docker along with encryption. With built in overlay is container only. Note overlay is multiple host so any device on the network will be available.
docker network create overlay overnet -o encrypted
docker service create -d -name pinger --replicas 2 --network overnet alpine sleep 1d
If you want to talk to physical boxes or vlans you can use MACVLAN.
Network Services
- Discovery Make every service in the swarm discoverable via built-in DNS
- Ingress/Internal Load Balancing Every node in the swarm knows about every service
Volumes and Persistent Data
Introduction
Here for completeness
docker volume create myvol
docker volume ls
docker volume inspect
docker volume rm myvol
Using Volumes
This mounts a volume on the container at /vol and creates a volume if it does not exist.
docker container run -dit -name myvol --mount source=ubervol, target=/vol alpine:latest
Docker Secrets
A docker secret is a blob up to 500k. It needs swarm mode with services because it use the security components. We create a secret and send it to the swarm manager with the following command.
docker secret create  mysec-v1 .\myfileondisk
docker secret ls
docker secret inspect

#Create a service
docker service create -d --name my-service --secret mysec-v1 alpine sleep 1d

#We can see the secret config
docker service inspect my-service

#On the node we can see /run/secrets
cat /run/secrets

#You cannot delete a secret in use to you need to delete the service first.
docker service rm my-service
Stacks
Introduction
This is a way to defined deployment for multi container solutions and an alternative to kubernetes.
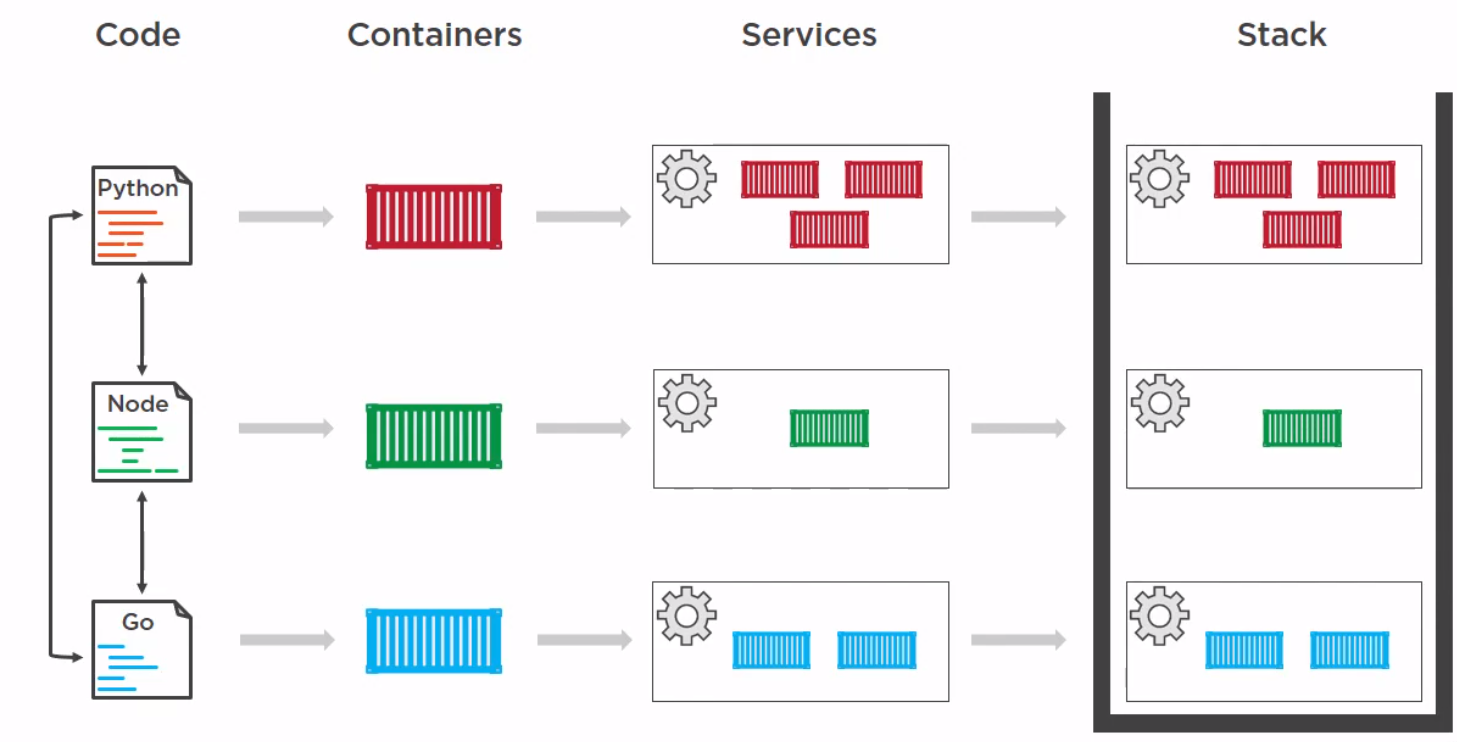
Example Docker Stack File
Here is an example stack file with four key levels
- version
- services
- networks
- volumes
version: "3"
services:
  redis:
    image: redis:alpine
    networks:
      - frontend
    deploy:
      replicas: 1
      update_config:
        parallelism: 2
        delay: 10s
      restart_policy:
        condition: on-failure
  db:
    image: postgres:9.4
    environment:
      POSTGRES_USER: "postgres"
      POSTGRES_PASSWORD: "postgres"
    volumes:
      - db-data:/var/lib/postgresql/data
    networks:
      - backend
    deploy:
      placement:
        constraints: [node.role == manager]
  vote:
    image: dockersamples/examplevotingapp_vote:before
    ports:
      - 5000:80
    networks:
      - frontend
    depends_on:
      - redis
    deploy:
      replicas: 2
      update_config:
        parallelism: 2
      restart_policy:
        condition: on-failure
  result:
    image: dockersamples/examplevotingapp_result:before
    ports:
      - 5001:80
    networks:
      - backend
    depends_on:
      - db
    deploy:
      replicas: 1
      update_config:
        parallelism: 2
        delay: 10s
      restart_policy:
        condition: on-failure

  worker:
    image: dockersamples/examplevotingapp_worker
    networks:
      - frontend
      - backend
    depends_on:
      - db
      - redis
    deploy:
      mode: replicated
      replicas: 1
      labels: [APP=VOTING]
      restart_policy:
        condition: on-failure
        delay: 10s
        max_attempts: 3
        window: 120s
      placement:
        constraints: [node.role == manager]

  visualizer:
    image: dockersamples/visualizer:stable
    ports:
      - "8080:8080"
    stop_grace_period: 1m30s
    volumes:
      - "/var/run/docker.sock:/var/run/docker.sock"
    deploy:
      placement:
        constraints: [node.role == manager]

networks:
  frontend:
  backend:

volumes:
  db-data:
Deploying Docker Stack File
Again liking kubernetes so here is the short version
docker stack deploy -c stackfile.yml mydeployment

docker stack ps mydeployment
docker stack services mydeployment

#Updating depployment
#Change the stackfile
docker stack deploy -c stackfile.yml mydeployment