Keycloak: Difference between revisions
| (4 intermediate revisions by the same user not shown) | |||
| Line 215: | Line 215: | ||
ENTRYPOINT ["/opt/keycloak/bin/kc.sh"] | ENTRYPOINT ["/opt/keycloak/bin/kc.sh"] | ||
</syntaxhighlight> | </syntaxhighlight> | ||
create database | |||
<syntaxhighlight lang="bash"> | <syntaxhighlight lang="bash"> | ||
/* Create user */ | |||
create user keycloak_admin; | |||
/* Set password */ | /* Set password */ | ||
alter user keycloak_admin with encrypted password 'no_saying' | alter user keycloak_admin with encrypted password 'no_saying'; | ||
/* Create database */ | /* Create database */ | ||
CREATE DATABASE keycloak_db | CREATE DATABASE keycloak_db; | ||
/* Change Owner */ | |||
ALTER DATABASE keycloak_db OWNER TO keycloak_admin; | |||
/* Grant Privileges */ | /* Grant Privileges */ | ||
grant all privileges on database keycloak_db to keycloak_admin | grant all privileges on database keycloak_db to keycloak_admin; | ||
/* Change to database */ | /* Change to database */ | ||
\c keycloak_db | \c keycloak_db; | ||
/* Schema */ | /* Schema */ | ||
grant all PRIVILEGES ON ALL TABLES IN SCHEMA public to keycloak_admin; | grant all PRIVILEGES ON ALL TABLES IN SCHEMA public to keycloak_admin; | ||
</syntaxhighlight> | </syntaxhighlight> | ||
And the start up script | |||
<syntaxhighlight lang="bash"> | |||
docker run --name bibble_keycloak -p 9080:8080 \ | |||
-e KC_BOOTSTRAP_ADMIN_USERNAME=keycloak_admin \ | |||
-e KC_BOOTSTRAP_ADMIN_PASSWORD=blahhhblahhh \ | |||
-e KC_HOSTNAME_ADMIN_URL=http://localhost:9080 \ | |||
bibble_keycloak \ | |||
start-dev --hostname=http://localhost:9080 | |||
</syntaxhighlight> | |||
==Configure== | ==Configure== | ||
For configuring I was able to get it working just by setting up | For configuring I was able to get it working just by setting up | ||
Latest revision as of 06:04, 9 April 2025
Setting up Server
Install Podman
sudo apt install podman
Create Image
podman pull quay.io/keycloak/keycloak
# Note I run tomcat so changed the ports from 8080
# quay.io/keycloak/keycloak:12.0.1

podman run -d \
  --name keycloak \
  -p 8081:8080 \
  -e KEYCLOAK_USER=admin \
  -e KEYCLOAK_PASSWORD=password \
  -e KEYCLOAK_IMPORT=/tmp/one-realm.json,/tmp/two-realm.json \
  quay.io/keycloak/keycloak:7.0.0
Moving to Docker
Stopping and starting
sudo docker-compose up -d
sudo docker-compose down
Could not get the keycloak to work in Podman so moved to docker
version: '3'
services:
  keycloak:
    image: jboss/keycloak:12.0.1
    ports:
      - "9999:8080"
    environment:
      KEYCLOAK_USER: admin
      KEYCLOAK_PASSWORD: password
      KEYCLOAK_LOGLEVEL: DEBUG
      WILDFLY_LOGLEVEL: DEBUG
    volumes:
      - "./realms:/tmp"
version: '3'
services:
  keycloak:
    image: quay.io/keycloak/keycloak:12.0.1
    ports:
      - "9999:8080"
    environment:
      KEYCLOAK_USER: admin
      KEYCLOAK_PASSWORD: password
Migrating From 7.0.0
Export from 7.0.0
/opt/jboss/keycloak/bin/standalone.sh \
  -Djboss.socket.binding.port-offset=100 \
  -Dkeycloak.migration.action=export \
  -Dkeycloak.migration.provider=singleFile \
  -Dkeycloak.migration.file=/tmp/keycloak-export.json
Import to 12.0.1
/opt/jboss/keycloak/bin/standalone.sh \
   -Djboss.socket.binding.port-offset=100 \
   -Dkeycloak.migration.action=import \
   -Dkeycloak.profile.feature.upload_scripts=enabled \
   -Dkeycloak.migration.provider=singleFile \
   -Dkeycloak.migration.file=/tmp/keycloak-export.json
Configure Keycloak
If using docker you need to change podman to docker Disable https
podman exec -it keycloak bash
cd /opt/jboss/keycloak/bin
./kcadm.sh config credentials --server http://localhost:8080/auth --realm master --user admin
./kcadm.sh update realms/master -s sslRequired=NONE
Setting up the Server
To set this up I needed to
- Create Realm
- Create Client
- Create Roles
- Create Roles for Client
- Map Roles from Client
- Create Users
- Add Roles to Users.
I used online help to set the server up. Especially https://medium.com/devops-dudes/securing-node-js-express-rest-apis-with-keycloak-a4946083be51
Generate a Token
Had a bit of grief getting this going but in the end I set my own keycloak server up and I think the isssue was either using localhost instead of the IP or putting a dash in the realm.
export TOKEN=`curl -X POST 'http://192.168.1.70:9999/auth/realms/bibble/protocol/openid-connect/token' \
 --header 'Content-Type: application/x-www-form-urlencoded' \
 --data-urlencode 'grant_type=password' \
 --data-urlencode 'client_id=bibble-client' \
 --data-urlencode 'client_secret=xxxx' \
 --data-urlencode 'username=bwiseman' \
 --data-urlencode 'password=xxxx' | jq -r .access_token`
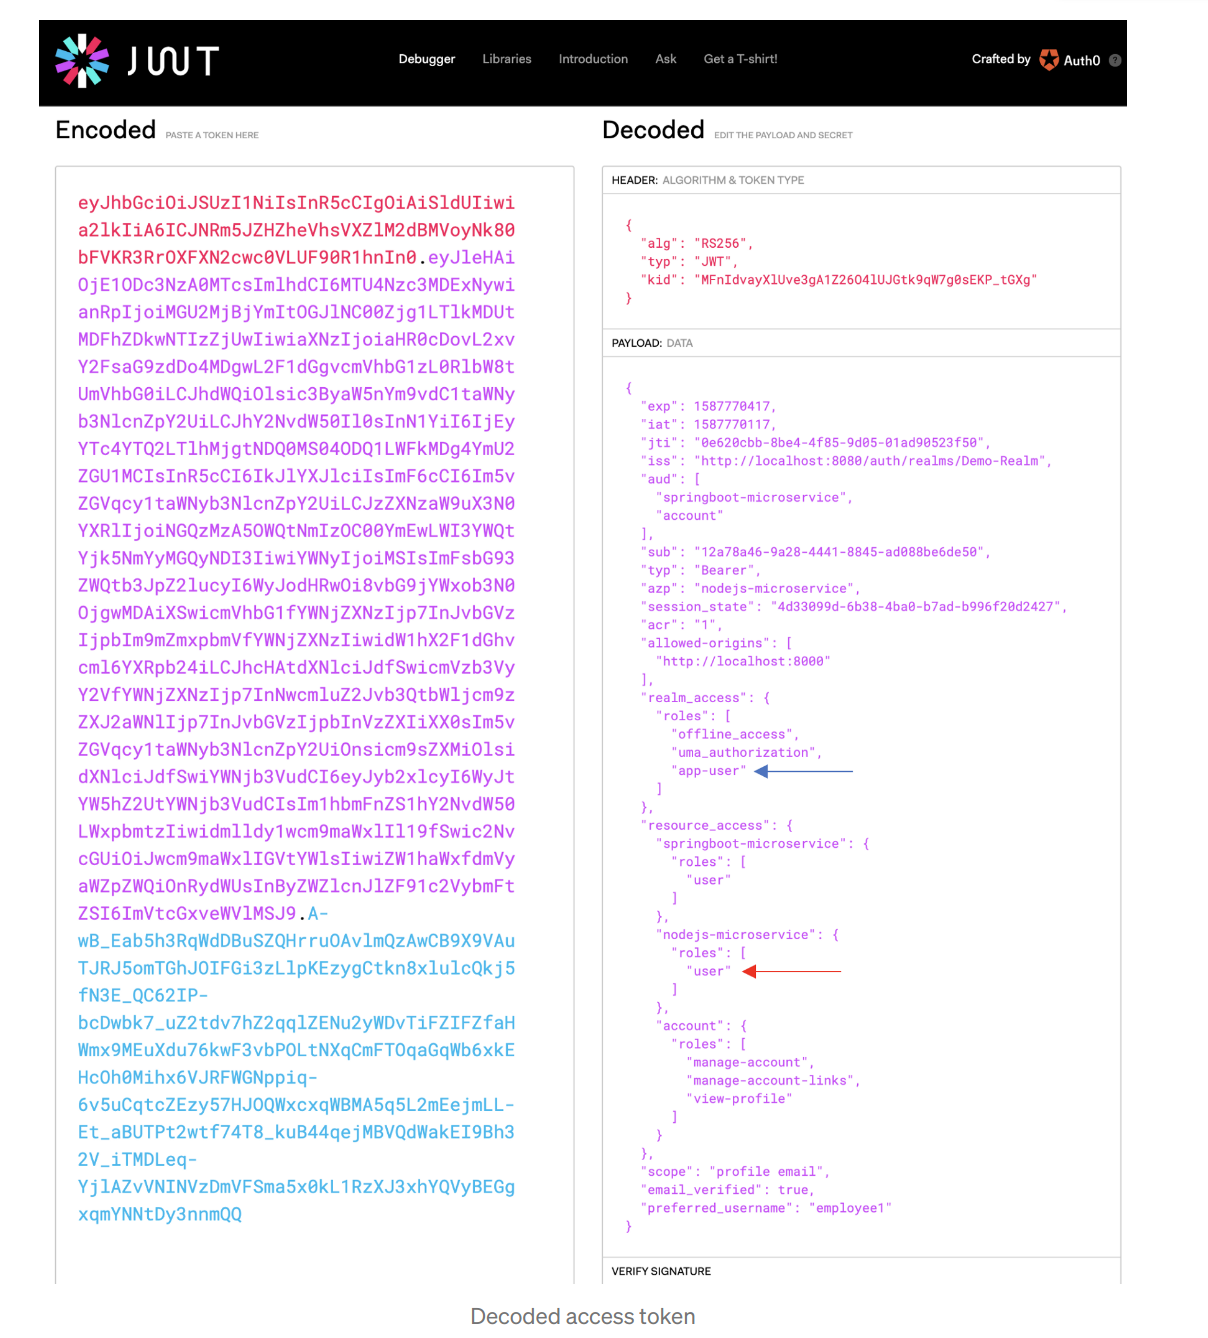
You can view your tokens, carefully at https://jwt.io/#debugger-io
Using Keycloak with NodeJS
Very simple.
Configure Keycloak
This is the main work. I did not need the credentials or the public key to get it working
const session = require('express-session');
const Keycloak = require('keycloak-connect');

// eslint-disable-next-line no-underscore-dangle
let _keycloak;

const keycloakConfig = {
  resource: 'bibble-client',
  bearerOnly: true,
  'auth-server-url': 'http://192.168.1.70:9999/auth/',
  realm: 'bibble',
// 'realm-public-key': '',
//    'credentials': {
//        'secret': ''
//    },
};

function initKeycloak() {
  if (_keycloak) {
    // eslint-disable-next-line no-console
    console.warn('Trying to init Keycloak again!');
    return _keycloak;
  }

  // eslint-disable-next-line no-console
  console.log('Initializing Keycloak...');
  const memoryStore = new session.MemoryStore();
  _keycloak = new Keycloak({ store: memoryStore }, keycloakConfig);
  // eslint-disable-next-line no-console
  console.log('Done initializing Keycloak...');
  return _keycloak;
}

function getKeycloak() {
  if (!_keycloak) {
    // eslint-disable-next-line no-console
    console.error('Keycloak has not been initialized. Please called init first.');
  }
  return _keycloak;
}

module.exports = {
  initKeycloak,
  getKeycloak,
};
Add the Middleware
require('dotenv/config')

const express = require('express')
const server = express();

...
// Use Keycloak
const keycloak = require('./keycloak-config.js').initKeycloak();
server.use(keycloak.middleware());
...
// Use Controller
const controller = require('./controller')
server.use('/', controller);

// Listen
server.listen(process.env.PORT, '192.168.1.70',
    () => console.log(`Server listening of port ${process.env.PORT}`)
)
Revisited 2025
Setup
So had a look at this in 2025 and this mostly worked I had to create a Docker container and a script to run it. The only real issue were
- move postgres to run on the network rather than 127.0.0.1
- override a QUARKUS_HTTP_LIMITS_MAX_HEADER_SIZE
- changing the port
- start-dev
FROM quay.io/keycloak/keycloak:latest as builder

# Enable health and metrics support
ENV KC_HEALTH_ENABLED=true
ENV KC_METRICS_ENABLED=true

# Configure a database vendor
ENV KC_DB=postgres

WORKDIR /opt/keycloak
# for demonstration purposes only, please make sure to use proper certificates in production instead
RUN keytool -genkeypair -storepass password -storetype PKCS12 -keyalg RSA -keysize 2048 -dname "CN=server" -alias server -ext "SAN:c=DNS:localhost,IP:127.0.0.1" -keystore conf/server.keystore
RUN /opt/keycloak/bin/kc.sh build

FROM quay.io/keycloak/keycloak:latest
COPY --from=builder /opt/keycloak/ /opt/keycloak/

# change these values to point to a running postgres instance
ENV KC_DB=postgres
ENV KC_DB_URL=jdbc:postgresql://192.168.1.70:5432/keycloak_db
ENV KC_DB_USERNAME=keycloak_admin
ENV KC_DB_PASSWORD=blahhhblahhh
ENV KC_HOSTNAME=localhost
ENV QUARKUS_HTTP_LIMITS_MAX_HEADER_SIZE=40k
ENTRYPOINT ["/opt/keycloak/bin/kc.sh"]
create database
/* Create user */
create user keycloak_admin;

/* Set password */
alter user keycloak_admin with encrypted password 'no_saying';

/* Create database */
CREATE DATABASE keycloak_db;

/* Change Owner  */
ALTER DATABASE keycloak_db OWNER TO keycloak_admin;

/* Grant Privileges */
grant all privileges on database keycloak_db to keycloak_admin;

/* Change to database */
\c keycloak_db;


/* Schema */
grant all PRIVILEGES ON ALL TABLES IN SCHEMA public to keycloak_admin;
And the start up script
docker run --name bibble_keycloak  -p 9080:8080 \
        -e KC_BOOTSTRAP_ADMIN_USERNAME=keycloak_admin \
        -e KC_BOOTSTRAP_ADMIN_PASSWORD=blahhhblahhh \
        -e KC_HOSTNAME_ADMIN_URL=http://localhost:9080 \
        bibble_keycloak \
        start-dev --hostname=http://localhost:9080
Configure
For configuring I was able to get it working just by setting up
- realm
- client
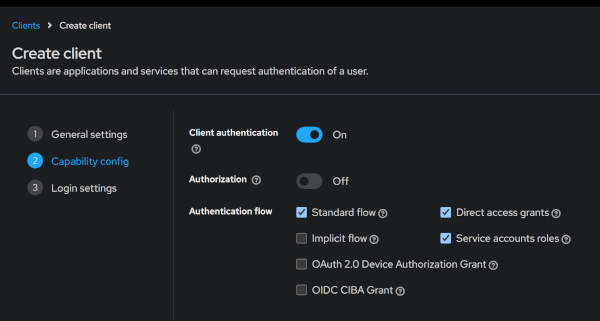
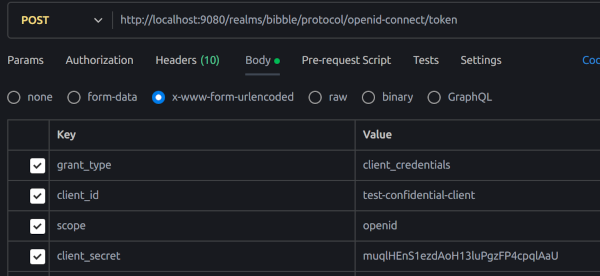
For the client_credentials grant type flow set up you need to specify client authentication on and service account roles. Then you will be able to see the client secret which you can use to send
Here is the request
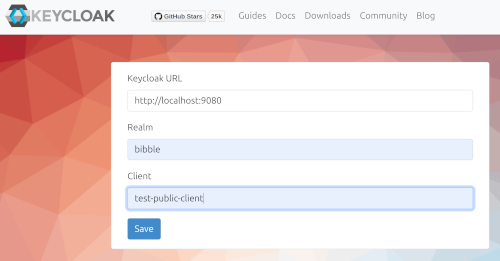
If you set up a user you can use the password grant type flow but this is not recommended. Here you can create a user and password and test it on the demonstration app at https://www.keycloak.org/app/. You will need to set up the client with the following Redirect URI and Orgin
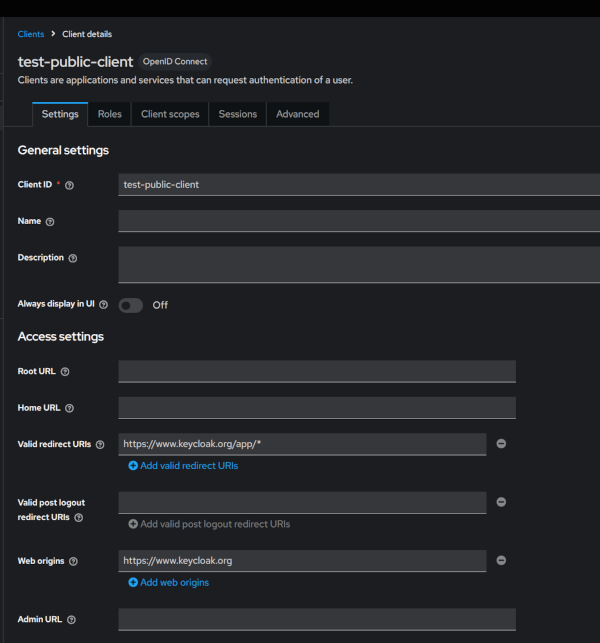
Now when you go to the site you put in the details and you should be able to sign in
