Angular Reactive forms: Difference between revisions
| Line 145: | Line 145: | ||
=Validation= | =Validation= | ||
==Basic== | ==Basic== | ||
We can set basic rules by passing | We can set basic rules by passing an array of validators at creation time. Below we pass the default value and an array of validators e.g. | ||
<syntaxhighlight lang="ts"> | <syntaxhighlight lang="ts"> | ||
| Line 153: | Line 153: | ||
nextField: '' | nextField: '' | ||
... | ... | ||
</syntaxhighlight> | |||
==At Runtime== | |||
We can do this with | |||
<syntaxhighlight lang="ts"> | |||
myEdit.setValidators(...); | |||
myEdit.clearValidators(); | |||
myEdit.updateValueAndValidity() | |||
</syntaxhighlight> | |||
Below is an example of handling a radio button on the form | |||
===Component | |||
<syntaxhighlight lang="ts"> | |||
setNotification(notifyVia: string): void { | |||
const phoneControl = this.customerForm.get('phone'); | |||
if (notifyVia === 'text') { | |||
phoneControl.setValidators(Validators.required); | |||
} else { | |||
phoneControl.clearValidators(); | |||
} | |||
phoneControl.updateValueAndValidity(); | |||
} | |||
</syntaxhighlight> | |||
===Template=== | |||
<syntaxhighlight lang="html"> | |||
<div class="form-group row mb-2"> | |||
<label class="col-md-2 col-form-label pt-0">Send Notifications</label> | |||
<div class="col-md-8"> | |||
<div class="form-check form-check-inline"> | |||
<label class="form-check-label"> | |||
<input class="form-check-input" | |||
type="radio" | |||
value="email" | |||
formControlName="notification" | |||
(click)="setNotification('email')">Email | |||
</label> | |||
</div> | |||
<div class="form-check form-check-inline"> | |||
<label class="form-check-label"> | |||
<input class="form-check-input" | |||
type="radio" | |||
value="text" | |||
formControlName="notification" | |||
(click)="setNotification('text')">Text | |||
</label> | |||
</div> | |||
</div> | |||
</div> | |||
</syntaxhighlight> | </syntaxhighlight> | ||
Revision as of 05:35, 7 September 2020
Angular Forms
Introduction
Angular provides two types of forms
- Template Driven
- Easy to use
- Familar to Angular JS
- Two-way data binding-> minimal component code
- Automatically tracks from and input element state
- Reactive (model driven
- More flexible
- Immutable data model
- Easier to perform an action on value change
- Access Reactive transformations such as DebounceTime or DistinctUntilChanged
- Easily add input elements dynamically
- Easier unit testing
Template driven forms put the responsibility in the template using basic HTML and data binding, Reactive forms move most of the responsibility to the component class
Template-Driven-Forms
In the Template we have
- Form elements
- Input elements
- Data binding to the component
- Validation rules (attributes)
- Validation error messages
- Form model (automatically generated)
In the Component Class we have
- Properties for data binding
- Method for form Operations such as submit
Directives used are
- ngForm
- ngModel
- ngModelGroup
Example form
<form (ngSubmit)="save()">
  <input id="firstNameId" type="text"
  [(ngMode)]="customer.firstname"
  name="firstname"
  #firstNameVar="ngModel" />
</form>
Reactive Forms
In the template we have
- Form elements
- Input elements
- Binding to form model
In the class we have
- Form model which we create
- Validation rules
- Validation error messages
- Properties for managing data (data model)
- Methods for form Operations such as submit
Directives used (ReactiveFormsModule)
- formGroup
- formControl
- formControlName
- formGroupName
- formArrayName
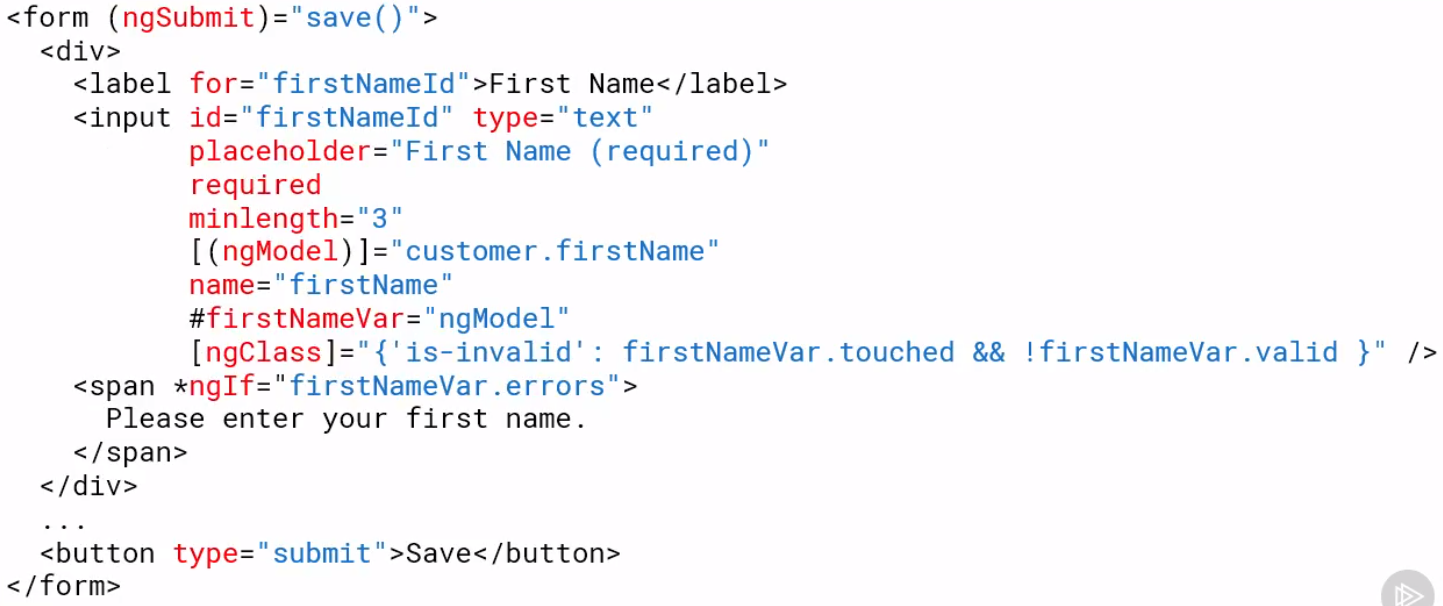
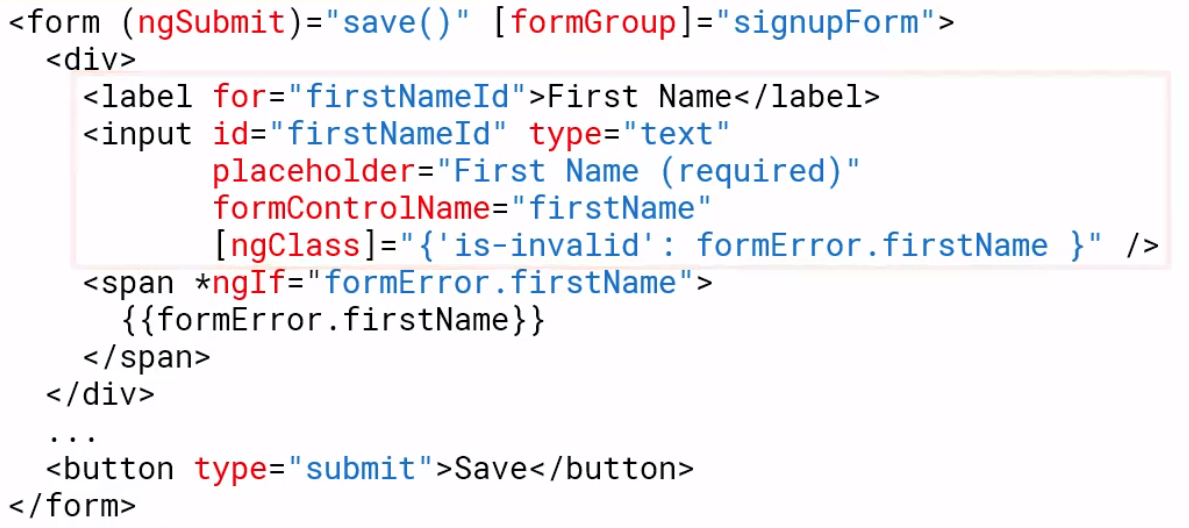
Template vs Reactive Example
Template form example
Reactive form example
Create a Reactive Form
Preparation
Make sure we import the ReactiveFormsModule in app.module.ts
Component Creation
Create a FormGroup in ngInit. Note we can initialize the controls at creation
export class CustomerComponent implements OnInit {
...
  customerForm :FormGroup

  ngOnInit(): void {
    this.customerForm = new FormGroup({
      firstName: new FormControl(),
      lastName: new FormControl(),
      emailName: new FormControl(),
      sendCatog: new FormControl(true)
    })
  }
...
To set the values of the components you can use setValue or patchValue. Patch value will set a subset of the fields
export class CustomerComponent implements OnInit {
      customerForm.patchValue({
         firstName: 'Jack'
      }
  }
...
Now we can use FormBuilder using injection to simplify the code.
...
  constructor(private formBuilder: FormBuilder) {}

  ngOnInit(): void {

    this.customerForm = this.formBuilder.group({
       firstName: '',
       lastName: '',
       email: '',
       sendCatalog: true,
    })
Template Creation
We specify the form using the formGroup
  <div class="card-body">
    <form novalidate
          (ngSubmit)="save()"
          [formGroup]="customerForm">
...
We add fields with formControlName tag. Note getting this wrong, e.g. the name or the tag will result in the form not being rendered correctly. You can test this by adding a
          <input class="form-control"
                 id="emailId"
                 type="email"
                 placeholder="Email (required)"
                 required
                 email
                 formControlName='email'
                 [ngClass]="{'is-invalid': (customerForm.get('email').touched || customerForm.get('email').dirty) && !customerForm.get('email').valid }" />
Accessing Form Model Properties
In the template we can use
customerForm.controls.firstName.valid
customerForm.get('firstName').valid
Or create a reference in the component to be used, in this case firstName
this.customerFrom = new FormGroup({
   firstName: this.firstName
})
Validation
Basic
We can set basic rules by passing an array of validators at creation time. Below we pass the default value and an array of validators e.g.
this.customerForm  this.formBuilder.group({
   firstName: ['default value'],
     [Validators.required, Validators.minLength(3)]],
   nextField: ''
...
At Runtime
We can do this with
  myEdit.setValidators(...);
  myEdit.clearValidators();
  myEdit.updateValueAndValidity()
Below is an example of handling a radio button on the form ===Component
  setNotification(notifyVia: string): void {
    const phoneControl = this.customerForm.get('phone');
    if (notifyVia === 'text') {
      phoneControl.setValidators(Validators.required);
    } else {
      phoneControl.clearValidators();
    }
    phoneControl.updateValueAndValidity();
  }
Template
      <div class="form-group row mb-2">
        <label class="col-md-2 col-form-label pt-0">Send Notifications</label>
        <div class="col-md-8">
          <div class="form-check form-check-inline">
            <label class="form-check-label">
              <input class="form-check-input"
                     type="radio"
                     value="email"
                     formControlName="notification"
                     (click)="setNotification('email')">Email
            </label>
          </div>
          <div class="form-check form-check-inline">
            <label class="form-check-label">
              <input class="form-check-input"
                     type="radio"
                     value="text"
                     formControlName="notification"
                     (click)="setNotification('text')">Text
            </label>
          </div>
        </div>
      </div>

