Angular: Difference between revisions
| Line 97: | Line 97: | ||
==Interfaces== | ==Interfaces== | ||
===Defining=== | |||
We can define interfaces in Angular | |||
<syntaxhighlight lang="typescript"> | |||
export interface IProduct { | |||
productId: number; | |||
productName: string; | |||
... | |||
calculateDiscount(percent: number): number; | |||
} | |||
</syntaxhighlight> | |||
===Usage=== | |||
So we just need to change our any definition in the product component to be IProduct | |||
<syntaxhighlight lang="typescript"> | |||
import { Component } from '@angular/core'; | |||
import { IProduct} from './product' | |||
@Component({ | |||
selector: 'pm-products', | |||
templateUrl: './product-list.component.html' | |||
}) | |||
export class ProductListComponent { | |||
pageTitle: string = "Product List" | |||
imageWidth: number = 50; | |||
imageMargin: number = 2; | |||
showImage: boolean = false; | |||
listFilter: string = "cart" | |||
products: IProduct[] = [ | |||
{ | |||
"productId": 1, | |||
"productName": "Leaf Rake", | |||
... | |||
</syntaxhighlight> | |||
=Templates= | =Templates= | ||
Revision as of 02:37, 1 September 2020
Introduction
Angular Versions
- Angular 1.0 is the old version of angular along with AngularJS
- Angular, starts at 2 and skips 3 and is now at 9 is the version this page is about
Benefits
- Compiles with ES6
- Use modules
- Built in Internationalisation and Accessibility
- Comes with Router, http, forms, rxjs, etc
- Supports Progress Web Apps, (Mobile, Web like React)
- Server-side rendering (render page on server)
- One-way data flow (like React update from parent down)
- Dependency injection
- Uses zone.js to detect change before rendering
- Like React, multiple rendering targets, Browser/DOM, Server Side, Mobile Apps, Desktops
Angular CLI
When we build JavaScript we have to manage
- Module Handling
- Minifying
- Shims (compatibility to legacy code)
- Zone.js wrapper
- Bundling
- Transpilation, compiling to ESx (babel)
Then Angular CLI can
- Create new application
- New components/service/pipe
- Serve up the Application
- Linting
- Testing
- Building
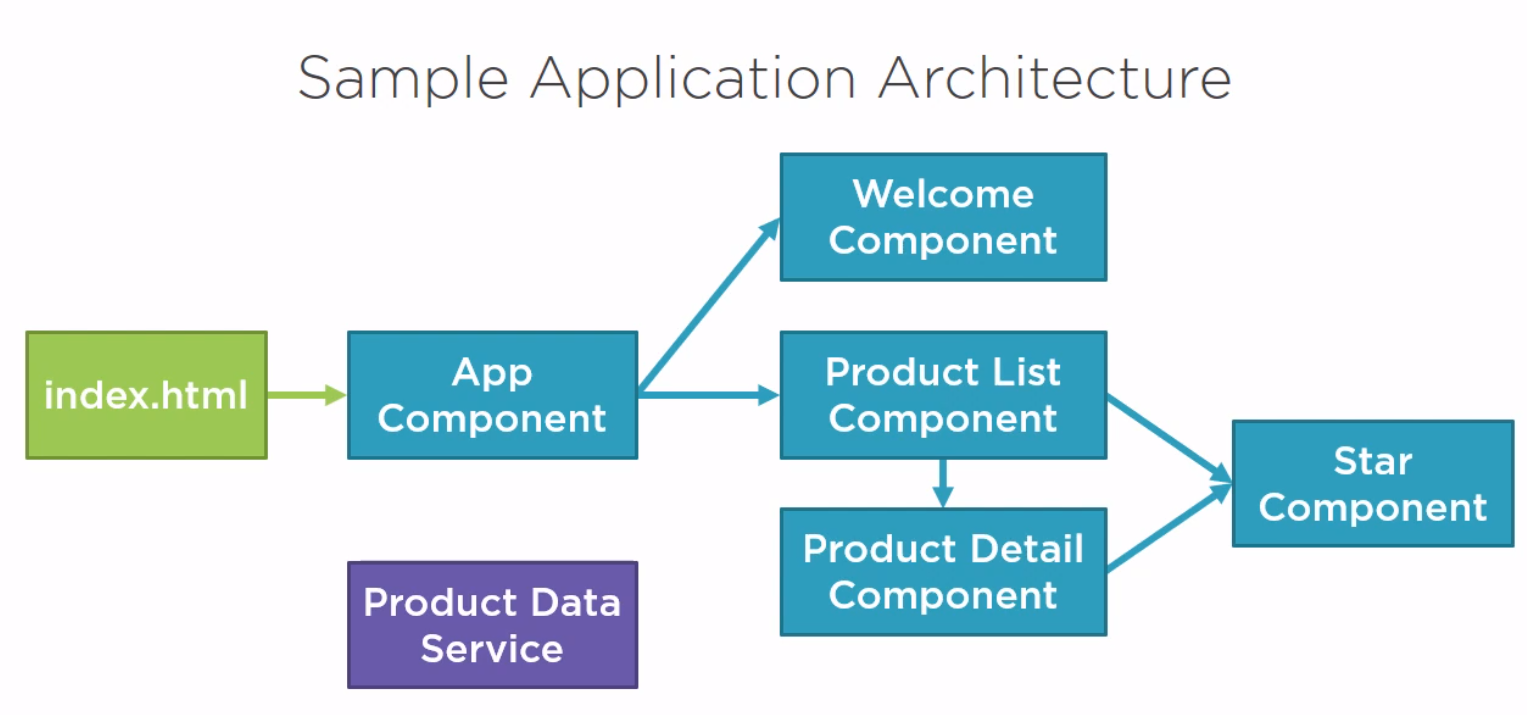
Sample App
This is the sample app I built

The files for the example can be found at [1]
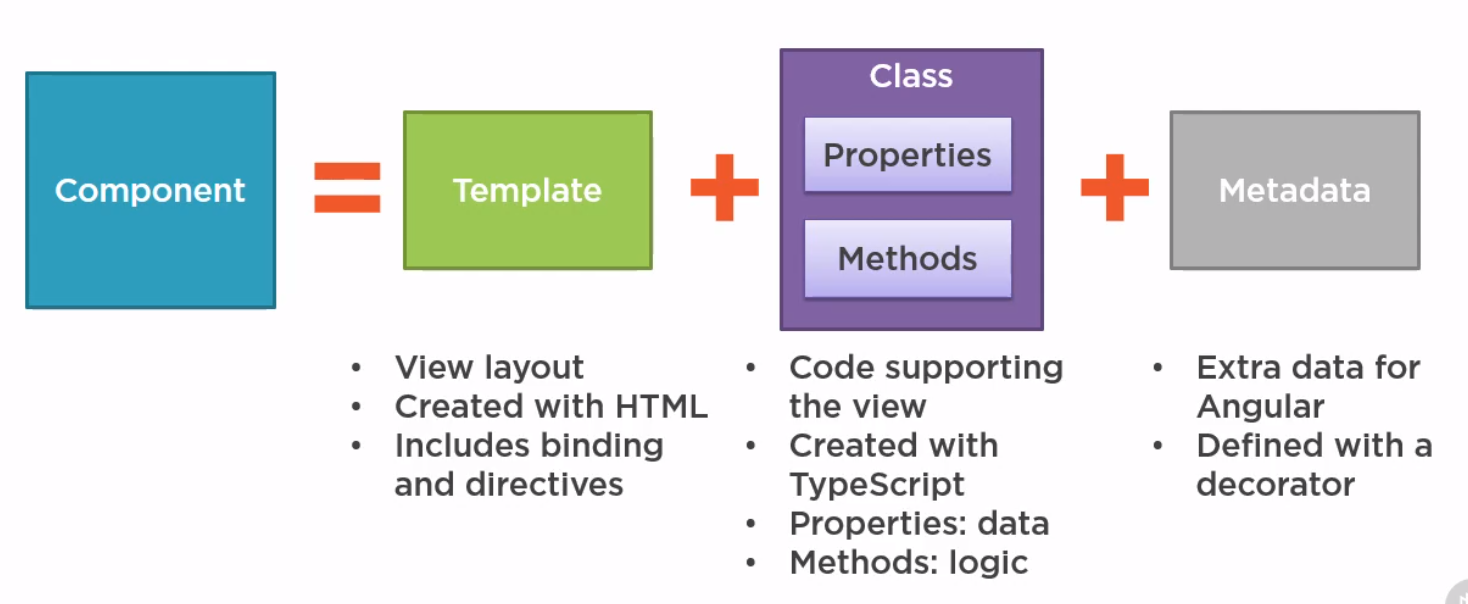
Components
Introduction
- Template
- Class
- Metadata
Starting the App
Here is the index.html which has the pm-root tag inside it to denote a component.
<!doctype html>
<html lang="en">
<head>
  <meta charset="utf-8">
  <title>APM</title>
  <base href="/">
  <meta name="viewport" content="width=device-width, initial-scale=1">
  <link rel="icon" type="image/x-icon" href="favicon.ico">
</head>
<body>
  <pm-root></pm-root>
</body>
</html>
Here is a sample app.module (possibly main) used.
import { BrowserModule } from '@angular/platform-browser';
import { NgModule } from '@angular/core';

import { AppComponent } from './app.component';

@NgModule({
  declarations: [
    AppComponent
  ],
  imports: [
    BrowserModule
  ],
  bootstrap: [AppComponent]
})
export class AppModule { }
And finally the component we defined.
import { Component } from '@angular/core';

@Component({
  selector: 'pm-root',
  template: `
    <div>
      <h1>{{pageTitle}}</h1>
      <div>My First Component</div>
    </div>
    `
})
export class AppComponent {
  pageTitle: string = 'Angular: Getting Started 2';
}
Interfaces
Defining
We can define interfaces in Angular
export interface IProduct {
    productId: number;
    productName: string;
...
    calculateDiscount(percent: number): number;
}
Usage
So we just need to change our any definition in the product component to be IProduct
import { Component } from '@angular/core';
import { IProduct} from './product'

@Component({
  selector: 'pm-products',
  templateUrl: './product-list.component.html'
})
export class ProductListComponent {
    pageTitle: string = "Product List"
    imageWidth: number = 50;
    imageMargin: number = 2;
    showImage: boolean = false;
    listFilter: string = "cart"
    products: IProduct[] = [
        {
          "productId": 1,
          "productName": "Leaf Rake",
...
Templates
Inline Templates
We can define templates using double quotes on one line or by using back ticks.
  template: `
    <div>
      <h1>{{pageTitle}}</h1>
      <div>My First Component</div>
    </div>
    `
Linked Templates
In general it would look like using and linked template would be better. You simply reference the template using the templateUrl keyword instead of template.
Styling
We used bootstrap and font-awesome. To make them available in angular we added the imports to the styles.css
@import "~bootstrap/dist/css/bootstrap.min.css";
@import "~font-awesome/css/font-awesome.min.css";
Creating the Template
We call the template the same name as the component. In the same app this was product-list.component.html. This starts with html
<div class='card'>
    <div class='card-header'>
      Page Title
    </div>
    <div class='card-body'>
      <div class='row'>
        <div class='col-md-2'>Filter by:</div>
        <div class='col-md-4'>
          <input type='text'/>
        </div>
      </div>
      <div class='row'>
        <div class='col-md-6'>
          <h4>Filtered by: </h4>
        </div>
      </div>
      <div class='table-responsive'>
        <table class='table'>
          <thead>
            <tr>
              <th>
                <button class='btn btn-primary'>
                  Show Image
                </button>
              </th>
              <th>Product</th>
              <th>Code</th>
              <th>Available</th>
              <th>Price</th>
              <th>5 Star Rating</th>
            </tr>
          </thead>
          <tbody>
          </tbody>
        </table>
    </div>
</div>
Creating the Component
So we create the component
import { Component } from '@angular/core';

@Component({
  selector: 'pm-products',
  templateUrl: './product-list.component.html'
})
export class ProductListComponent {
}
Add Component to App
Seems a popular error but whenever we use a component we must add it to the app. In this case it was app.modules.ts with an import. Note the import AND the add to declarations
import { ProductListComponent } from './products/product-list.component';
import { BrowserModule } from '@angular/platform-browser';
import { NgModule } from '@angular/core';

import { AppComponent } from './app.component';

@NgModule({
  declarations: [
    AppComponent,
    ProductListComponent
  ],
  imports: [
    BrowserModule
  ],
  bootstrap: [AppComponent]
})
export class AppModule { }
Interpolation
We can use this to bind the properties to functions to the component in the template. E.g. This gets the property pageTitle from the class component
<div>{{pageTitle}}</div>
This calls foo() in the class
<div>{{getFoo()}}</div>
Directives
These are ways to control template logic. Below are the 3 of the key ones
- NgIf—conditionally creates or destroys subviews from the template.
- NgFor—repeat a node for each item in a list.
- NgSwitch—a set of directives that switch among alternative views.
You can find the docs at [2]
ngIf
Example
<table class='table' *ngIf='products && products.length'>
ngFor
Within javascript there is a for...of and and a for...in. The for..of iterates over the objects. The for..in loop iterates over the properties of an object. Example
          <tbody>
              <tr *ngFor="let product of products">
                  <td></td>
                  <td>{{product.productName}}</td>
                  <td>{{product.productCode}}</td>
                  <td>{{product.releaseData}}</td>
                  <td>{{product.price}}</td>
                  <td>{{product.starRating}}</td>
              </tr>
          </tbody>
Data Binding & Pipes
Property Binding
Property binding is binding properties and should not be confused with the interpolation. Property binding is one-way. Note some of the values need product because they are from the variable in the for loop. The values such as imageWidth are a property of the component and do not need the component.
<td><img [src]='product.imageUrl'
         [title]='product.imageUrl'
         [style.width.px]='imageWidth'
         [style.margin.px]='imageMargin'>
</td>
Event Binding
No surprises,
In the template define an event on the left and a function to call on the right.
<button class="btn btn-primary"
   (click)='toggleImage()'>
   Show Image
</button>
In the class create a function
export class ProductListComponent {
...
   // Generally at the end
   toggleImage(): void {
      this.showImage = !this.showImage
   }
}
Two-way Binding
To implement two-way binding we use ngModel. We will need to import the FormsModule to use this. We do this by specifying the module in the imports array as it is a third-party component not made by us.
import { ProductListComponent } from './products/product-list.component';
import { BrowserModule } from '@angular/platform-browser';
import { NgModule } from '@angular/core';
import { FormsModule } from '@angular/forms';

import { AppComponent } from './app.component';

@NgModule({
  declarations: [
    AppComponent,
    ProductListComponent
  ],
  imports: [
    BrowserModule,
    FormsModule
  ],
  bootstrap: [AppComponent]
})
export class AppModule { }
Add Out Listfilter to the class
export class ProductListComponent {
    pageTitle: string = "Product List"
    imageWidth: number = 50;
    imageMargin: number = 2;
    showImage: boolean = false;
    listFilter: string = "cart"
...
Now we can add our filter to the page using the ngModel.
        <input type='text'
            [(ngModel)]="listFilter"/>
        </div>
Pipes
Pipes are used to transform data such as bound properties. There are several built-in data types for dates, numbers,json, slice etc or build our own. As the name suggests, it is achieved by using the "|" character. Parameters can be passed by using the full colon.
{{product.price | currency:'USD':'symbol':'1.2-2' }}
