Vue Introduction: Difference between revisions
| Line 261: | Line 261: | ||
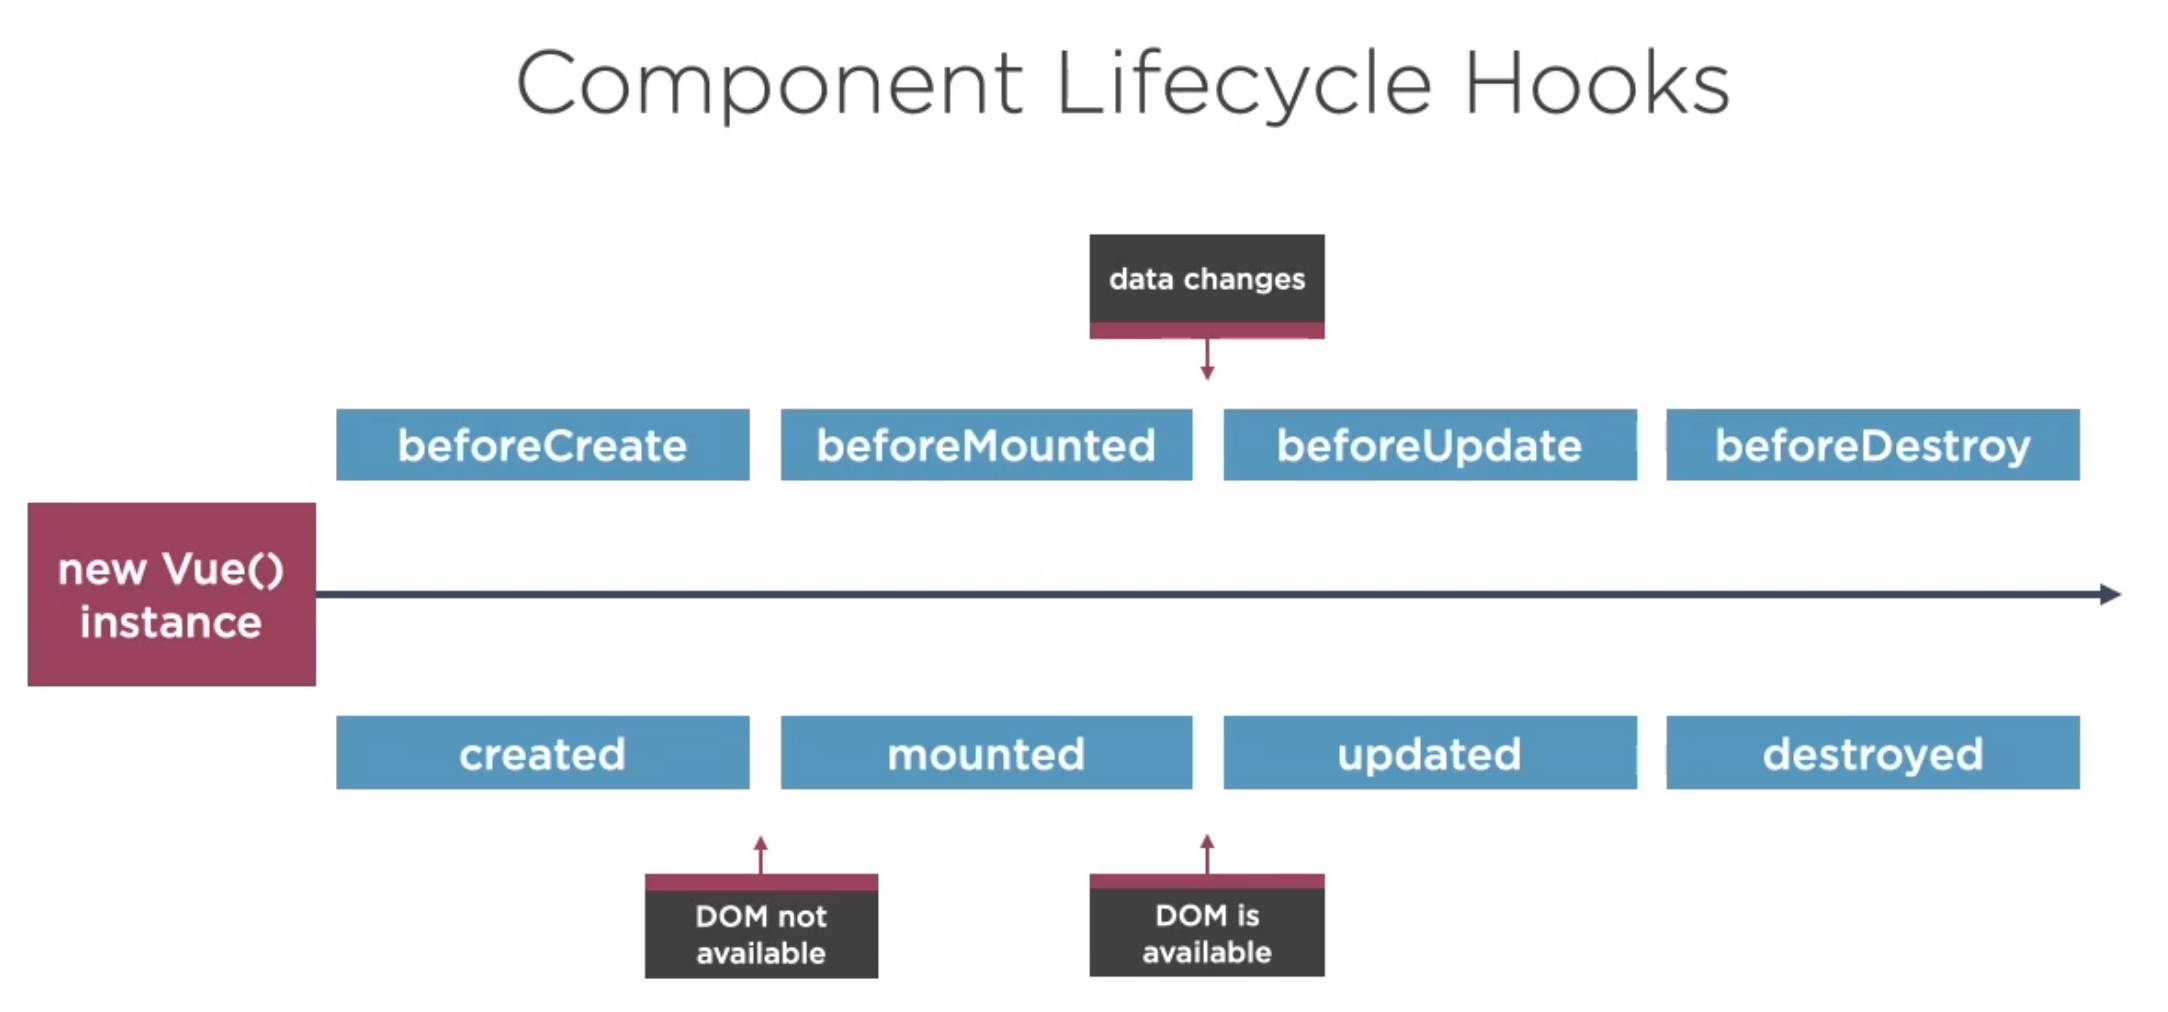
Here are the component lifecycle hooks for Vue. | Here are the component lifecycle hooks for Vue. | ||
[[File:Component lifecyle vue.png| 700px]] | [[File:Component lifecyle vue.png| 700px]] | ||
So here is an example of the created below. Note the lifecycle hooks do not go in the methods section but are at the same level as methods: and computed: | |||
<syntaxhighlight lang="vue"> | <syntaxhighlight lang="vue"> | ||
<script> | <script> | ||
... | |||
created() { | |||
this.loadHeroes(); | |||
}, | |||
methods: { | |||
async getHeroes() { | |||
return new Promise(resolve => { | |||
setTimeout(() => resolve(ourHeroes), 1500); | |||
}); | |||
}, | |||
async loadHeroes() { | |||
this.heroes = []; | |||
this.message = 'getting the heroes, please be patient'; | |||
this.heroes = await this.getHeroes(); | |||
this.message = ''; | |||
}, | |||
... | |||
</script> | </script> | ||
</syntaxhighlight> | </syntaxhighlight> | ||
Revision as of 13:11, 9 December 2020
Intro
Hello John (No world)
Resource for the tutorial was https://github.com/johnpapa/vue-getting-started
The vue js lives at https://cdn.jsdelivr.net/npm/vue. Below is a simple example just showing two way binding
<!DOCTYPE html>
<html lang="en">
<head>
    <meta charset="UTF-8">
    <meta name="viewport" content="width=device-width, initial-scale=1.0">
    <title>Document</title>
    <script src="https://cdn.jsdelivr.net/npm/vue"></script>
</head>
<body>
    <div id="app">
        <input type="text" v-model="name">
        <p>Hello {{name}}</p>
    </div>
    <script>
        new Vue({
            el: "#app",
            data() {
                return {
                    name: "John"
                }
            }
        })
    </script>
</body>
</html>
Sections
Vue files are comprised of three sections. No prizes for what each bit does
<template>
<a v-bind:href="github" target="_blank">
</a>
<template/>

<script>
</script>

<style>
</style>
Displaying Data and Events
Data Model
We can define a data model and use it with standard double curly braces.
</template>
...
<div>{{hero.id}}</div>
...
</template>

<script>
export default {
  name: 'Heroes',
  data() {
    return {
      id: 20,
      firstName: 'Fred',
      lastName: 'Bloggs'
      message: ''
    }
  },
};
</script>
Data Binding
Binding we can use v-bind or the short cut : (full colon). So in the template put the colon and define a data component below
<template>
...
          <a
            v-bind:="github"
            target="_blank"
            rel="noopener noreferrer"
          >
            <i class="fab fa-github fa-2x" aria-hidden="true"></i>
          </a>

          <a
            :href="twitter"
            target="_blank"
            rel="noopener noreferrer"
          >
            <i class="fab fa-twitter fa-2x" aria-hidden="true"></i>
          </a>
...
</template>

<script>
export default {
  name: 'headerLinks',
  data() {
    return {
      github: 'https://github.com/johnpapa/vue-getting-started',
      twitter:'https://twitter.com/john_papa',
    }
  },
}
</script>
Two Way Binding
To bind two-way with v-model with the model and property.
</template>
   <input class="input" id="firstName" v-model="hero.firstName"/>
</template>
Event Binding
Example
To bind events we use v-on: or @ to bind our methods to an event.
</template>
<button @click="cancelHero">Cancel</button>
<button v-on:click="cancelHero">Cancel 2</button>
</template>
<script>
export default {
  name: 'Heroes',
  data() {
...
  },
  methods: {
    cancelHero() {
       this.message = ''
    },
  }
};
</script>
Keyup
Below is an example of binding to the keyup event. The .esc denotes the escape key. </template> <script>
               <select
                 id="power"
                 v-model="hero.power"
                 :class="{ invalid: !hero.power }"
                  @keyup.esc="clearPower"
               >
</script> </syntaxhighlight>
Checkbox, Radio
No surprises here
<template>
                  <input
                    type="radio"
                    id="color-red"
                    value="red"
                    v-model="hero.capeColor"
                  />

                  <input
                    type="checkbox"
                    class="is-primary"
                    id="active"
                    v-model="hero.active"
                  />
</template>
Styles and Classes
Styles and Classes are trickier because of the object approach of the data
<template>
                <select
                  id="power"
                  v-model="hero.power"
                   @keyup.esc="clearPower"
                >

                <div
                  class="color-line"
                  :style="{ 'background-color': hero.capeColor }"
                ></div>
</template>
Displaying List and Conditional Content
Iterating v-for
So just create a key and use the right syntax and the defined model
<template>
        <ul class="list is-hoverable">
          <li v-for="hero in heroes" :key="hero.id">
            <a class="list-item"><span>{{ hero.firstName }}</span></a>
          </li>
        </ul>
</template>
Binding to selection
We can do this by binding to the model on click. Note the conditional class based on if the current hero === selected hero.
<template>
          <li v-for="hero in heroes" :key="hero.id">
            <a
              class="list-item"
              @click="selectedHero = hero"
              :class="{ 'is-active': selectedHero === hero }"
              ><span>{{ hero.firstName }}</span></a
            >
          </li>

</template>
Conditional Displaying v-if and v-show
v-if
Same as *ngIf. So if no selection on the list
<template>
    <div class="columns" v-if="selectedHero">
      <div class="column is-3">
        <header class="card-header">
          <p class="card-header-title">{{ selectedHero.firstName }}</p>
        </header>
        <div class="card-content">
          <div class="content">
...
</template>
v-show
This will put the data in dom.
<template>
            <div class="field" v-show="showMore">
              <label class="label" for="lastName">last name</label>
              <input
                class="input"
                id="lastName"
                v-model="selectedHero.lastName"
              />
            </div>
</template>
Interacting within a Component
Computed
This is a section in the scripts section which allow you to define function to compute value maybe from existing model data
<script>
  computed: {
    fullName() {
      return `${this.selectedHero.firstName} ${this.selectedHero.lastName}`;
    },
  },

</script>
Component Lifecycle Hooks
Here are the component lifecycle hooks for Vue.
 So here is an example of the created below. Note the lifecycle hooks do not go in the methods section but are at the same level as methods: and computed:
<script>
...
  created() {
    this.loadHeroes();
  },
  methods: {
    async getHeroes() {
      return new Promise(resolve => {
        setTimeout(() => resolve(ourHeroes), 1500);
      });
    },
    async loadHeroes() {
      this.heroes = [];
      this.message = 'getting the heroes, please be patient';
      this.heroes = await this.getHeroes();
      this.message = '';
    },
...
</script>
<script>
</script>