Android Picasso: Difference between revisions
| Line 78: | Line 78: | ||
[[File:Raster vs vector.png|center|400px]] | [[File:Raster vs vector.png|center|400px]] | ||
<br> | <br> | ||
==Error Handling== | |||
We just create a handler for Picasso and then we can add a breakpoint on the listener. All of the problems I have had have been I forget they do not process svgs. | |||
<syntaxhighlight lang="kotlin"> | |||
val picasso = Picasso.Builder(context) | |||
.listener { picasso, uri, exception -> | |||
Log.e("Picasso Error", "Errored out, hiding view"); | |||
} | |||
.build() | |||
viewHolder.viewBinding.imgViewState.setImageBitmap(R.drawable.ic_green_arrow_up) | |||
picasso.load(R.drawable.ic_green_arrow_up) | |||
.into(viewHolder.viewBinding.imgViewState) | |||
</syntaxhighlight> | |||
==Example 1 Drawable PNG== | ==Example 1 Drawable PNG== | ||
Create drawables in your res/drawable folder. | Create drawables in your res/drawable folder. | ||
| Line 90: | Line 105: | ||
Picasso.with(getContext()).load(R.drawable.beans).into(banner); | Picasso.with(getContext()).load(R.drawable.beans).into(banner); | ||
</syntaxhighlight> | </syntaxhighlight> | ||
==Example 2 Drawable Icon== | ==Example 2 Drawable Icon== | ||
Using the code | Using the code | ||
Latest revision as of 02:10, 5 February 2021
Introduction
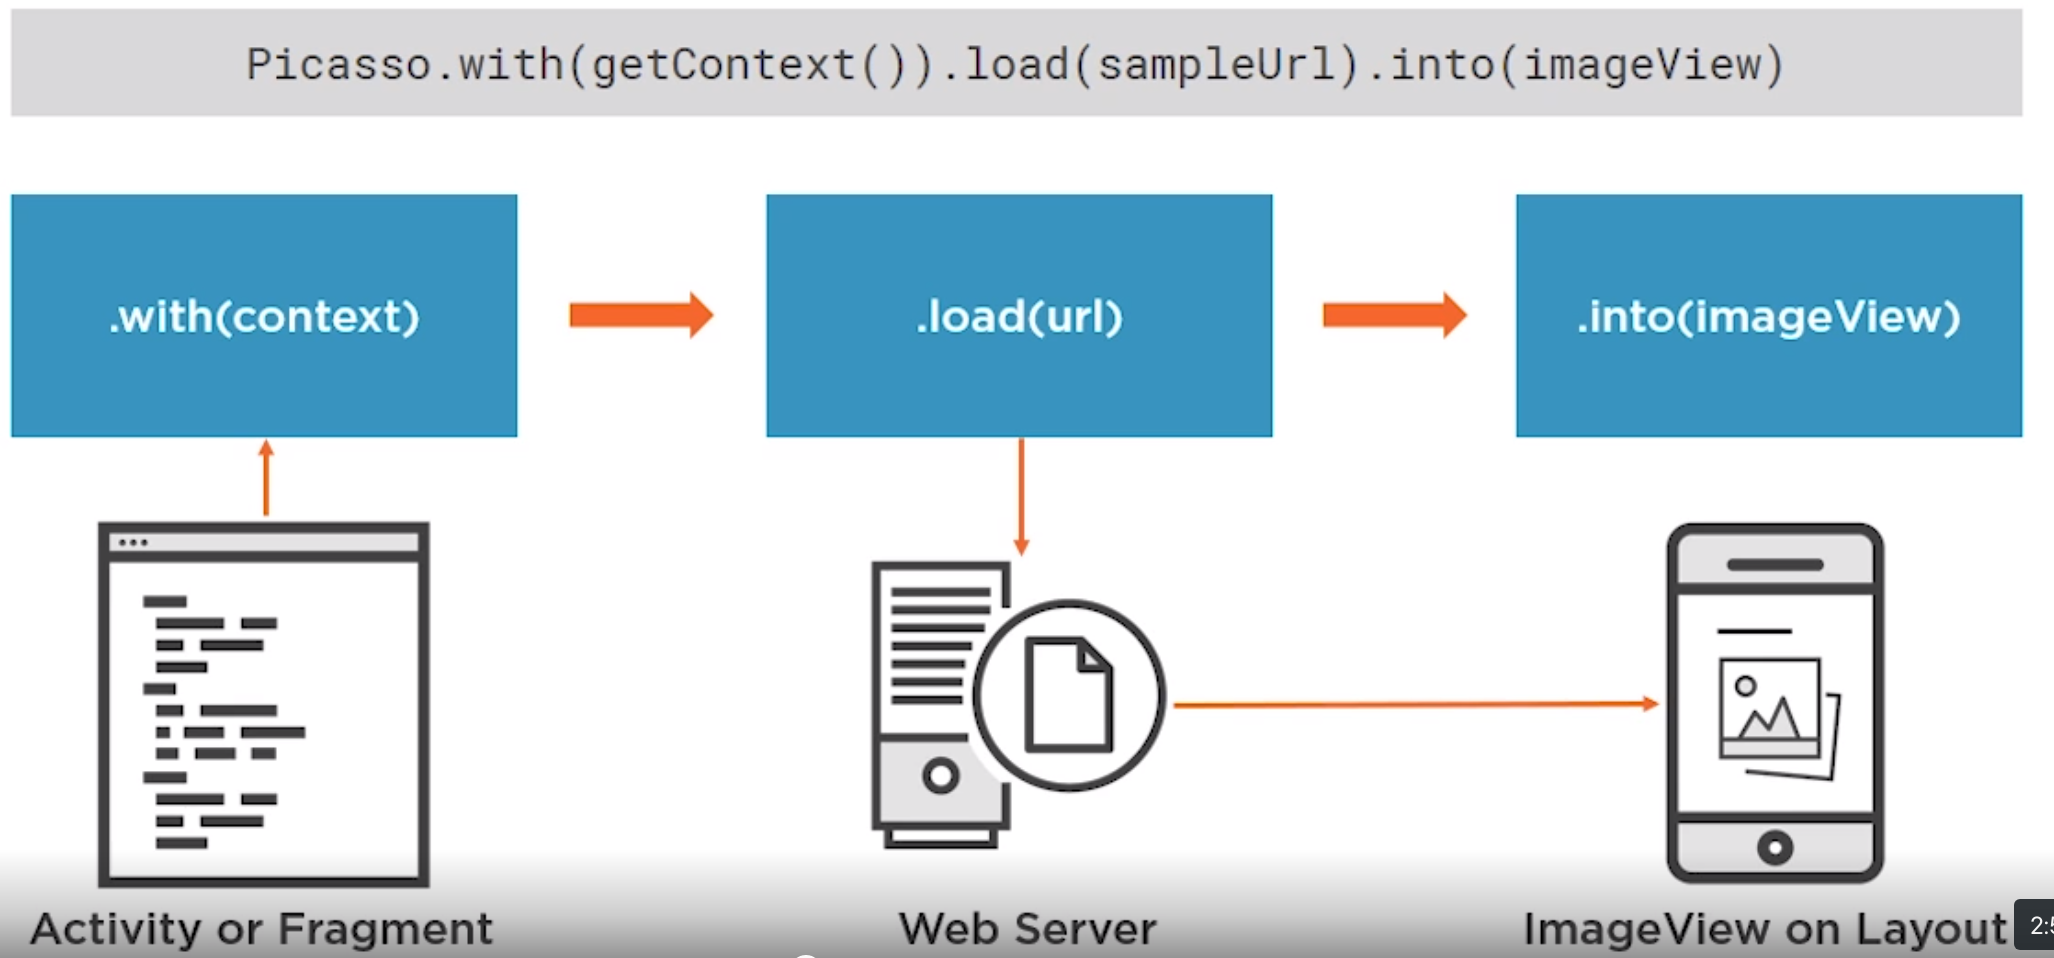
Picasso is a library for managing images on Android and is very simple to use
Picasso.with(getContext()).load(sampleURI).into(imageView)
- Flexible Source Locations
- Caching
- Image Trnasformations
- Error Handling
- Logging
- Request Management
To add it to our projects we simply add it to the gradle. At the time this was
implementation 'com.squareup.picasso:picasso:2.71828'
Resources for this can be found at
https://github.com/alex-wolf-ps/android-picasso
Comparison
Here are some comparisons on the competition at the time, Glide and Fresco. I guess I am more interested in the items to compare as this points to the problem people are trying to solve.
Loading Images
Sources
Picasso supports loading images from either
- String, "https:://www.bibble.co.nz/myimage.png
- Resource ID, images stored in the app drawable e.g. R.drawable.myimage
- URI, Maybe an image from the phone using an intent
- File, a Android File Object
File Types
Picasso supports many file types include JPEG, PNG and SVG. JPEG and PNG are raster images and SVGs are vector Images. Vector images are stored as a series of paths curves and points. Where as raster images of pixels which makes them less unable to scale

Error Handling
We just create a handler for Picasso and then we can add a breakpoint on the listener. All of the problems I have had have been I forget they do not process svgs.
        val picasso = Picasso.Builder(context)
                .listener { picasso, uri, exception ->
                    Log.e("Picasso Error", "Errored out, hiding view");
                }
                .build()

        viewHolder.viewBinding.imgViewState.setImageBitmap(R.drawable.ic_green_arrow_up)
        picasso.load(R.drawable.ic_green_arrow_up)
                .into(viewHolder.viewBinding.imgViewState)
Example 1 Drawable PNG
Create drawables in your res/drawable folder. We can create an appropriate folder for different resolutions e.g.
- /drawable-ldpi For low density screens.
- /drawable-mdpi For medium density screens.
- /drawable-hdpi For high resolution screens.
- /drawable-xhdpi For extra high resolution screens.
Note that the these folders are at the same level as drawable and not inside. From there it is a simple case of getting the Resource ID and loading it into the control.
        ImageView banner = view.findViewById(R.id.banner);
        Picasso.with(getContext()).load(R.drawable.beans).into(banner);
Example 2 Drawable Icon
Using the code
ImageView imgAboutOne = view.findViewById(R.id.icon_wait);
Picasso.with(getContext()).load(R.drawable.ic_done).into(imgAboutOne);
I struggled to get this to work as Android Studio now supports vectors. When you create an icon the result includes a vector.
Failed to create image decoder with message 'unimplemented'
To resolve this updated the version of picasso and achieved nothing except understanding the new syntax which does not require the context.
        ImageView imgAboutOne = view.findViewById(R.id.icon_wait);
        Picasso.get().load(R.drawable.ic_done).into(imgAboutOne);
Then found that icons are stored under mipmap so this all worked on the old picasso with
        ImageView imageView1 = view.findViewById(R.id.icon_drivethru);
        Picasso.with(getContext()).load(R.mipmap.ic_done).into(imageView1);
Using with a GridView
This is of course trivial and a big repetitive but here goes for reference. It just loads the images as above
    @Override
    public View getView(int position, View convertView, ViewGroup parent) {

        if (convertView == null) {
            LayoutInflater inflater = ((Activity) context).getLayoutInflater();
            convertView = inflater.inflate(layoutResourceId, parent, false);
        }

        Picasso.with(context).
                load(UrlHelper.BaseUrl + this.data.get(position)).
                into((ImageView) convertView);

        return convertView;
    }
Using with a RecyclerView
Much the same story. For this I needed to pass the context and then amend the view holder.
    @Override
    public void onBindViewHolder(ItemViewHolder holder, int position) {
        holder.mItemDesc.setText(mItems.get(position).getDescription());
        holder.mItemName.setText(mItems.get(position).getName());
        Picasso.with(mContext).
                load(UrlHelper.BaseUrl + mItems.get(position).getImageUrl())
                .into(holder.mImageView);
    }
Using an Intent (Downloads, Gallery)
The picasso code is exactly the same but this is a great example
Create Button and ImageView
Let's create a button and image view
        <LinearLayout
            android:layout_width="match_parent"
            android:layout_margin="6dp"
            android:weightSum="2"
            android:layout_height="wrap_content">

            <TextView
                android:layout_width="wrap_content"
                android:layout_height="wrap_content"
                android:textAlignment="center"
                android:layout_weight="1"
                android:text="Share Your Experience!" />

            <Button
                android:id="@+id/btn_submit"
                android:layout_width="wrap_content"
                android:layout_height="wrap_content"
                android:layout_gravity="center"
                android:layout_weight="1"
                android:text="Upload Image" />
        </LinearLayout>

        <ImageView
            android:id="@+id/image_submission"
            android:layout_width="wrap_content"
            android:layout_height="wrap_content"
            android:layout_gravity="center_horizontal" />
Create Click Event
Create a click event implementation
        Button btnSubmit = (Button) view.findViewById(R.id.btn_submit);
        btnSubmit.setOnClickListener(new View.OnClickListener() {
            @Override
            public void onClick(View v) {
                Intent intent = new Intent().setType("image/*").setAction(Intent.ACTION_GET_CONTENT);
                startActivityForResult(intent, 1);
            }
        });
Populate ImageView
After the intent ends lets populate the image view
    @Override
    public void onActivityResult(int requestCode, int resultCode, Intent data) {
        super.onActivityResult(requestCode, resultCode, data);

        Uri imgUri = data.getData();
        ImageView imgPreview = (ImageView) getActivity().findViewById(R.id.image_submission);
        Picasso.with(getContext()).load(imgUri).into(imgPreview);
    }
Transformations
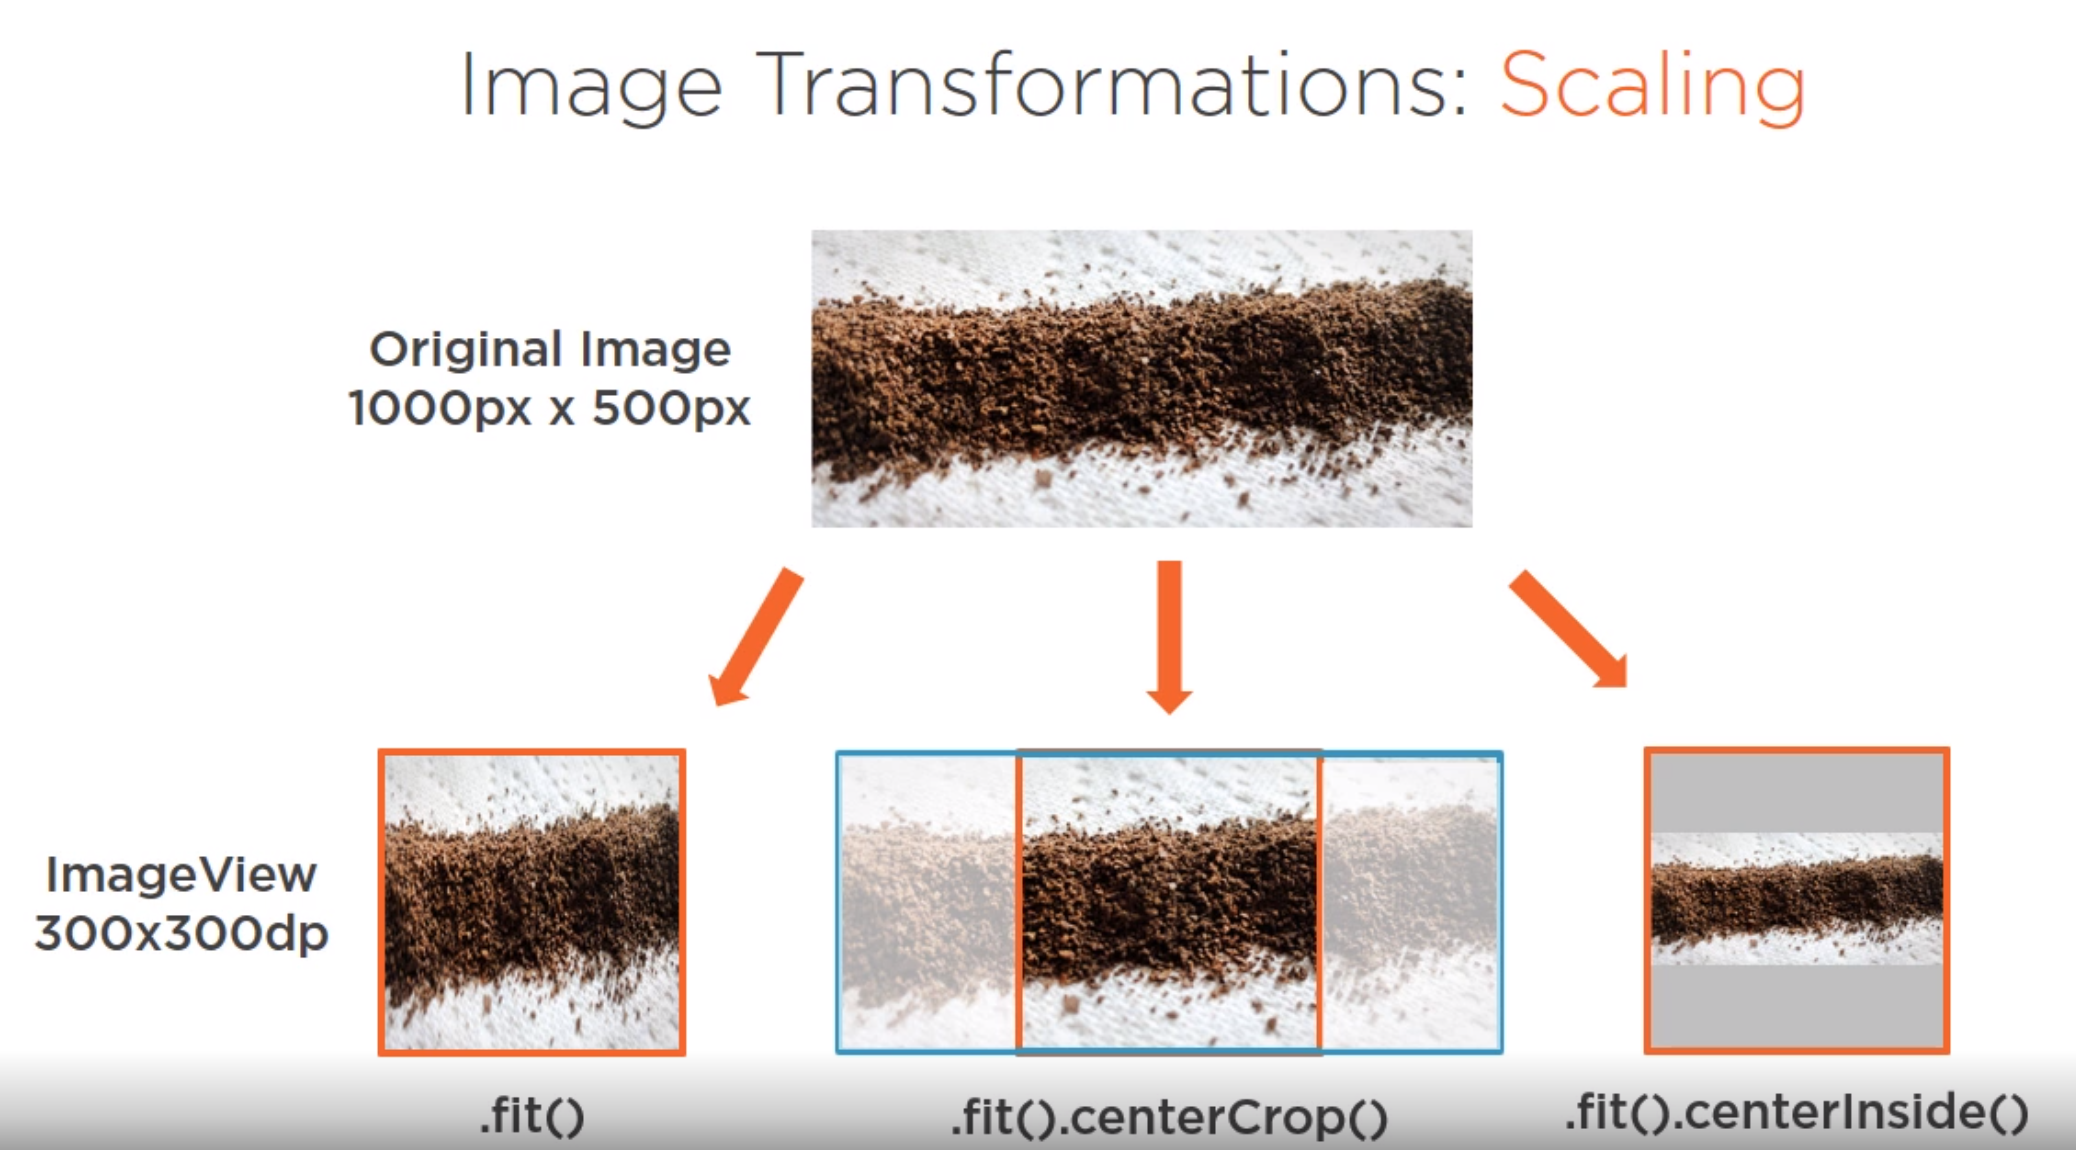
Scaling
Picasso provides 3 types of scaling. Probably does not need more information
Resizing
Some function are available for resizing.
Rotation
We can rotate images with a number of degrees and a pivot point. An a example of random is
        int twiceMax = 20;
        int actualMax = 10;
        int degrees = new Random().nextInt(twiceMax) - actualMax;

        Picasso.with(context).
                load(UrlHelper.BaseUrl + this.data.get(position))
                .rotate(degrees)
                .fit()
                .centerCrop()
                .into((ImageView) convertView);
Custom Transformations
Recommend Classes for Image
- Canvas
- Paint
- ColorMatrix
- Bitmap
Example
A bit disappointing but this allows you to run some code prior to the image being rendered. You do all of the work. Just create and instance to a transform
public class BannerTransformation implements Transformation {
    @Override
    public Bitmap transform(Bitmap source) {
        int originalHeight = source.getHeight();
        int totalMargin = originalHeight / 2;
        int croppedImageHeight = originalHeight / 2;

        Bitmap croppedImage =
                Bitmap.createBitmap(source, 0, totalMargin / 2, source.getWidth(), croppedImageHeight);

        if (croppedImage != source) {
            source.recycle();
        }

        return croppedImage;
    }

    @Override
    public String key() {
        return "BannerTransformation";
    }
}
And use it
        Picasso.with(getContext())
                .load(R.drawable.beans)
                .transform(new BannerTransformation())
                .into(imageBanner);
Caching
Introduction
Picasso default loading process is as follows
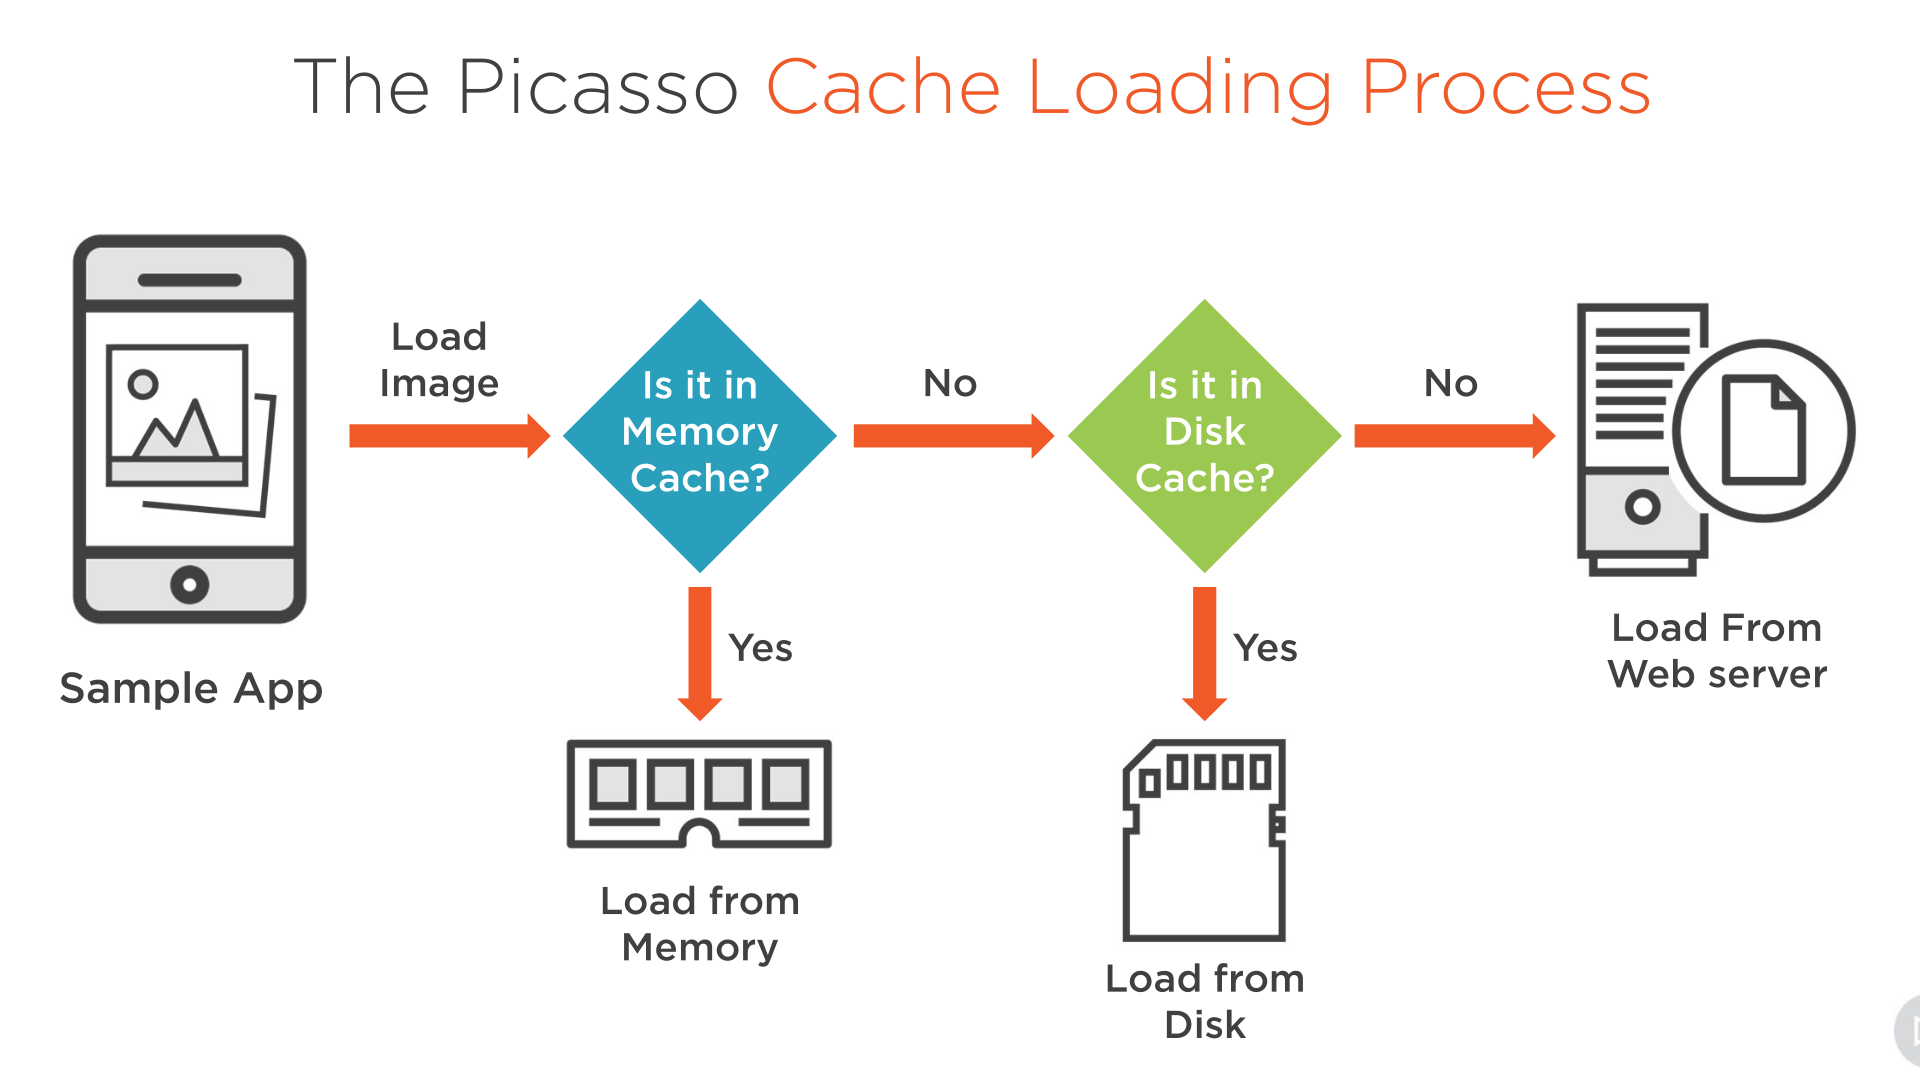
Policies
There are two policies you can implement
- disk policy
- memory policy
These are independent, i.e. if you turn one off the other is checked.
We can also
- log the activity for debugging purposes.
- add indicator to image to show where the image was from e.g memory, disk, network
Example Indicators
This is a global setting
Picasso.with(getContext()).setIndicatorsEnabled(true);
Example Turning off Cache
We can do this on a per usage basis
        Picasso.with(mContext)
                .load(UrlHelper.BaseUrl + mItems.get(position).getImageUrl())
                .memoryPolicy(MemoryPolicy.NO_CACHE)
                .networkPolicy(NetworkPolicy.NO_CACHE)
                .into(holder.mImageView);
Example Logging
This is set simple by
Picasso.with(mContext).setLoggingEnabled(true);
Managing Requests
Prefetch
Because Picasso uses caching we can prefetch images but call fetch earlier. So calling fetch on the front screen will mean that the second screen loads faster.
        String[] array = new String[] {
                "ground.jpg",
                "table.jpg",
                "beans.jpg",
                "granola.jpg",
                "bag.jpg",
        };

        for(String url : array) {
            Picasso.with(this).load(UrlHelper.BaseUrl + url).fetch();
        }
Placeholder and Errors
We can have a default image if all does not go well on loading and use the error function. We can also specify a pre-image placeholder with the placeholder function
        Picasso.with(context).
                load(UrlHelper.BaseUrl + this.data.get(position))
                .error(R.drawable.default)
                .placeholder(R.drawable.initial)
                .rotate(degrees)
                .fit()
                .centerCrop()
                .into((ImageView) convertView);
Tagging
Introduction
We can group images by name (Tag). We can Cancel, Pause and Resume groups of images using tags.
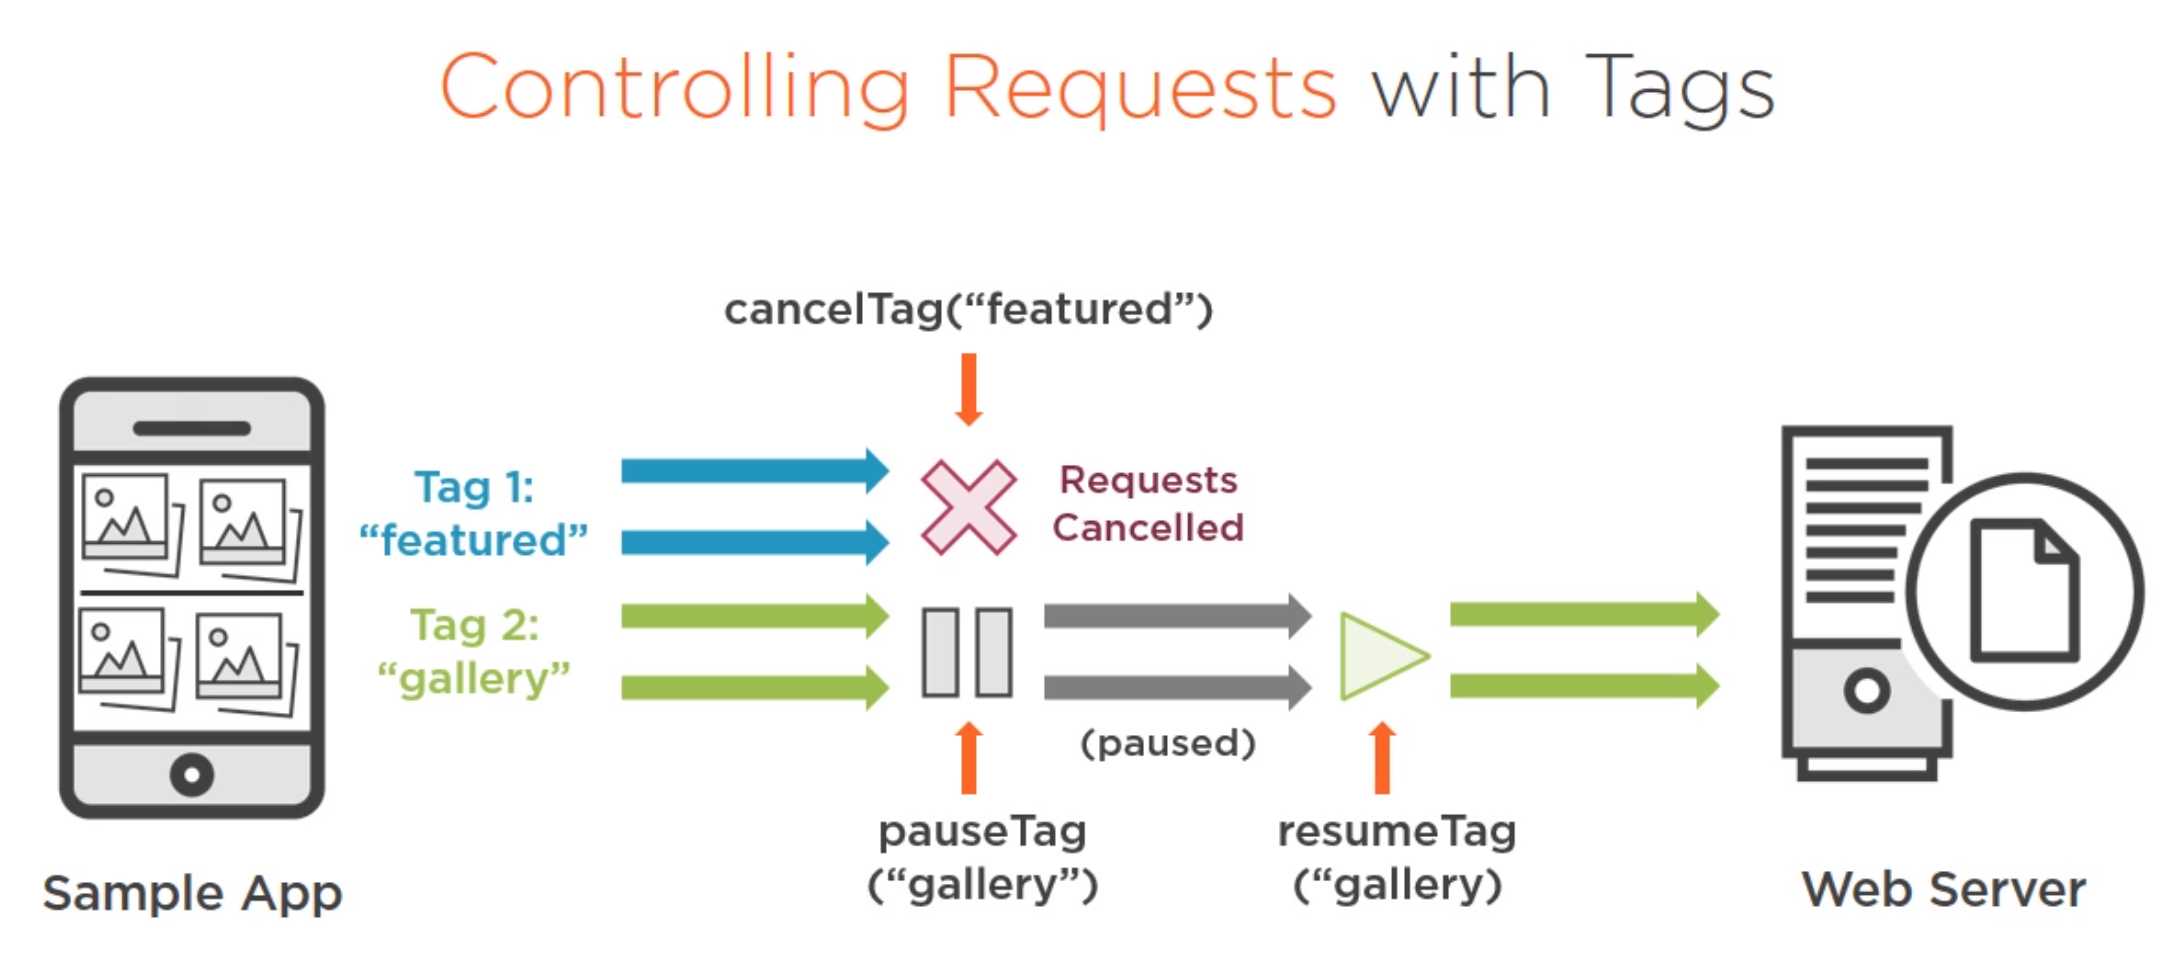 The use case was a gallery. To implement this we implement the onScrollListener and tag the images in the adapter (not shown) with the function Picasso function tag("gallery").
    @Override
    public void onScrollStateChanged(AbsListView view, int scrollState) {
        if (scrollState == SCROLL_STATE_IDLE || scrollState == SCROLL_STATE_TOUCH_SCROLL) {
            Picasso.with(mContext).resumeTag("gallery");
        } else {
            Picasso.with(mContext).pauseTag("gallery");
        }
    }

    @Override
    public void onScroll(AbsListView view, int firstVisibleItem, int visibleItemCount, int totalItemCount)
    {

    }
Targets
This allow custom logic to run much like the transformation. We
- Create a class
- Implement the methods
- Attach it to the load
Create a class
Target mTarget;
Implement the methods
        mTarget = new Target() {
            @Override
            public void onBitmapLoaded(Bitmap bitmap, Picasso.LoadedFrom from) {
                imageView1.setImageBitmap(bitmap);
            }

            @Override
            public void onBitmapFailed(Drawable errorDrawable) {
                Toast.makeText(context, "Your connection needs espresso", Toast.LENGTH_LONG).show();
            }

            @Override
            public void onPrepareLoad(Drawable placeHolderDrawable) {

            }
        };
Attach it to the load
And finally instead of the image view we specify the target.
        Picasso.with(this)
                .load("http://www.alexwolfps.com/images/logo.png")
                .into(mTarget);
