Docker and Kubernetes: Difference between revisions
| Line 247: | Line 247: | ||
name: ps-nodeport | name: ps-nodeport | ||
spec: | spec: | ||
type: | type: NodePort | ||
- | ports: | ||
- port: 80 | |||
targetPort: 8080 | |||
nodePort: 31111 | |||
selector: | selector: | ||
name: web | name: web | ||
</syntaxhighlight> | </syntaxhighlight> | ||
Revision as of 04:52, 14 August 2021
Introduction
Containers
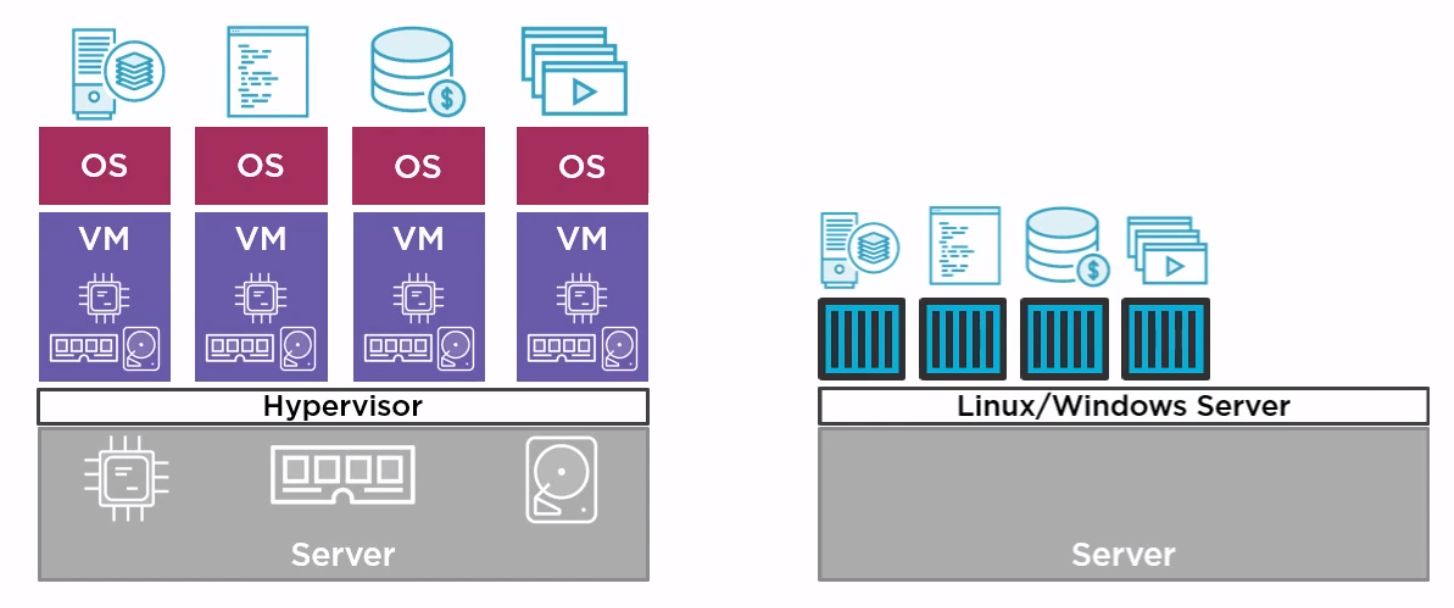
This all started with VMWare where the total resource could be divided up to run more than one application on difference virtual machines. But VMWare required an OS on every machine and licenses in the case of Windows. They also needed managing, e.g. patching, Anti-virus and patching. Along came containers which shared the OS.
Docker
Docker Inc. Docker is a company which gave the word technology for containers. They are now a company which provides services around the company.
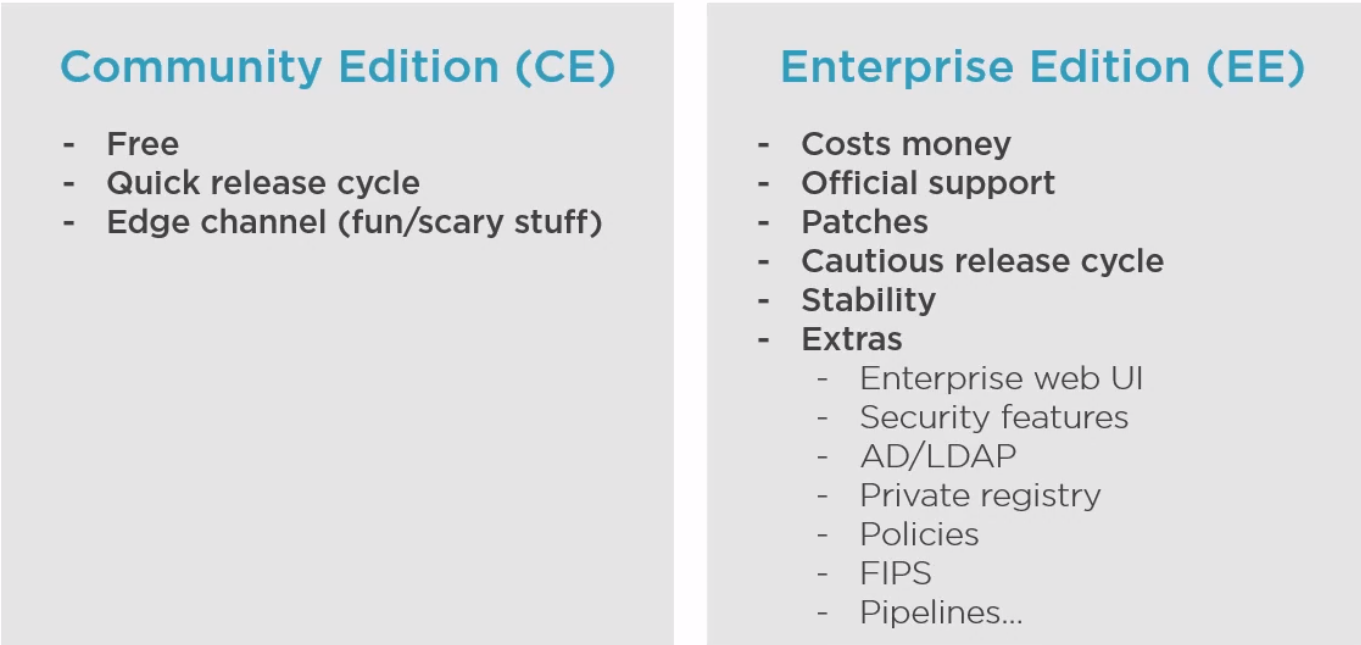
Docker is Open source and known as Community Edition (CE). The company Docker releases an Enterprise Edition (EE).
The general approach is to
- Create an image (docker build)
- Store it in a registry (docker image push)
- Start a container from it (docker container run)
The differences between EE and CE are shown below
Kubernetes
Kubernetes came out of Google and Open Source. Greek for helmsman or k8s (Kates). Kubernetes is an orchestrator and can schedule, scale and update containers. There are alternatives like Docker Swarm
Architecture
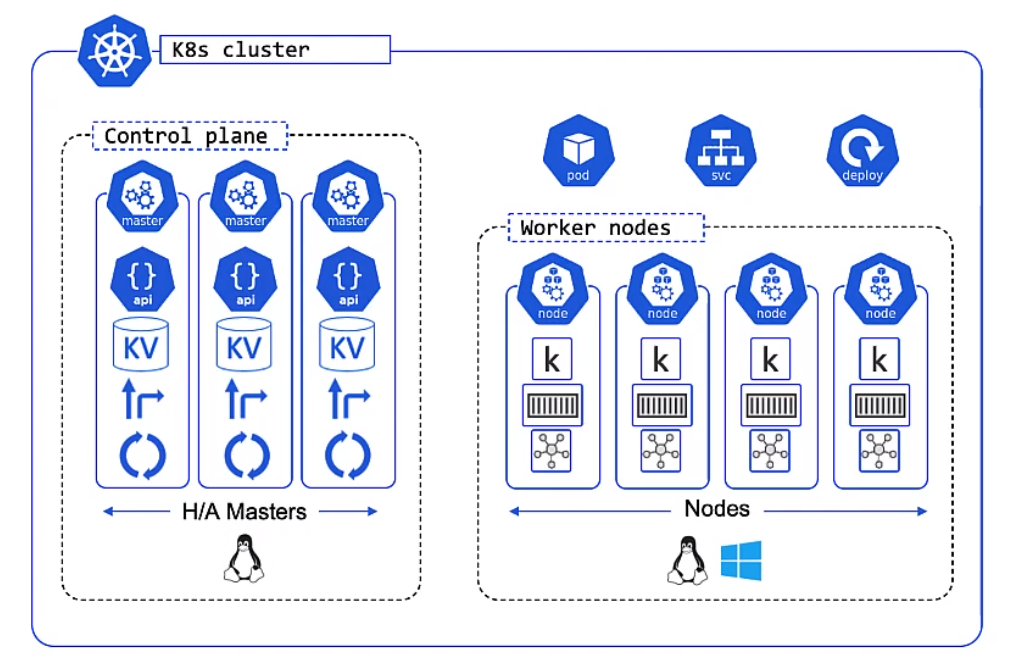
Overview
Apps are put in a container, wrapped in a pod and deployment details. They are provisioned on a Node inside a K8s Clustoer
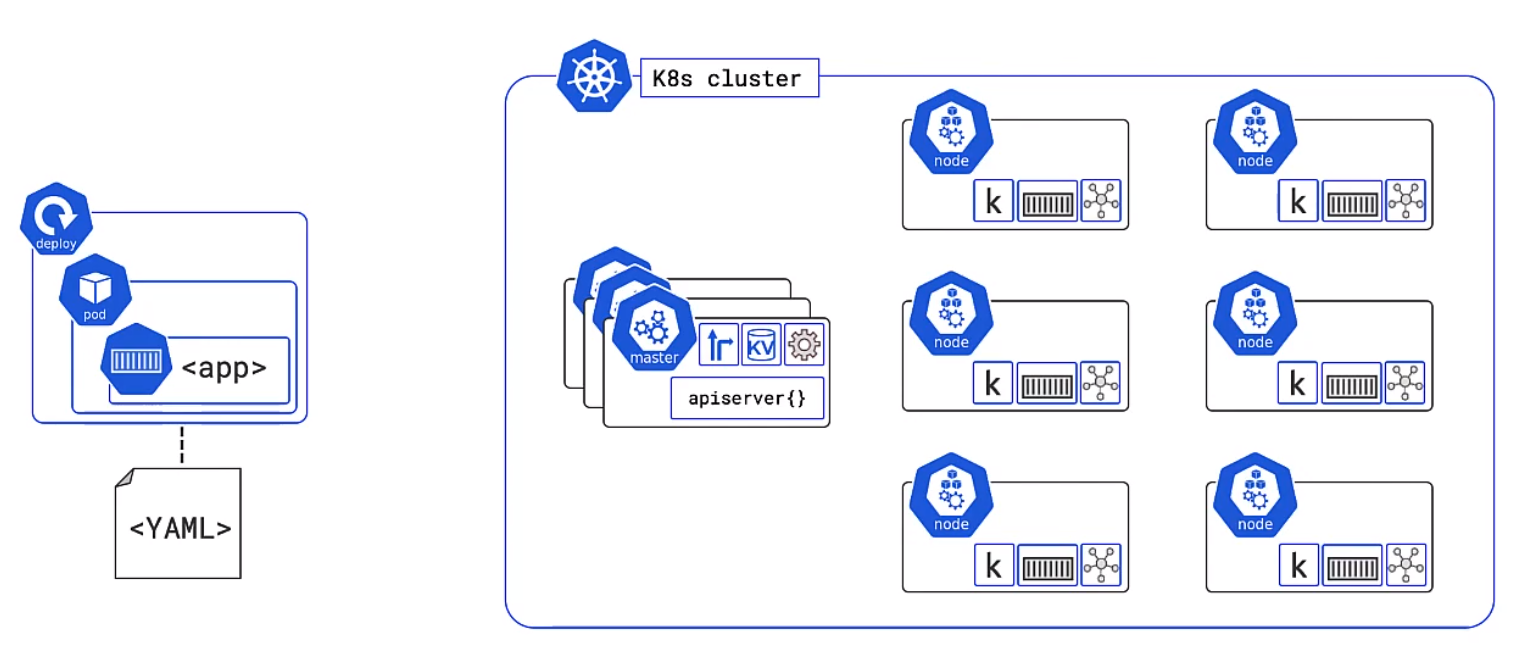
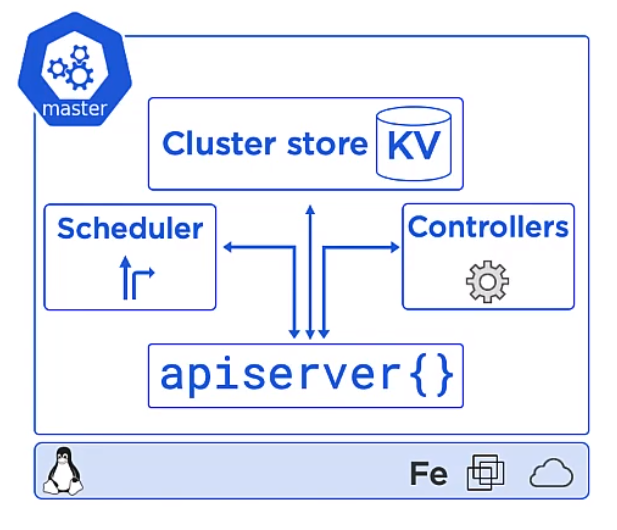
Master
In general these are a hosted services on the cloud but you can run them locally on a linux box.
- This is the front-end to the control plane
- It exposes a RESTFul API consuming JSON and Yaml
- We send manifests describing our apps to this
The Cluster Store for users with large changes often separate this
The controllers controls
- Node Controller
- Deployment controller
- Endpoints/EndpointSlice
The scheduler
- Watches for new work
- Assigns Work to the cluster nodes
Kubernetes Nodes
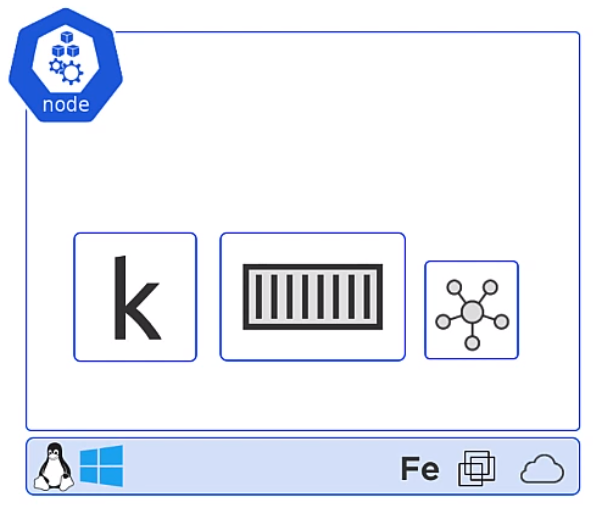
Now its time for the Nodes. These are made up of three parts, the Kublet, Container runtime and the Kube Proxy
Kubelet
The Kubelet is the Main Kubernetes agent it
- Registers node with the cluster
- Watches API Server for work tasks (Pods)
- Executes Pods
- Reports to the master
Container Runtime
- Can be Docker
- Pluggable via Container Runtime Interface (CRI)
- Generally is Docker or containerd, other like gVisor and katacontainers exist
- Does the stop and starting of containers
Kube Proxy
- The Networking Component
- Does light-weight load balancing
Declarative Model/Desired State
We describe what we want the cluster to look like but we do not care how it happens. Kubernetes constantly checks the desired state matches the observed state.
Pods
A pod is a shared execution environment and can container one or more containers. It is the Pod which has a unique IP. Containers within the same pod must allocate unique ports if they are to talk to each other or the outside world. The same for volumes etc.When scaling you scale Pods not Containers.
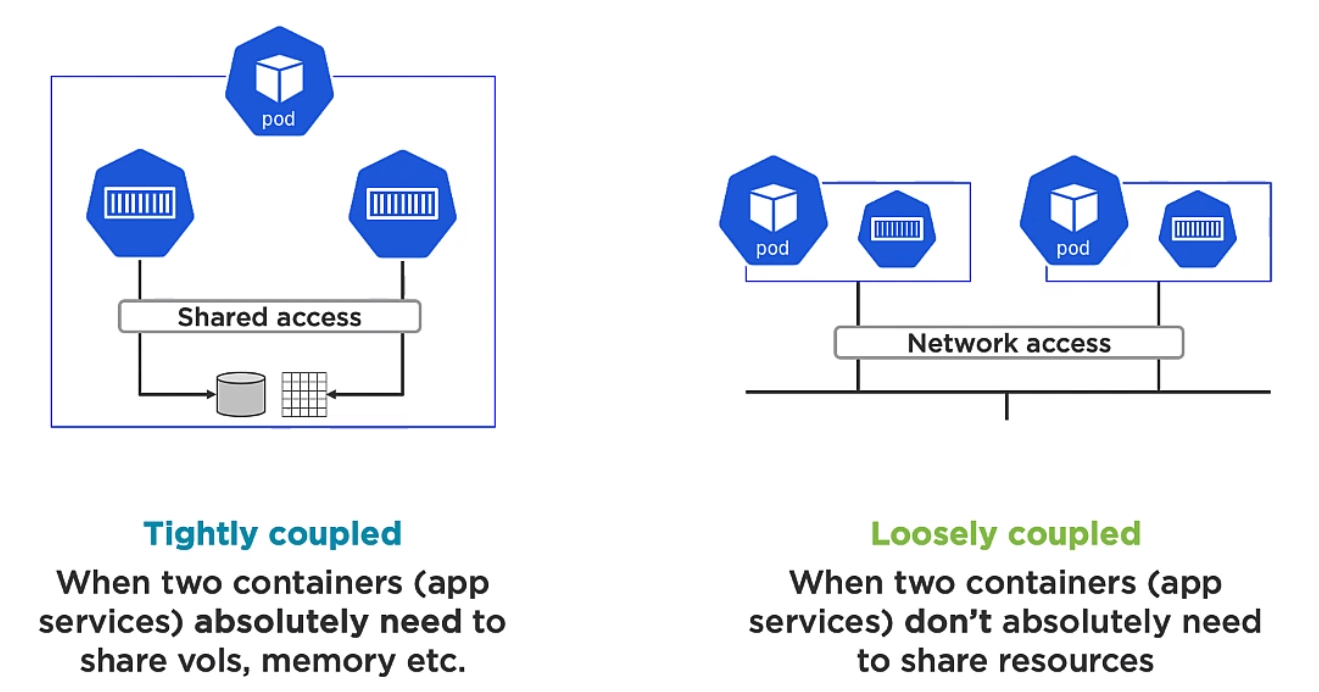
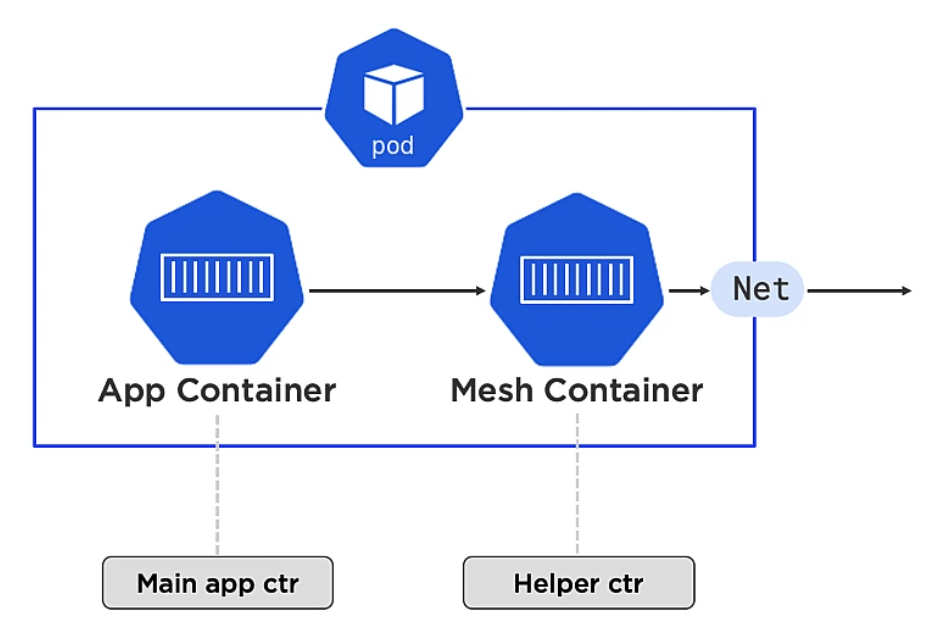
Multi container Pods are for two different but complimentary containers which need to be aligned. An example of this might be a service mesh. For example the mesh container could be responsible for encryption or decryption. Note Deployment of Pods is atomic
Pods provide
- Annotations
- Labels
- Policies
- Resources
- Co-scheduling of contianers
and other Metadata.
Kubernetes Service Objects
As mentioned the IP address are provided for each Pod. However Pods die, we scales up and down and it would not be practical to use them so Kurbenetes provides the Service object which is describe in the deploymennt. With the use of labels the Service object knows which pods to send traffic to. By either removing labels from the pod the objects can be match generically.
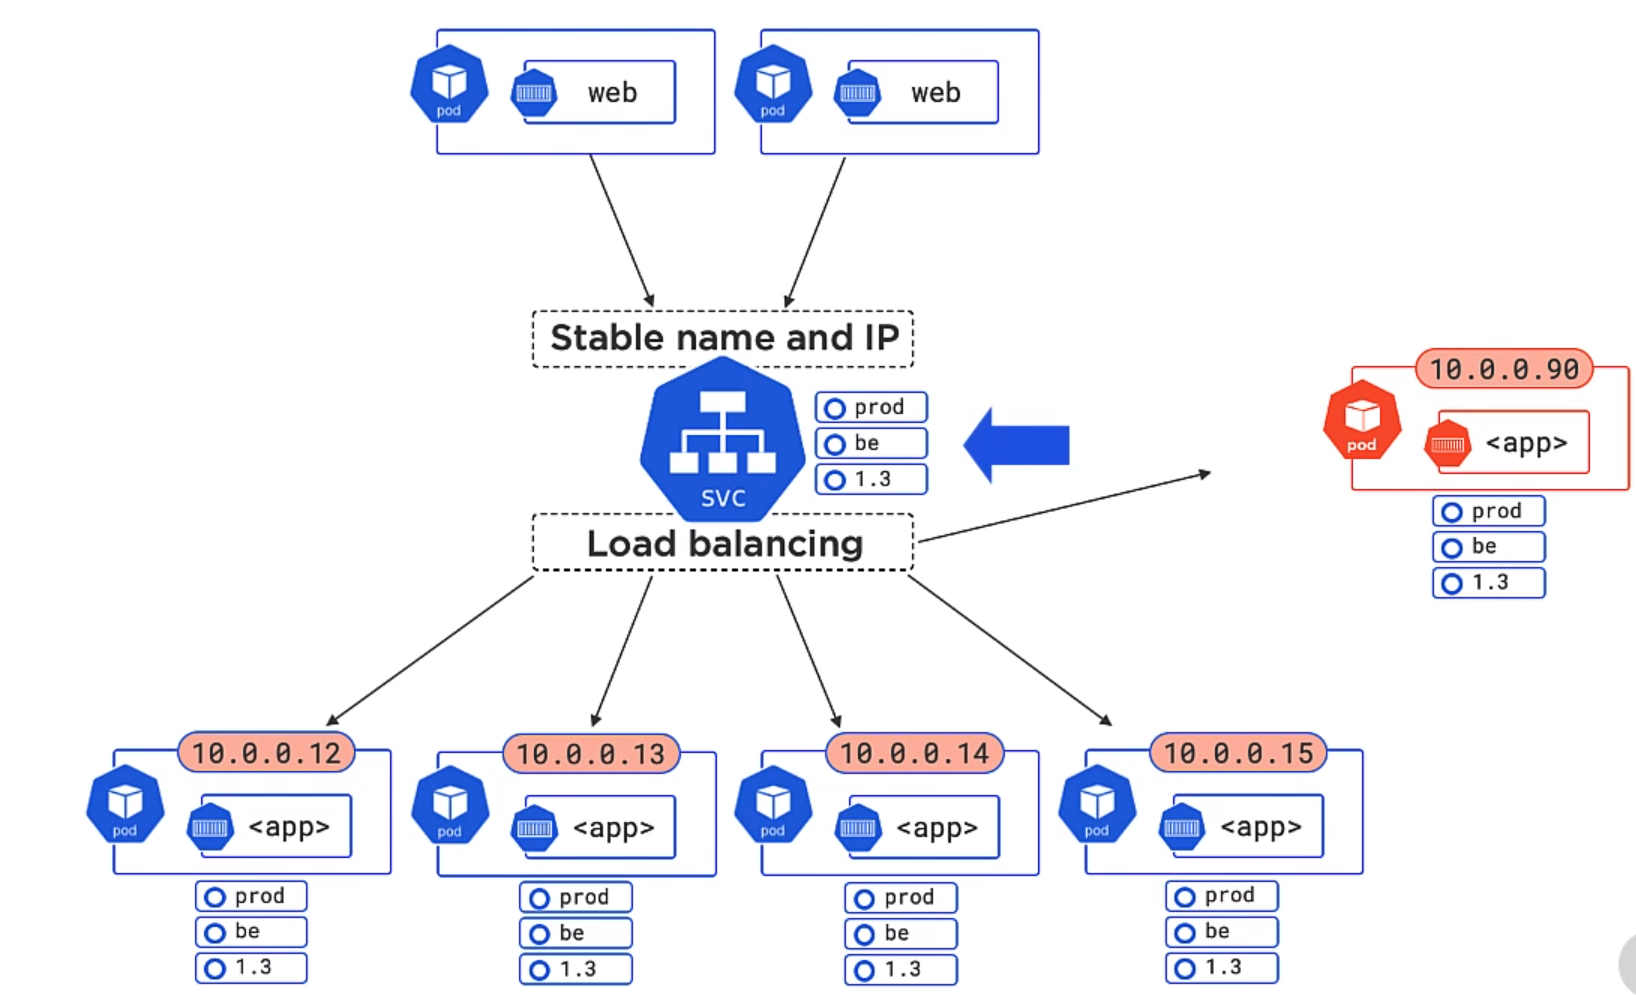
In the example below both 1.3 and 1.4 will be matched of the Pods. Equally we could add a version to the service object and the unmatched version would not be used.
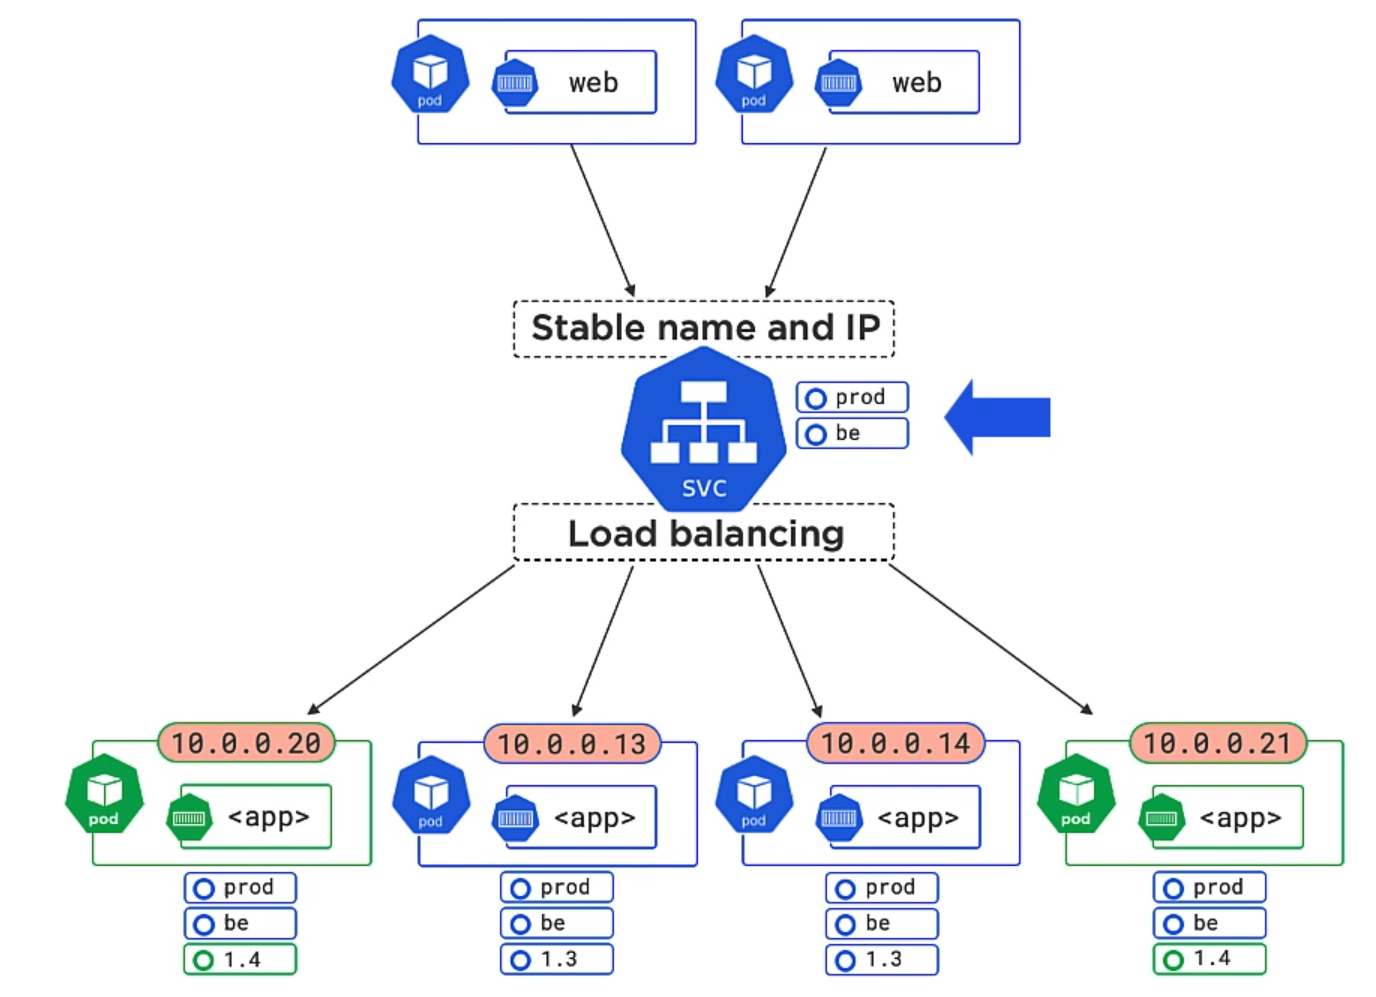 Service objects
- Only Send traffic to healthy Pods
- Can do session affinity (Sending of subsequent requests to the same Pod)
- Can send traffic to endpoints outside of the cluster
- Can do TCP and UDP
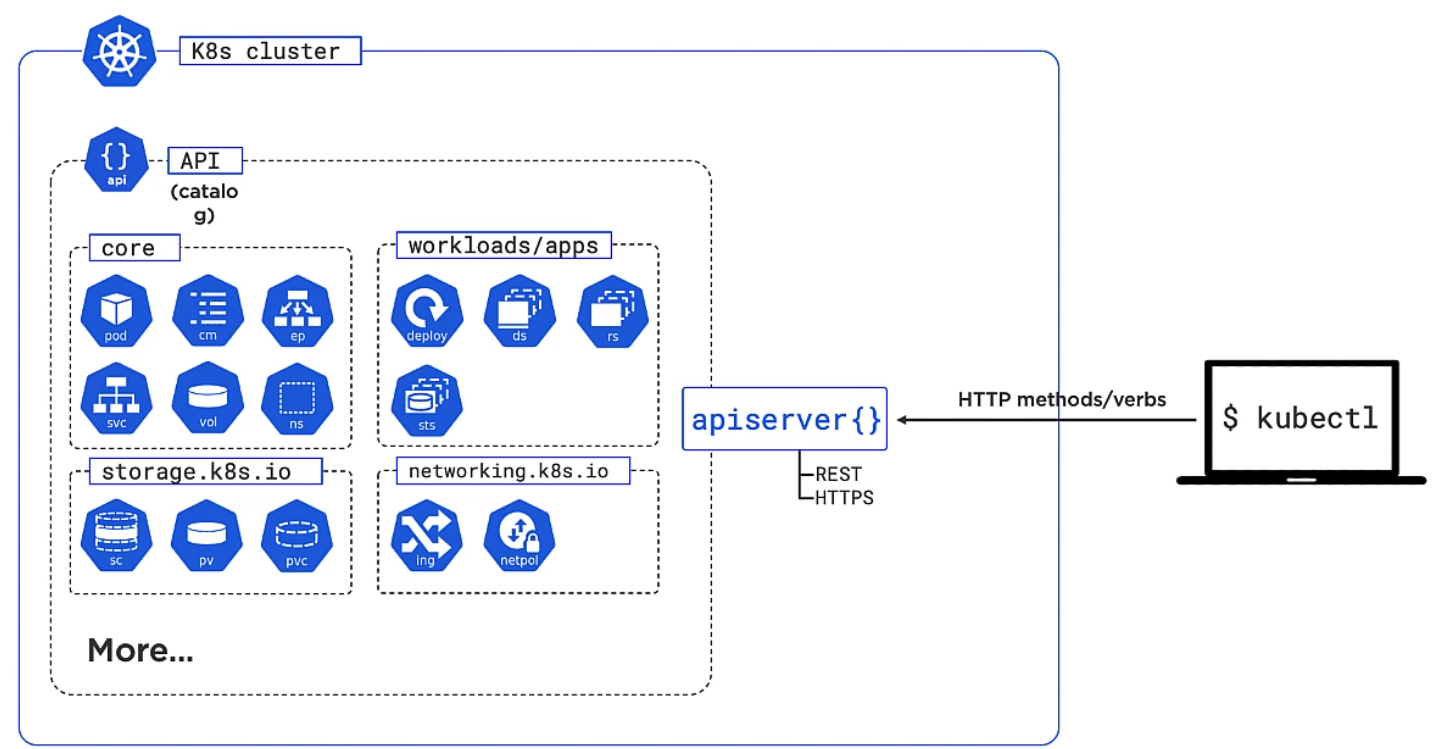
Kubernetes API Server
This is the API which exposes and RESTFul API. It exposes the various objects handles the requests. The objects are broken up into various sub categories. We use the command line kubectl to control this.
Installing Ubuntu
This was really easy. Had to use Firefox to get the dashboard to work on https://127.0.0.1:10443. Need to review how to get it to work on Chrome.
sudo snap install microk8s --classic
sudo usermod -a -G microk8s $USER
sudo chown -f -R $USER ~/.kube
su - $USER
microk8s status --wait-ready
microk8s enable dashboard dns ingress
microk8s kubectl get all --all-namespaces
microk8s dashboard-proxy
To be able to use the dashboard on chrome you need to go to chrome://flags/#allow-insecure-localhost and enable Allow invalid certificates for resources loaded from localhost. Firefox works by default.
Deployment
Introduction
We do this by
- Creating App Code
- Create an image
- Store in a repo
- Define in a manifest
- Post to the API Server
Example
Creating App Code
Clone the App Code
git clone https://github.com/nigelpoulton/getting-started-k8s.git
Create an Image
Easy pezzy lemon squeezy. Where nigelpulton is your own Docker hub account/repository
cd getting-started-k8s/App
docker image build -t nigelpulton/getting-started-k8s:1.0 .
Store in repo
Now push the image to your docker hub account.
docker image push nigelpoulton/getting-started-k8s:1.0
Define in a manifest
We can define this in either Yaml or Json. I used yq eval -j to convert mine but it does say kubectl convert should work. I am using microk8s and it said it did not work.
apiVersion: v1
kind: Pod
metadata:
  name: hello-pod
  labels:
    app: web
spec:
  containers:
    - name: web-ctr
      image: nigelpulton/getting-started-k8s:1.0
      ports:
       - containerPort: 8080
And the json version
{
  "apiVersion": "v1",
  "kind": "Pod",
  "metadata": {
    "name": "hello-pod",
    "labels": {
      "app": "web"
    }
  },
  "spec": {
    "containers": [
      {
        "name": "web-ctr",
        "image": "nigelpulton/getting-started-k8s:1.0",
        "ports": [
          {
            "containerPort": 8080
          }
        ]
      }
    ]
  }
}
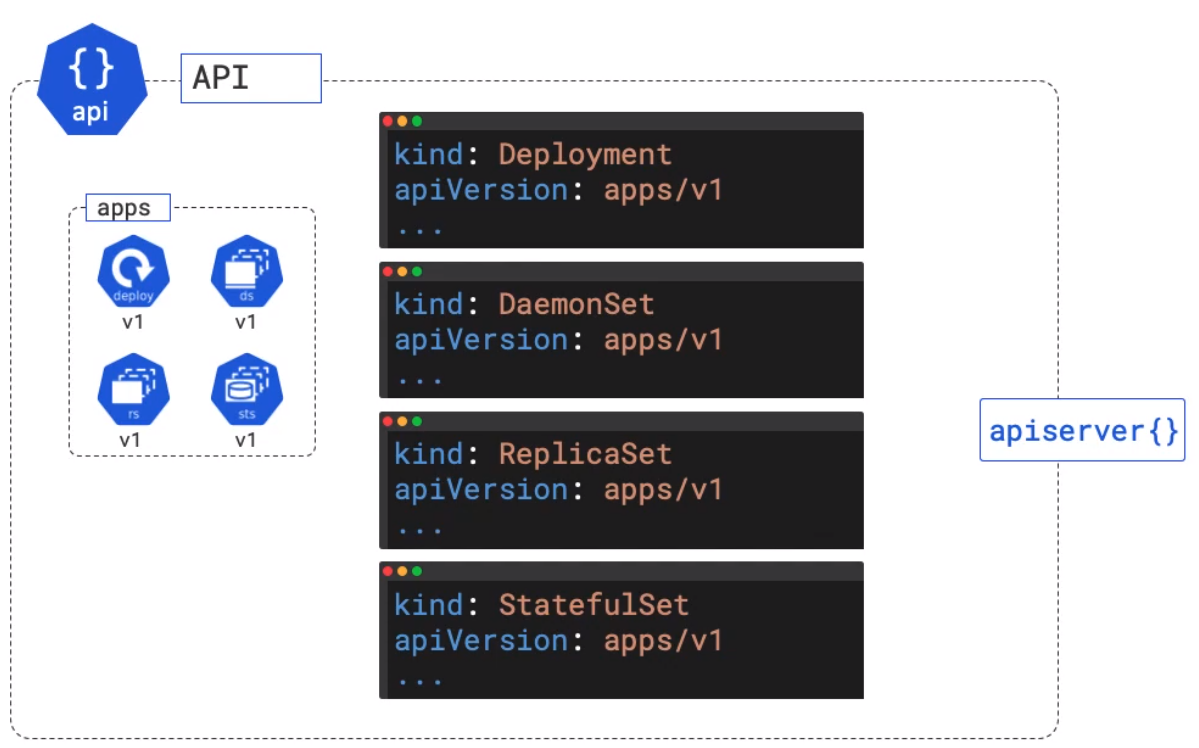
The "Kind" and "apiVersion" refer to the object. The objects you can use are grouped into types. Here is some of the objects in the apps group.
 The default image tag by default will use the docker hub. You can add a prefix with the dns name if it is stored somewhere else.
Post to the API Server
You can post the manifest to the cluster with
cd Pods
kubectl apply -f pod.yml

# Get the status
kubectl get pods --watch -o wide

# Get All the Pod information
kubectl describe pods hello-pod
Example Cleanup
To clean up the deployment we can either
# Delete by using delete and the manifest
kubectl delete -f pod.yml
# Or delete using the name
kubectl delete pod hello-pod
Kubernetes Services
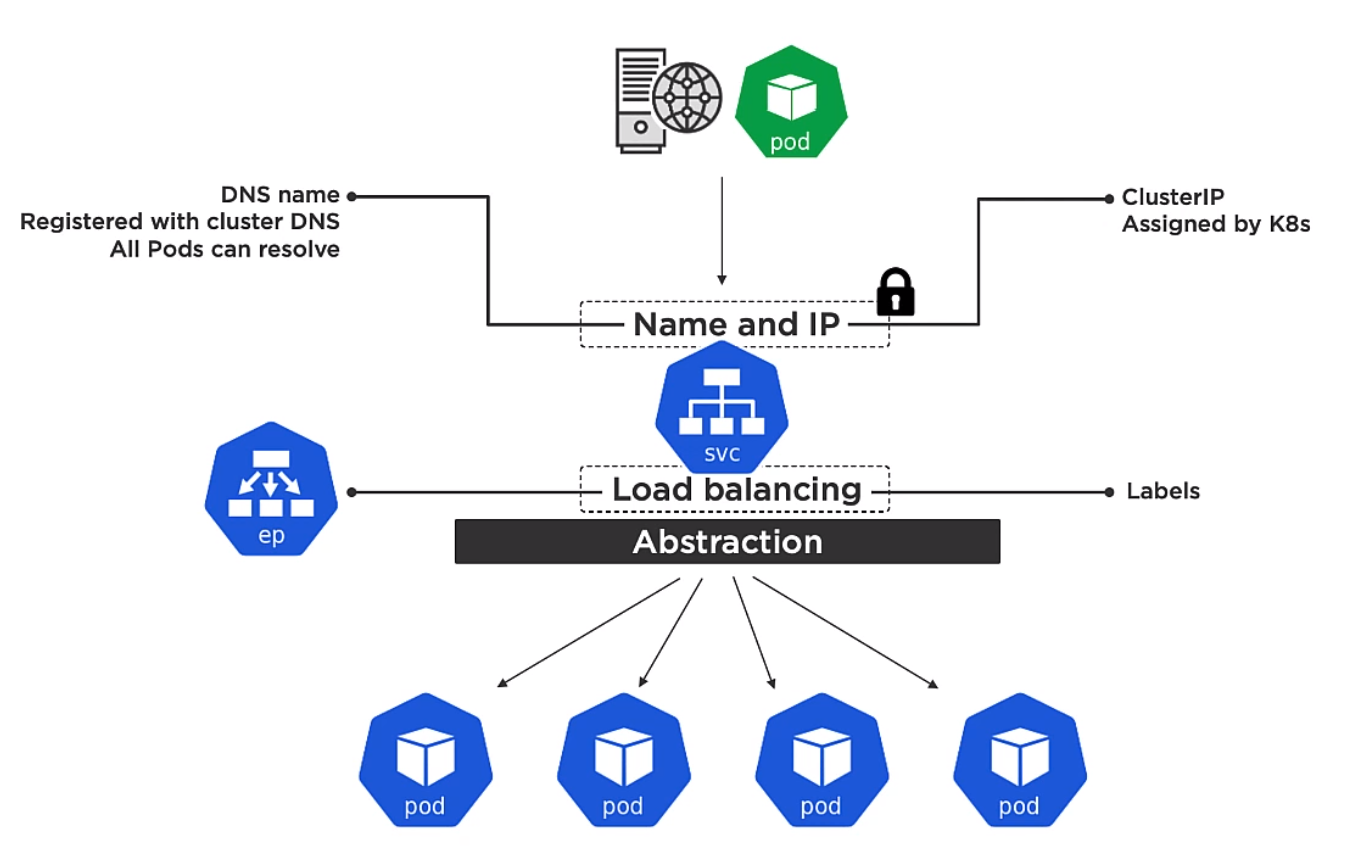
The Service has a frontend and a backend.
Frontend
The frontend is
- Name
- IP
- Port
The IP on the frontend is called a ClusterIP and is assigned by Kubernetes. It is only for use within the cluster. The name is the name of the service and that is registered with DNS.
Every container in every pod can resolve service names
Backend
Is a way for the service to know which pods to send track on to. The endpoint slice tracks the list of healthy Pod which match the services label selector.
Types of Service
- LoadBalancer External access via cloud load-balancer
- NodePrt External access via nodes
- ClusterIP (default) internal cluster connectivity
Creating a Services
We can create service in two ways
- Imperatively
- Declaratively
Imperatively
With imperative we can simply use the kubectl.
kubectl expose pod hello-pod --name=hello-svc --target-port=8080 --type=NodePort

microk8s kubectl get svc
>NAME         TYPE        CLUSTER-IP       EXTERNAL-IP   PORT(S)          AGE
>kubernetes   ClusterIP   10.152.183.1     <none>        443/TCP          21h
>hello-svc    NodePort    10.152.183.147   <none>        8080:30737/TCP   11s
From there we can get to the service using the node port which is the outbound port shown for the service. In our case this is 30737. So going to the ip of the machine and port should show the service. e.g. htttp://192.xxx.xxx.1.70:30737. Node ports are allocated by Kubernetes between 32000 and 32767
Declaratively
Here is the yaml file to create the above service.
apiVersion: v1
kind: Service
metadata:
  name: ps-nodeport
spec:
  type: NodePort
  ports:
    - port: 80
      targetPort: 8080
      nodePort: 31111
  selector:
    name: web
And here is a picture to explain the ports.
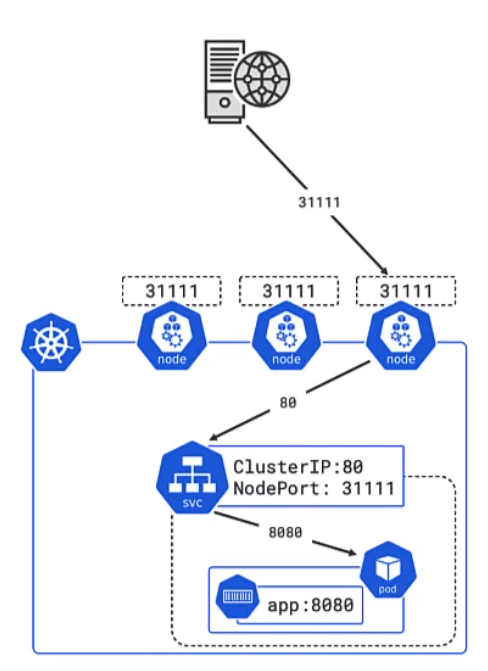
- 31111 is the port for external access
- 80 is the port the cluster is listening on
- 8080 is the port exposed by the pod and the defined in the docker container
We can check we have the right name (label) in the service with the command
kubectl get pods --show=labels
Clean up
Deleting service can be done with
kubectl delete svc hello-svc
