Angular
Introduction
Angular Versions
- Angular 1.0 is the old version of angular along with AngularJS
- Angular, starts at 2 and skips 3 and is now at 9 is the version this page is about
Benefits
- Compiles with ES6
- Use modules
- Built in Internationalisation and Accessibility
- Comes with Router, http, forms, rxjs, etc
- Supports Progress Web Apps, (Mobile, Web like React)
- Server-side rendering (render page on server)
- One-way data flow (like React update from parent down)
- Dependency injection
- Uses zone.js to detect change before rendering
- Like React, multiple rendering targets, Browser/DOM, Server Side, Mobile Apps, Desktops
Angular CLI
When we build JavaScript we have to manage
- Module Handling
- Minifying
- Shims (compatibility to legacy code)
- Zone.js wrapper
- Bundling
- Transpilation, compiling to ESx (babel)
Then Angular CLI can
- Create new application
- New components/service/pipe
- Serve up the Application
- Linting
- Testing
- Building
Sample App
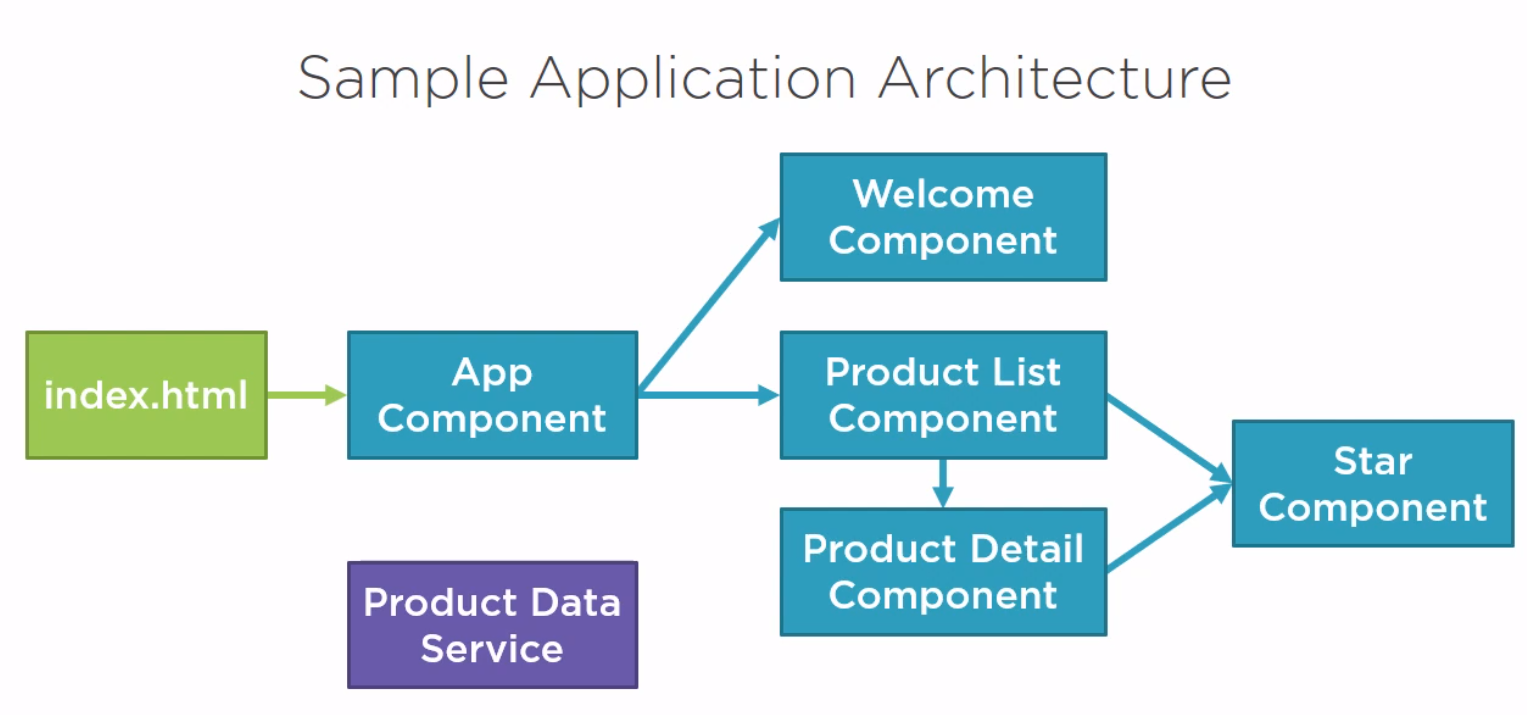
This is the sample app I built

The files for the example can be found at [1]
Components
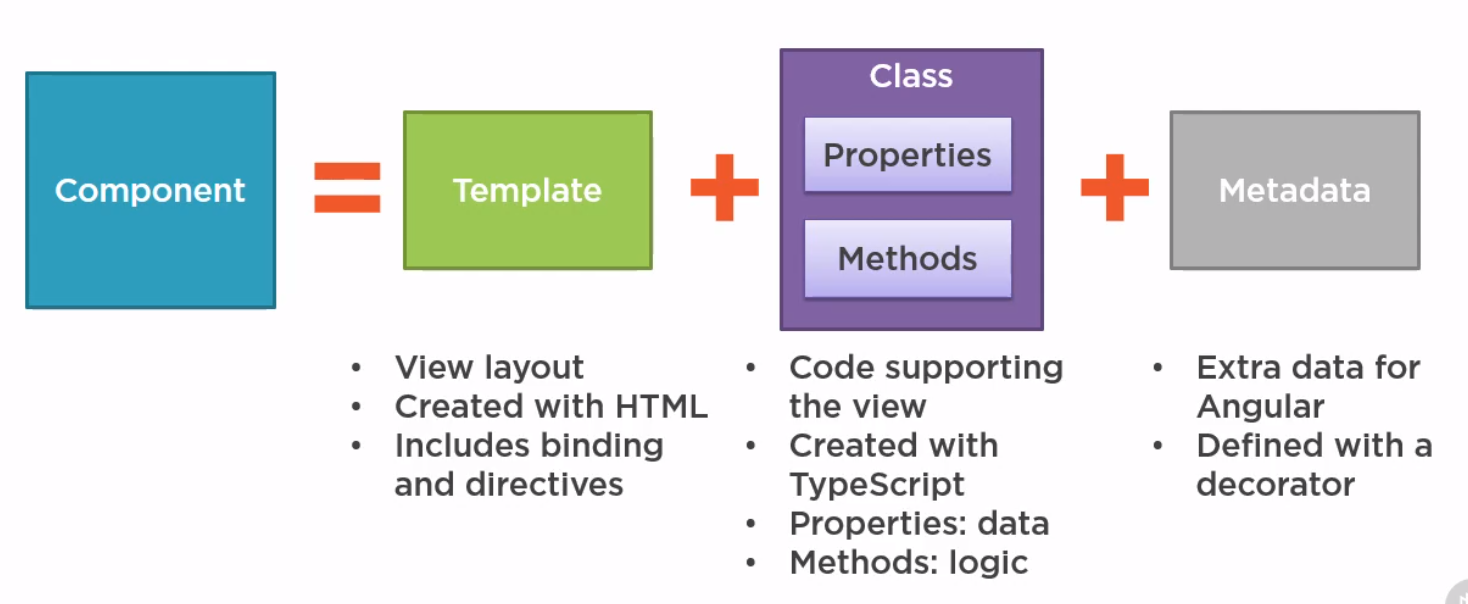
Introduction
- Template
- Class
- Metadata
How An Application Starts
Here is the index.html which has the pm-root tag inside it to denote a component.
<!doctype html>
<html lang="en">
<head>
  <meta charset="utf-8">
  <title>APM</title>
  <base href="/">
  <meta name="viewport" content="width=device-width, initial-scale=1">
  <link rel="icon" type="image/x-icon" href="favicon.ico">
</head>
<body>
  <pm-root></pm-root>
</body>
</html>
Here is a sample app.module (possibly main) used.
import { BrowserModule } from '@angular/platform-browser';
import { NgModule } from '@angular/core';

import { AppComponent } from './app.component';

@NgModule({
  declarations: [
    AppComponent
  ],
  imports: [
    BrowserModule
  ],
  bootstrap: [AppComponent]
})
export class AppModule { }
And finally the component we defined.
import { Component } from '@angular/core';

@Component({
  selector: 'pm-root',
  template: `
    <div>
      <h1>{{pageTitle}}</h1>
      <div>My First Component</div>
    </div>
    `
})
export class AppComponent {
  pageTitle: string = 'Angular: Getting Started 2';
}
Interfaces
Defining
We can define interfaces in Angular
export interface IProduct {
    productId: number;
    productName: string;
...
    calculateDiscount(percent: number): number;
}
Usage
So we just need to change our any definition in the product component to be IProduct
import { Component } from '@angular/core';
import { IProduct} from './product'

@Component({
  selector: 'pm-products',
  templateUrl: './product-list.component.html'
})
export class ProductListComponent {
    pageTitle: string = "Product List"
    imageWidth: number = 50;
    imageMargin: number = 2;
    showImage: boolean = false;
    listFilter: string = "cart"
    products: IProduct[] = [
        {
          "productId": 1,
          "productName": "Leaf Rake",
...
LifeCyle Hooks
Introduction
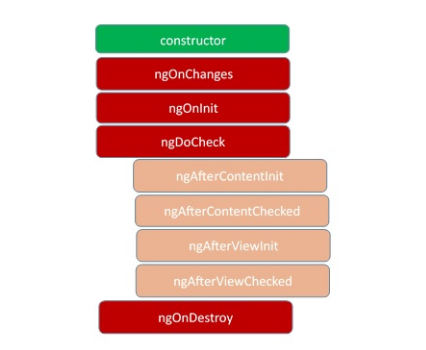
In Angular, every component has a life-cycle, a number of different stages it goes through. There are 8 different stages in the component lifecycle. Every stage is called as lifecycle hook event.

ngOnChanges
This event executes every time when a value of an input control within the component has been changed. Actually, this event is fired first when a value of a bound property has been changed. It always receives a change data map, containing the current and previous value of the bound property wrapped in a SimpleChange.
ngOnInit
This event initializes after Angular first displays the data-bound properties or when the component has been initialized. This event is basically called only after the ngOnChanges()events. This event is mainly used for the initialize data in a component.
ngDoCheck
This event is triggered every time the input properties of a component are checked. We can use this hook method to implement the check with our own logic check. Basically, this method allows us to implement our own custom change detection logic or algorithm for any component.
ngAfterContentInit
This lifecycle method is executed when Angular performs any content projection within the component views. This method executes when all the bindings of the component need to be checked for the first time. This event executes just after the ngDoCheck() method. This method is basically linked with the child component initializations.
ngAfterContentChecked
This lifecycle hook method executes every time the content of the component has been checked by the change detection mechanism of Angular. This method is called after the ngAfterContentInit() method. This method is also called on every subsequent execution of ngDoCheck(). This method is also mainly linked with the child component initializations.
ngAfterViewInit
This lifecycle hook method executes when the component’s view has been fully initialized. This method is initialized after Angular initializes the component’s view and child views. It is called after ngAfterContentChecked(). This lifecycle hook method only applies to components.
ngAfterViewChecked
This method is called after the ngAterViewInit() method. It is executed every time the view of the given component has been checked by the change detection algorithm of Angular. This method executes after every subsequent execution of the
ngAfterContentChecked()
This method also executes when any binding of the children directives has been changed. So this method is very useful when the component waits for some value which is coming from its child components.
ngOnDestroy
This method will be executed just before Angular destroys the components. This method is very useful for unsubscribing from the observables and detaching the event handlers to avoid memory leaks. Actually, it is called just before the instance of the component is finally destroyed. This method is called just before the component is removed from the DOM.
Nested Components
Introduction
We often want to put component within other component. The nested component receives information from it's input properties and talks to the container (parent) via events. In the example we create a
- component,
- style,
- template
Component
import { Component, OnChanges, Input, EventEmitter, Output } from '@angular/core';

@Component({
  selector: 'pm-star',
  templateUrl: './star.component.html',
  styleUrls: ['./star.component.css']
})
export class StarComponent implements OnChanges {
  @Input() rating = 0;
  starWidth = 0;
  @Output() ratingClicked: EventEmitter<string> =
    new EventEmitter<string>();

  ngOnChanges(): void {
    this.starWidth = this.rating * 75 / 5;
  }

  onClick(): void {
    this.ratingClicked.emit(`The rating ${this.rating} was clicked!`);
  }
}
Style
.crop {
  overflow: hidden;
}
div {
  cursor: pointer;
}
Template
<div class="crop"
     [style.width.px]="starWidth"
     [title]="rating"
     (click)="onClick()">
  <div style="width: 75px">
    <span class="fa fa-star"></span>
    <span class="fa fa-star"></span>
    <span class="fa fa-star"></span>
    <span class="fa fa-star"></span>
    <span class="fa fa-star"></span>
  </div>
</div>
Using the Component
To use the component we need to
- add the component to the app module
- add the tag to the template and pass the relevant parameters
Add to App Module
import { StarComponent } from './shared/star.component';
import { ConvertToSpacesPipe } from './shared/convert-to-spaces.pipe';
...

@NgModule({
  declarations: [
    AppComponent,
    ProductListComponent,
    ConvertToSpacesPipe,
    StarComponent,
  ],
  imports: [
    BrowserModule,
...
Add to the template
Note the starRating is bound to the @input property of the component. This is similar to props used in react.
<td><pm-star [rating]='product.starRating'></pm-star></td>
Outputting from Nested Component
We can only use events to talk to the parent container but we can do this by creating events within the component. In the example we created
@Output() ratingClicked: EventEmitter<string> = new EventEmitter<string>()
We can bind to this in the parent where ratingClicked is the name of the output function and OnRatingClicked is the parents function to execute.
In the parent template
            <td>
              <pm-star [rating]='product.starRating'
                       (ratingClicked)='onRatingClicked($event)'>
              </pm-star>
            </td>
In the parent class
     onRatingClicked(message: string): void {
        this.pageTitle = 'Product List Me: ' + message;
      }
Styles
Styles can be added either by adding an array of styles using the keyword styles or by referencing a style sheet using styleUrls.
import { Component, OnInit } from '@angular/core';

import { IProduct } from './product';
import { ProductService } from './product.service';

@Component({
  templateUrl: './product-list.component.html',
  styleUrls: ['./product-list.component.css']
})
....
Example ./product-list.component.css
thead {
  color: #337AB7;
}
Templates
Inline Templates
We can define templates using double quotes on one line or by using back ticks.
  template: `
    <div>
      <h1>{{pageTitle}}</h1>
      <div>My First Component</div>
    </div>
    `
Linked Templates
In general it would look like using and linked template would be better. You simply reference the template using the templateUrl keyword instead of template.
Adding Styling Components
We used bootstrap and font-awesome. To make them available in angular we added the imports to the styles.css
@import "~bootstrap/dist/css/bootstrap.min.css";
@import "~font-awesome/css/font-awesome.min.css";
Creating the Template
We call the template the same name as the component. In the same app this was product-list.component.html. This starts with html
<div class='card'>
    <div class='card-header'>
      Page Title
    </div>
    <div class='card-body'>
      <div class='row'>
        <div class='col-md-2'>Filter by:</div>
        <div class='col-md-4'>
          <input type='text'/>
        </div>
      </div>
      <div class='row'>
        <div class='col-md-6'>
          <h4>Filtered by: </h4>
        </div>
      </div>
      <div class='table-responsive'>
        <table class='table'>
          <thead>
            <tr>
              <th>
                <button class='btn btn-primary'>
                  Show Image
                </button>
              </th>
              <th>Product</th>
              <th>Code</th>
              <th>Available</th>
              <th>Price</th>
              <th>5 Star Rating</th>
            </tr>
          </thead>
          <tbody>
          </tbody>
        </table>
    </div>
</div>
Creating the Component
So we create the component
import { Component } from '@angular/core';

@Component({
  selector: 'pm-products',
  templateUrl: './product-list.component.html'
})
export class ProductListComponent {
}
Add Component to App
Seems a popular error but whenever we use a component we must add it to the app. In this case it was app.modules.ts with an import. Note the import AND the add to declarations
import { ProductListComponent } from './products/product-list.component';
import { BrowserModule } from '@angular/platform-browser';
import { NgModule } from '@angular/core';

import { AppComponent } from './app.component';

@NgModule({
  declarations: [
    AppComponent,
    ProductListComponent
  ],
  imports: [
    BrowserModule
  ],
  bootstrap: [AppComponent]
})
export class AppModule { }
Interpolation
We can use this to bind the properties to functions to the component in the template. E.g. This gets the property pageTitle from the class component
<div>{{pageTitle}}</div>
This calls foo() in the class
<div>{{getFoo()}}</div>
Directives
These are ways to control template logic. Below are the 3 of the key ones
- NgIf—conditionally creates or destroys subviews from the template.
- NgFor—repeat a node for each item in a list.
- NgSwitch—a set of directives that switch among alternative views.
You can find the docs at [2]
ngIf
Example
<table class='table' *ngIf='products && products.length'>
ngFor
Within javascript there is a for...of and and a for...in. The for..of iterates over the objects. The for..in loop iterates over the properties of an object. Example
          <tbody>
              <tr *ngFor="let product of products">
                  <td></td>
                  <td>{{product.productName}}</td>
                  <td>{{product.productCode}}</td>
                  <td>{{product.releaseData}}</td>
                  <td>{{product.price}}</td>
                  <td>{{product.starRating}}</td>
              </tr>
          </tbody>
Data Binding & Pipes
Property Binding
Property binding is binding properties and should not be confused with the interpolation. Property binding is one-way. Note some of the values need product because they are from the variable in the for loop. The values such as imageWidth are a property of the component and do not need the component.
<td><img [src]='product.imageUrl'
         [title]='product.imageUrl'
         [style.width.px]='imageWidth'
         [style.margin.px]='imageMargin'>
</td>
Event Binding
No surprises,
In the template define an event on the left and a function to call on the right.
<button class="btn btn-primary"
   (click)='toggleImage()'>
   Show Image
</button>
In the class create a function
export class ProductListComponent {
...
   // Generally at the end
   toggleImage(): void {
      this.showImage = !this.showImage
   }
}
Two-way Binding
To implement two-way binding we use ngModel. We will need to import the FormsModule to use this. We do this by specifying the module in the imports array as it is a third-party component not made by us.
import { ProductListComponent } from './products/product-list.component';
import { BrowserModule } from '@angular/platform-browser';
import { NgModule } from '@angular/core';
import { FormsModule } from '@angular/forms';

import { AppComponent } from './app.component';

@NgModule({
  declarations: [
    AppComponent,
    ProductListComponent
  ],
  imports: [
    BrowserModule,
    FormsModule
  ],
  bootstrap: [AppComponent]
})
export class AppModule { }
Add Out Listfilter to the class
export class ProductListComponent {
    pageTitle: string = "Product List"
    imageWidth: number = 50;
    imageMargin: number = 2;
    showImage: boolean = false;
    listFilter: string = "cart"
...
Now we can add our filter to the page using the ngModel.
        <input type='text'
            [(ngModel)]="listFilter"/>
        </div>
Pipes
Introduction
Pipes are used to transform data such as bound properties. There are several built-in data types for dates, numbers,json, slice etc or build our own. As the name suggests, it is achieved by using the "|" character. Parameters can be passed by using the full colon.
{{product.price | currency:'USD':'symbol':'1.2-2' }}
Custom Pipes
We can build our own pipe by
- implementing the PipeTransform interface on a class using the @Pipe decorator
- adding the component to our app module
import { Pipe, PipeTransform } from '@angular/core';

@Pipe({
  name: 'convertToSpaces'
})
export class ConvertToSpacesPipe implements PipeTransform {

  transform(value: string, character: string): string {
    return value.replace(character, ' ');
  }
}
Filtering
It is suggested that it is better to filter within the component rather than to have pipes which could do this for us. In the example code we
- Added a variable to hold the filtered products
- Added a getter/setter to the filter property to encapsulate access
- Create a function to do the filtering
- Add constructor to default values
  constructor() {
     this.filteredProducts = this.products
     this.listFilter = 'cart'
  }

  filteredProducts: IProduct[]

  _listFilter = '';
  get listFilter(): string {
    return this._listFilter;
  }
  set listFilter(value: string) {
    this._listFilter = value;
    this.filteredProducts = this.listFilter ? this.performFilter(this.listFilter) : this.products;
  }

  performFilter(filterBy: string): IProduct[] {
    filterBy = filterBy.toLocaleLowerCase();
    return this.products.filter((product: IProduct) =>
      product.productName.toLocaleLowerCase().indexOf(filterBy) !== -1);
  }
Services
Introduction
Angular provides the management of services. We can use dependency injections to provide services.
Building a Service
To build a service we need to define a class and add the @Injectable decorator.
import { Injectable } from '@angular/core';
import { IProduct } from './product';

@Injectable()
export class ProductService {

  getProducts(): IProduct[] { return [
    {
      "productId": 1,
      "productName": "Leaf Rake",
      "productCode": "GDN-0011",
      "releaseDate": "March 19, 2019",
      "description": "Leaf rake with 48-inch wooden handle.",
      "price": 19.95,
      "starRating": 3.2,
      "imageUrl": "assets/images/leaf_rake.png"
    },
    {
      "productId": 2,
      "productName": "Garden Cart",
      "productCode": "GDN-0023",
      "releaseDate": "March 18, 2019",
      "description": "15 gallon capacity rolling garden cart",
      "price": 32.99,
      "starRating": 4.2,
      "imageUrl": "assets/images/garden_cart.png"
    },
....
  ]
  }
}
Registering a Service
You can register services to either the root or just to component and its children. To register it with the root we set the providedIn: to root on the @Injectable decorator.
@Injectable({
  providedIn: 'root'
})
Injecting A Service
We do this the same way as we do it in javascript. We create a constructor, pass in the service and assign it to a variable in the class. This is not much different to C#
export class ProductListComponent {
    private _productService : ProductService;

    constructor(inProductService: ProductService) {
       this._productService = inProductService
   }

// For short
   constructor(private _productService: ProductService)
}
We also need to initialize our products from this service. To do this once then we should use the OnInit function.
     ngOnInit(): void {
        this.products = this._productService.getProducts();
        this.filteredProducts = this.products
     }
Routing
Register the Service
As ever we need to register the service in the apps module.
import { RouterModule } from '@angular/router';

// And
....
  imports: [
    BrowserModule,
    FormsModule,
    HttpClientModule,
    RouterModule,
  ],
Retrieving Data
Add the HttpClientModule
No surprises
import { HttpClientModule } from '@angular/common/http';
...
  imports: [
    BrowserModule,
    FormsModule,
    HttpClientModule
  ],
Inject The Client the Service
Using the short code we learned in services we add a constructor to add the service to our service along with the imports.
constructor(private _httpClient: HttpClient) {}
Make the Http Call
This is as simple as passing the Url to the client.
  getProducts(): Observable<IProduct[]> {
    return this._httpClient.get<IProduct[]>(this.productUrl)
  }
Subscribing
We need to subscribe to the returning observable and make sure the filtered products are set post deliver of the data (which is async)
    ngOnInit(): void {
        this._productService.getProducts().subscribe({
            next: products => {
              this.products = products;
              this.filteredProducts = this.products;
            },
          });
    }
