Angular Reactive forms
Angular Forms
Introduction
Angular provides two types of forms
- Template Driven
- Easy to use
- Familar to Angular JS
- Two-way data binding-> minimal component code
- Automatically tracks from and input element state
- Reactive (model driven
- More flexible
- Immutable data model
- Easier to perform an action on value change
- Access Reactive transformations such as DebounceTime or DistinctUntilChanged
- Easily add input elements dynamically
- Easier unit testing
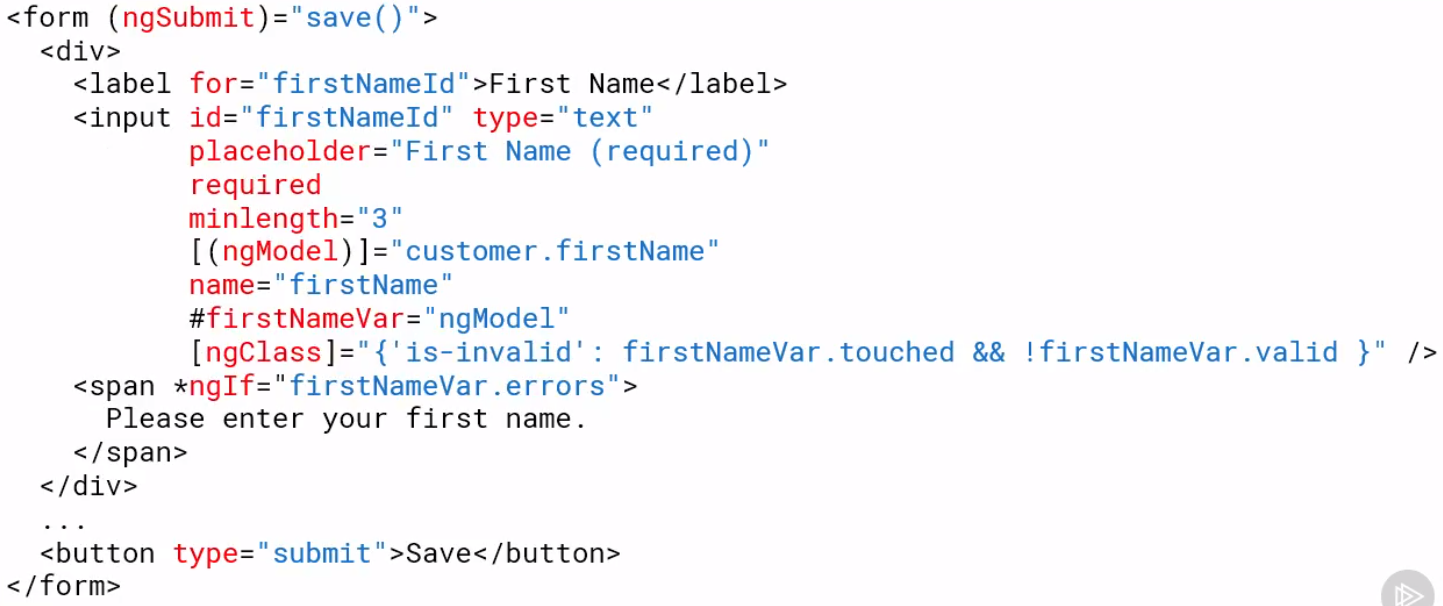
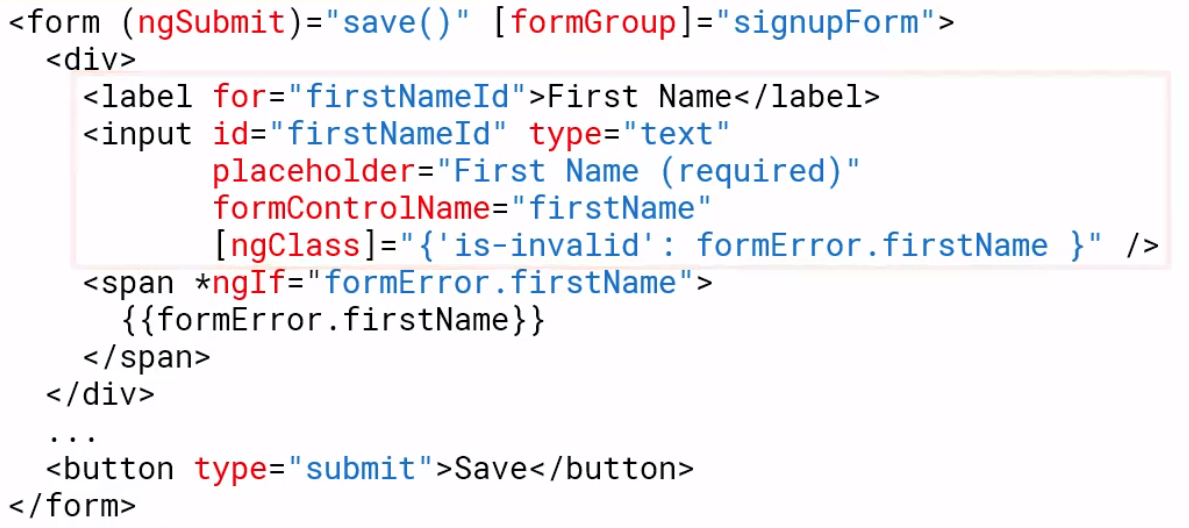
Template driven forms put the responsibility in the template using basic HTML and data binding, Reactive forms move most of the responsibility to the component class
Template-Driven-Forms
In the Template we have
- Form elements
- Input elements
- Data binding to the component
- Validation rules (attributes)
- Validation error messages
- Form model (automatically generated)
In the Component Class we have
- Properties for data binding
- Method for form Operations such as submit
Directives used are
- ngForm
- ngModel
- ngModelGroup
Example form
<form (ngSubmit)="save()">
  <input id="firstNameId" type="text"
  [(ngMode)]="customer.firstname"
  name="firstname"
  #firstNameVar="ngModel" />
</form>
Reactive Forms
In the template we have
- Form elements
- Input elements
- Binding to form model
In the class we have
- Form model which we create
- Validation rules
- Validation error messages
- Properties for managing data (data model)
- Methods for form Operations such as submit
Directives used (ReactiveFormsModule)
- formGroup
- formControl
- formControlName
- formGroupName
- formArrayName
Template vs Reactive Example
Template form example
Reactive form example
Create a Reactive Form
Preparation
Make sure we import the ReactiveFormsModule in app.module.ts
Component Creation
Create a FormGroup in ngInit. Note we can initialize the controls at creation
export class CustomerComponent implements OnInit {
...
  customerForm :FormGroup

  ngOnInit(): void {
    this.customerForm = new FormGroup({
      firstName: new FormControl(),
      lastName: new FormControl(),
      emailName: new FormControl(),
      sendCatog: new FormControl(true)
    })
  }
...
To set the values of the components you can use setValue or patchValue. Patch value will set a subset of the fields
export class CustomerComponent implements OnInit {
      customerForm.patchValue({
         firstName: 'Jack'
      }
  }
...
Now we can use FormBuilder using injection to simplify the code.
...
  constructor(private formBuilder: FormBuilder) {}

  ngOnInit(): void {

    this.customerForm = this.formBuilder.group({
       firstName: '',
       lastName: '',
       email: '',
       sendCatalog: true,
    })
Template Creation
We specify the form using the formGroup
  <div class="card-body">
    <form novalidate
          (ngSubmit)="save()"
          [formGroup]="customerForm">
...
We add fields with formControlName tag. Note getting this wrong, e.g. the name or the tag will result in the form not being rendered correctly. You can test this by adding a
          <input class="form-control"
                 id="emailId"
                 type="email"
                 placeholder="Email (required)"
                 required
                 email
                 formControlName='email'
                 [ngClass]="{'is-invalid': (customerForm.get('email').touched || customerForm.get('email').dirty) && !customerForm.get('email').valid }" />
Accessing Form Model Properties
In the template we can use
customerForm.controls.firstName.valid
customerForm.get('firstName').valid
Or create a reference in the component to be used, in this case firstName
this.customerFrom = new FormGroup({
   firstName: this.firstName
})
Validation
Basic
We can set basic rules by passing an array of validators at creation time. Below we pass the default value and an array of validators e.g.
this.customerForm  this.formBuilder.group({
   firstName: ['default value'],
     [Validators.required, Validators.minLength(3)]],
   nextField: ''
...
At Runtime
We can do this with
  myEdit.setValidators(...);
  myEdit.clearValidators();
  myEdit.updateValueAndValidity()
Below is an example of handling a radio button on the form
Component
  setNotification(notifyVia: string): void {
    const phoneControl = this.customerForm.get('phone');
    if (notifyVia === 'text') {
      phoneControl.setValidators(Validators.required);
    } else {
      phoneControl.clearValidators();
    }
    phoneControl.updateValueAndValidity();
  }
Template
      <div class="form-group row mb-2">
        <label class="col-md-2 col-form-label pt-0">Send Notifications</label>
        <div class="col-md-8">
          <div class="form-check form-check-inline">
            <label class="form-check-label">
              <input class="form-check-input"
                     type="radio"
                     value="email"
                     formControlName="notification"
                     (click)="setNotification('email')">Email
            </label>
          </div>
          <div class="form-check form-check-inline">
            <label class="form-check-label">
              <input class="form-check-input"
                     type="radio"
                     value="text"
                     formControlName="notification"
                     (click)="setNotification('text')">Text
            </label>
          </div>
        </div>
      </div>
Custom Validator
Introduction
Validators are functions, to create one we implement the function below returning 'null if everything is ok.
function myValidator(c: AbstractControl): {[key: string] : boolean} | null {
  if(somethingIsWrong) {
    return {'myValidator', true}
  }
  return null
}
Component
function ratingRange(c: AbstractControl): { [key: string]: boolean } | null {
  if (c.value !== null && (isNaN(c.value) || c.value < 1 || c.value > 5)) {
      return { range: true };
  }
  return null;
}
Template
      <div class="form-group row mb-2">
        <label class="col-md-2 col-form-label"
               for="ratingId">Rating</label>
        <div class="col-md-8">
          <input class="form-control"
                 id="ratingId"
                 type="number"
                 formControlName="rating"
                 [ngClass]="{'is-invalid': (customerForm.get('rating').touched ||
                                             customerForm.get('rating').dirty) &&
                                             !customerForm.get('rating').valid }" />
          <span class="invalid-feedback">
            <span *ngIf="customerForm.get('rating').errors?.range">
              Please rate your experience from 1 to 5.
            </span>
          </span>
        </div>
      </div>
Passing Parameters to Validator
To pass parameters we need to wrap the function in a function with the necessary parameters. Starting with
function myValidator(c: AbstractControl): {[key: string] : boolean} | null {
  if(somethingIsWrong) {
    return {'myValidator', true}
  }
  return null
}
And wrapping we get
function myValidator(param: any): ValidationFn {
   return (c: AbstractControl): {[key: string] : boolean} | null => {
          if(somethingIsWrong) {
       return {'myValidator', true}
    }
    return null
  }
}
Add Our parameters we get
function ratingRange(min: number, max: number): ValidatorFn {
  return (c: AbstractControl): { [key: string]: boolean } | null => {
    if (c.value !== null && (isNaN(c.value) || c.value < min || c.value > max)) {
      return { range: true };
    }
    return null;
  };
}
So now we can use this using
  ngOnInit(): void {

    this.customerForm = this.formBuilder.group({
...
       rating:[null, ratingRange(1,5)],
...
    })
  }
Cross Field Validation
Introduction
This is achieved using formGroups
Component
We create and group and add the two controls to the group. This allows the validator to gain access to the controls. For the validator we pass this as the second argument to the group as an object using the key validator and the name of the function to support this. In our case eamilmatcher
  ngOnInit(): void {

    this.customerForm = this.formBuilder.group({
      firstName: ['',[Validators.required,Validators.minLength(3)]],
...
       eailGroup: this.formBuilder.group({
        email: ['',[Validators.required,Validators.email]],
        confirmEmail: ['',[Validators.required]],
       }),
       phone: '',
...
Next we add a validation function. This accesses the controls via the formGroup
function emailMatcher(c: AbstractControl): { [key: string]: boolean } | null {
  const emailControl = c.get('email');
  const confirmControl = c.get('confirmEmail');

  if (emailControl.pristine || confirmControl.pristine) {
    return null;
  }

  if (emailControl.value === confirmControl.value) {
    return null;
  }
  return { match: true };
}
Template
      <div formGroupName="emailGroup">

        <div class="form-group row mb-2">
          <label class="col-md-2 col-form-label"
                 for="emailId">Email</label>
          <div class="col-md-8">
            <input class="form-control"
                   id="emailId"
                   type="email"
                   placeholder="Email (required)"
                   formControlName='email'
                   [ngClass]="{'is-invalid':
                      customerForm.get('emailGroup').errors ||
                      (customerForm.get('emailGroup.email').touched ||
                      customerForm.get('emailGroup.email').dirty) &&
                      !customerForm.get('emailGroup.email').valid }" />
          </div>
        </div>

        <div class="form-group row mb-2">
          <label class="col-md-2 col-form-label"
                 for="confirmEmailId">Confirm Email</label>
          <div class="col-md-8">

            <input class="form-control"
                   id="confirmEmailId"
                   type="email"
                   placeholder="Confirm Email (required)"
                   email
                   formControlName='confirmEmail'
                   [ngClass]="{'is-invalid':
                      customerForm.get('emailGroup').errors ||
                      (customerForm.get('emailGroup.confirmEmail').touched ||
                      customerForm.get('emailGroup.confirmEmail').dirty) &&
                      !customerForm.get('emailGroup.confirmEmail').valid }" />

            <span class="invalid-feedback">
              <span *ngIf="customerForm.get('emailGroup.confirmEmail').errors?.required">
                Please confirm your email address.
              </span>
              <span *ngIf="customerForm.get('emailGroup').errors?.match">
                The confirmation does not match the email address.
              </span>
            </span>

          </div>
        </div>

      </div>

