Vue Introduction
Intro
Hello John (No world)
Resource for the tutorial was https://github.com/johnpapa/vue-getting-started
The vue js lives at https://cdn.jsdelivr.net/npm/vue. Below is a simple example just showing two way binding
<!DOCTYPE html>
<html lang="en">
<head>
    <meta charset="UTF-8">
    <meta name="viewport" content="width=device-width, initial-scale=1.0">
    <title>Document</title>
    <script src="https://cdn.jsdelivr.net/npm/vue"></script>
</head>
<body>
    <div id="app">
        <input type="text" v-model="name">
        <p>Hello {{name}}</p>
    </div>
    <script>
        new Vue({
            el: "#app",
            data() {
                return {
                    name: "John"
                }
            }
        })
    </script>
</body>
</html>
Sections
Vue files are comprised of three sections. No prizes for what each bit does
<template>
<a v-bind:href="github" target="_blank">
</a>
<template/>

<script>
</script>

<style>
</style>
Displaying Data and Events
Data Model
We can define a data model and use it with standard double curly braces.
</template>
...
<div>{{hero.id}}</div>
...
</template>

<script>
export default {
  name: 'Heroes',
  data() {
    return {
      id: 20,
      firstName: 'Fred',
      lastName: 'Bloggs'
      message: ''
    }
  },
};
</script>
Data Binding
Binding we can use v-bind or the short cut : (full colon). So in the template put the colon and define a data component below
<template>
...
          <a
            v-bind:="github"
            target="_blank"
            rel="noopener noreferrer"
          >
            <i class="fab fa-github fa-2x" aria-hidden="true"></i>
          </a>

          <a
            :href="twitter"
            target="_blank"
            rel="noopener noreferrer"
          >
            <i class="fab fa-twitter fa-2x" aria-hidden="true"></i>
          </a>
...
</template>

<script>
export default {
  name: 'headerLinks',
  data() {
    return {
      github: 'https://github.com/johnpapa/vue-getting-started',
      twitter:'https://twitter.com/john_papa',
    }
  },
}
</script>
Two Way Binding
To bind two-way with v-model with the model and property.
</template>
   <input class="input" id="firstName" v-model="hero.firstName"/>
</template>
Event Binding
Example
To bind events we use v-on: or @ to bind our methods to an event.
</template>
<button @click="cancelHero">Cancel</button>
<button v-on:click="cancelHero">Cancel 2</button>
</template>
<script>
export default {
  name: 'Heroes',
  data() {
...
  },
  methods: {
    cancelHero() {
       this.message = ''
    },
  }
};
</script>
Keyup
Below is an example of binding to the keyup event. The .esc denotes the escape key. </template> <script>
               <select
                 id="power"
                 v-model="hero.power"
                 :class="{ invalid: !hero.power }"
                  @keyup.esc="clearPower"
               >
</script> </syntaxhighlight>
Checkbox, Radio
No surprises here
<template>
                  <input
                    type="radio"
                    id="color-red"
                    value="red"
                    v-model="hero.capeColor"
                  />

                  <input
                    type="checkbox"
                    class="is-primary"
                    id="active"
                    v-model="hero.active"
                  />
</template>
Styles and Classes
Styles and Classes are trickier because of the object approach of the data
<template>
                <select
                  id="power"
                  v-model="hero.power"
                   @keyup.esc="clearPower"
                >

                <div
                  class="color-line"
                  :style="{ 'background-color': hero.capeColor }"
                ></div>
</template>
Displaying List and Conditional Content
Iterating v-for
So just create a key and use the right syntax and the defined model
<template>
        <ul class="list is-hoverable">
          <li v-for="hero in heroes" :key="hero.id">
            <a class="list-item"><span>{{ hero.firstName }}</span></a>
          </li>
        </ul>
</template>
Binding to selection
We can do this by binding to the model on click. Note the conditional class based on if the current hero === selected hero.
<template>
          <li v-for="hero in heroes" :key="hero.id">
            <a
              class="list-item"
              @click="selectedHero = hero"
              :class="{ 'is-active': selectedHero === hero }"
              ><span>{{ hero.firstName }}</span></a
            >
          </li>

</template>
Conditional Displaying v-if and v-show
v-if
Same as *ngIf. So if no selection on the list
<template>
    <div class="columns" v-if="selectedHero">
      <div class="column is-3">
        <header class="card-header">
          <p class="card-header-title">{{ selectedHero.firstName }}</p>
        </header>
        <div class="card-content">
          <div class="content">
...
</template>
v-show
This will put the data in dom.
<template>
            <div class="field" v-show="showMore">
              <label class="label" for="lastName">last name</label>
              <input
                class="input"
                id="lastName"
                v-model="selectedHero.lastName"
              />
            </div>
</template>
Interacting within a Component
Computed
This is a section in the scripts section which allow you to define function to compute value maybe from existing model data
<script>
  computed: {
    fullName() {
      return `${this.selectedHero.firstName} ${this.selectedHero.lastName}`;
    },
  },

</script>
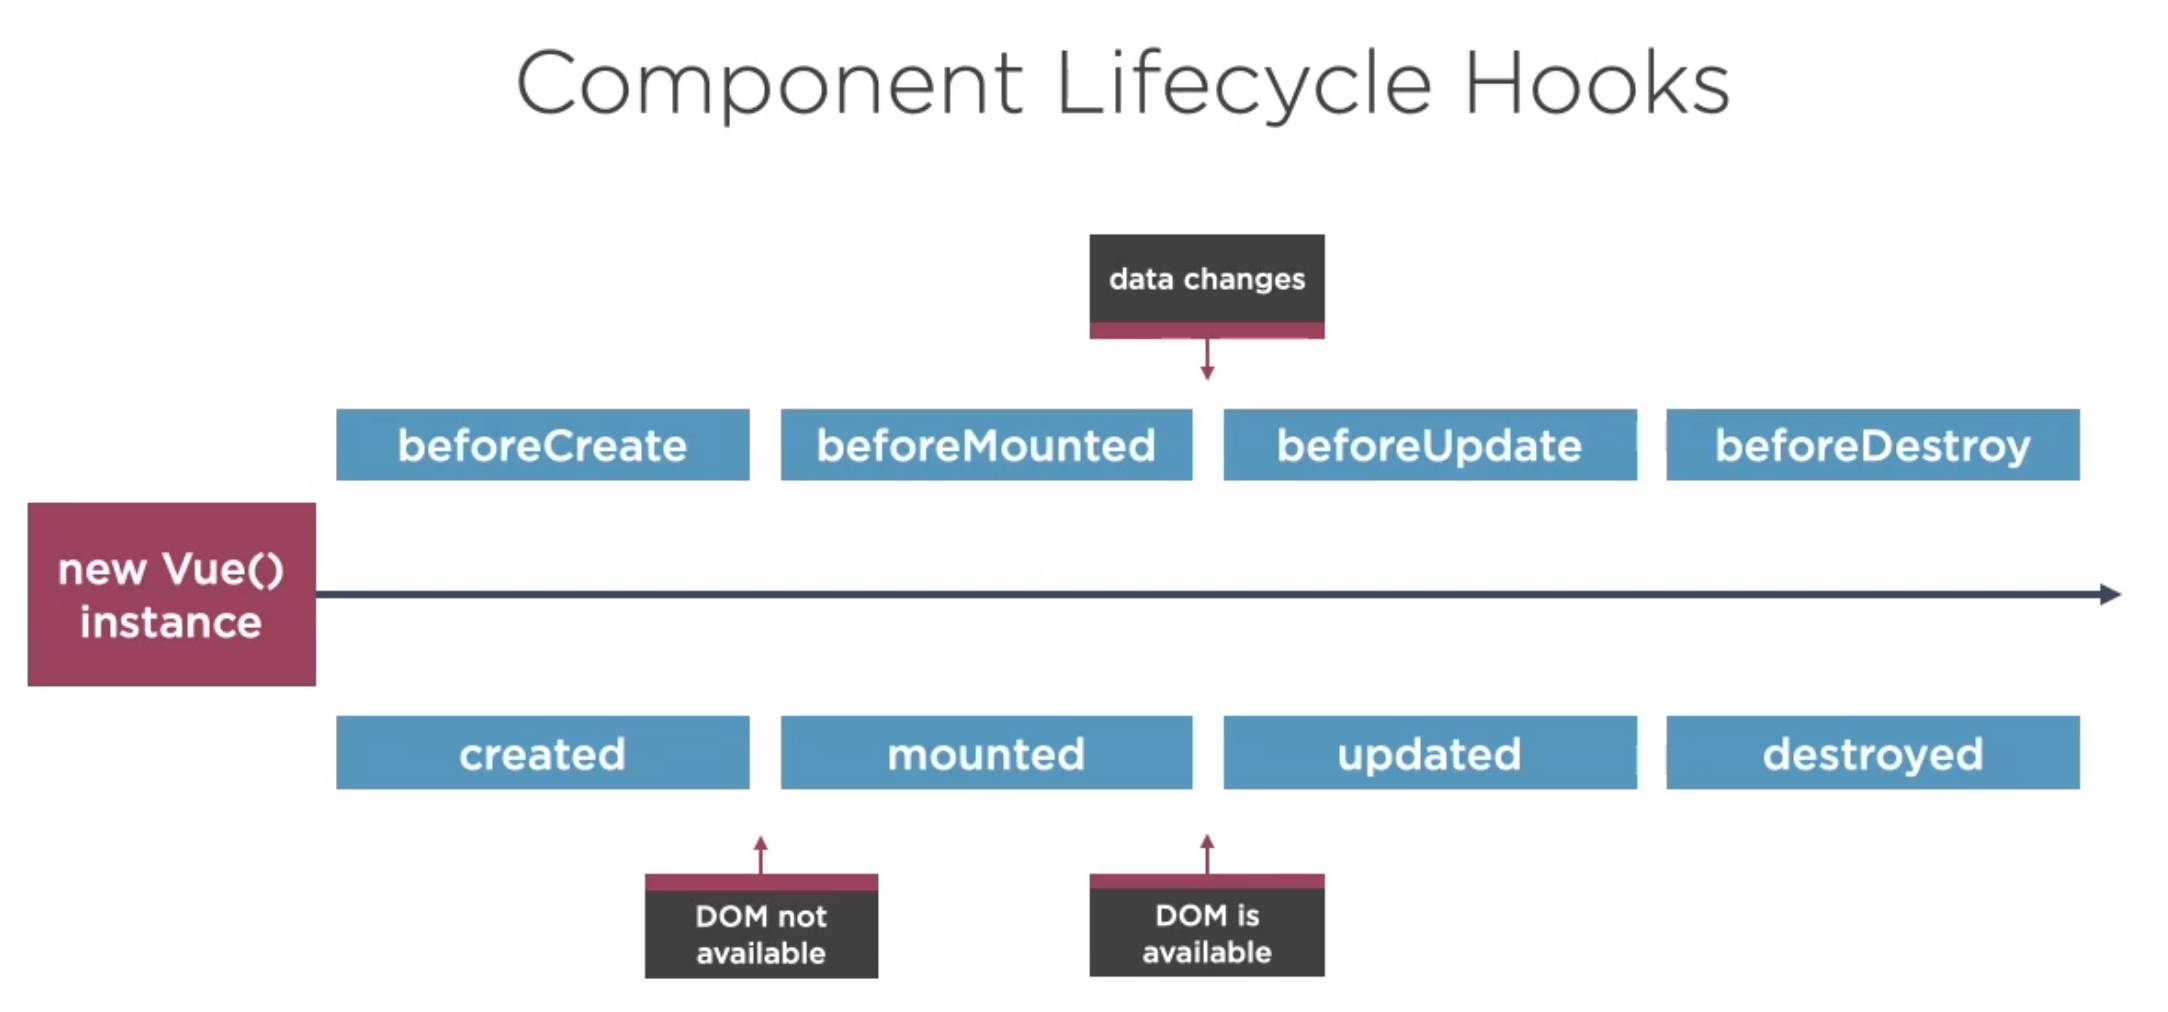
Component Lifecycle Hooks
Here are the component lifecycle hooks for Vue.

<script>
</script>
<script>
</script>