Vue Introduction
Intro
Hello John (No world)
Resource for the tutorial was https://github.com/johnpapa/vue-getting-started
The vue js lives at https://cdn.jsdelivr.net/npm/vue. Below is a simple example just showing two way binding
<!DOCTYPE html>
<html lang="en">
<head>
    <meta charset="UTF-8">
    <meta name="viewport" content="width=device-width, initial-scale=1.0">
    <title>Document</title>
    <script src="https://cdn.jsdelivr.net/npm/vue"></script>
</head>
<body>
    <div id="app">
        <input type="text" v-model="name">
        <p>Hello {{name}}</p>
    </div>
    <script>
        new Vue({
            el: "#app",
            data() {
                return {
                    name: "John"
                }
            }
        })
    </script>
</body>
</html>
Sections
Vue files are comprised of three sections. No prizes for what each bit does
<template>
<a v-bind:href="github" target="_blank">
</a>
<template/>

<script>
</script>

<style>
</style>
Displaying Data and Events
Data Model
We can define a data model and use it with standard double curly braces.
</template>
...
<div>{{hero.id}}</div>
...
</template>

<script>
export default {
  name: 'Heroes',
  data() {
    return {
      id: 20,
      firstName: 'Fred',
      lastName: 'Bloggs'
      message: ''
    }
  },
};
</script>
Data Binding
Binding we can use v-bind or the short cut : (full colon). So in the template put the colon and define a data component below
<template>
...
          <a
            v-bind:="github"
            target="_blank"
            rel="noopener noreferrer"
          >
            <i class="fab fa-github fa-2x" aria-hidden="true"></i>
          </a>

          <a
            :href="twitter"
            target="_blank"
            rel="noopener noreferrer"
          >
            <i class="fab fa-twitter fa-2x" aria-hidden="true"></i>
          </a>
...
</template>

<script>
export default {
  name: 'headerLinks',
  data() {
    return {
      github: 'https://github.com/johnpapa/vue-getting-started',
      twitter:'https://twitter.com/john_papa',
    }
  },
}
</script>
Two Way Binding
To bind two-way with v-model with the model and property.
</template>
   <input class="input" id="firstName" v-model="hero.firstName"/>
</template>
Event Binding
Example
To bind events we use v-on: or @ to bind our methods to an event.
</template>
<button @click="cancelHero">Cancel</button>
<button v-on:click="cancelHero">Cancel 2</button>
</template>
<script>
export default {
  name: 'Heroes',
  data() {
...
  },
  methods: {
    cancelHero() {
       this.message = ''
    },
  }
};
</script>
Keyup
Below is an example of binding to the keyup event. The .esc denotes the escape key. </template> <script>
               <select
                 id="power"
                 v-model="hero.power"
                 :class="{ invalid: !hero.power }"
                  @keyup.esc="clearPower"
               >
</script> </syntaxhighlight>
Checkbox, Radio
No surprises here
<template>
                  <input
                    type="radio"
                    id="color-red"
                    value="red"
                    v-model="hero.capeColor"
                  />

                  <input
                    type="checkbox"
                    class="is-primary"
                    id="active"
                    v-model="hero.active"
                  />
</template>
Styles and Classes
Styles and Classes are trickier because of the object approach of the data
<template>
                <select
                  id="power"
                  v-model="hero.power"
                   @keyup.esc="clearPower"
                >

                <div
                  class="color-line"
                  :style="{ 'background-color': hero.capeColor }"
                ></div>
</template>
Displaying List and Conditional Content
Iterating v-for
So just create a key and use the right syntax and the defined model
<template>
        <ul class="list is-hoverable">
          <li v-for="hero in heroes" :key="hero.id">
            <a class="list-item"><span>{{ hero.firstName }}</span></a>
          </li>
        </ul>
</template>
Binding to selection
We can do this by binding to the model on click. Note the conditional class based on if the current hero === selected hero.
<template>
          <li v-for="hero in heroes" :key="hero.id">
            <a
              class="list-item"
              @click="selectedHero = hero"
              :class="{ 'is-active': selectedHero === hero }"
              ><span>{{ hero.firstName }}</span></a
            >
          </li>

</template>
Conditional Displaying v-if and v-show
v-if
Same as *ngIf. So if no selection on the list
<template>
    <div class="columns" v-if="selectedHero">
      <div class="column is-3">
        <header class="card-header">
          <p class="card-header-title">{{ selectedHero.firstName }}</p>
        </header>
        <div class="card-content">
          <div class="content">
...
</template>
v-show
This will put the data in dom.
<template>
            <div class="field" v-show="showMore">
              <label class="label" for="lastName">last name</label>
              <input
                class="input"
                id="lastName"
                v-model="selectedHero.lastName"
              />
            </div>
</template>
Interacting within a Component
Computed
This is a section in the scripts section which allow you to define function to compute value maybe from existing model data
<script>
  computed: {
    fullName() {
      return `${this.selectedHero.firstName} ${this.selectedHero.lastName}`;
    },
  },

</script>
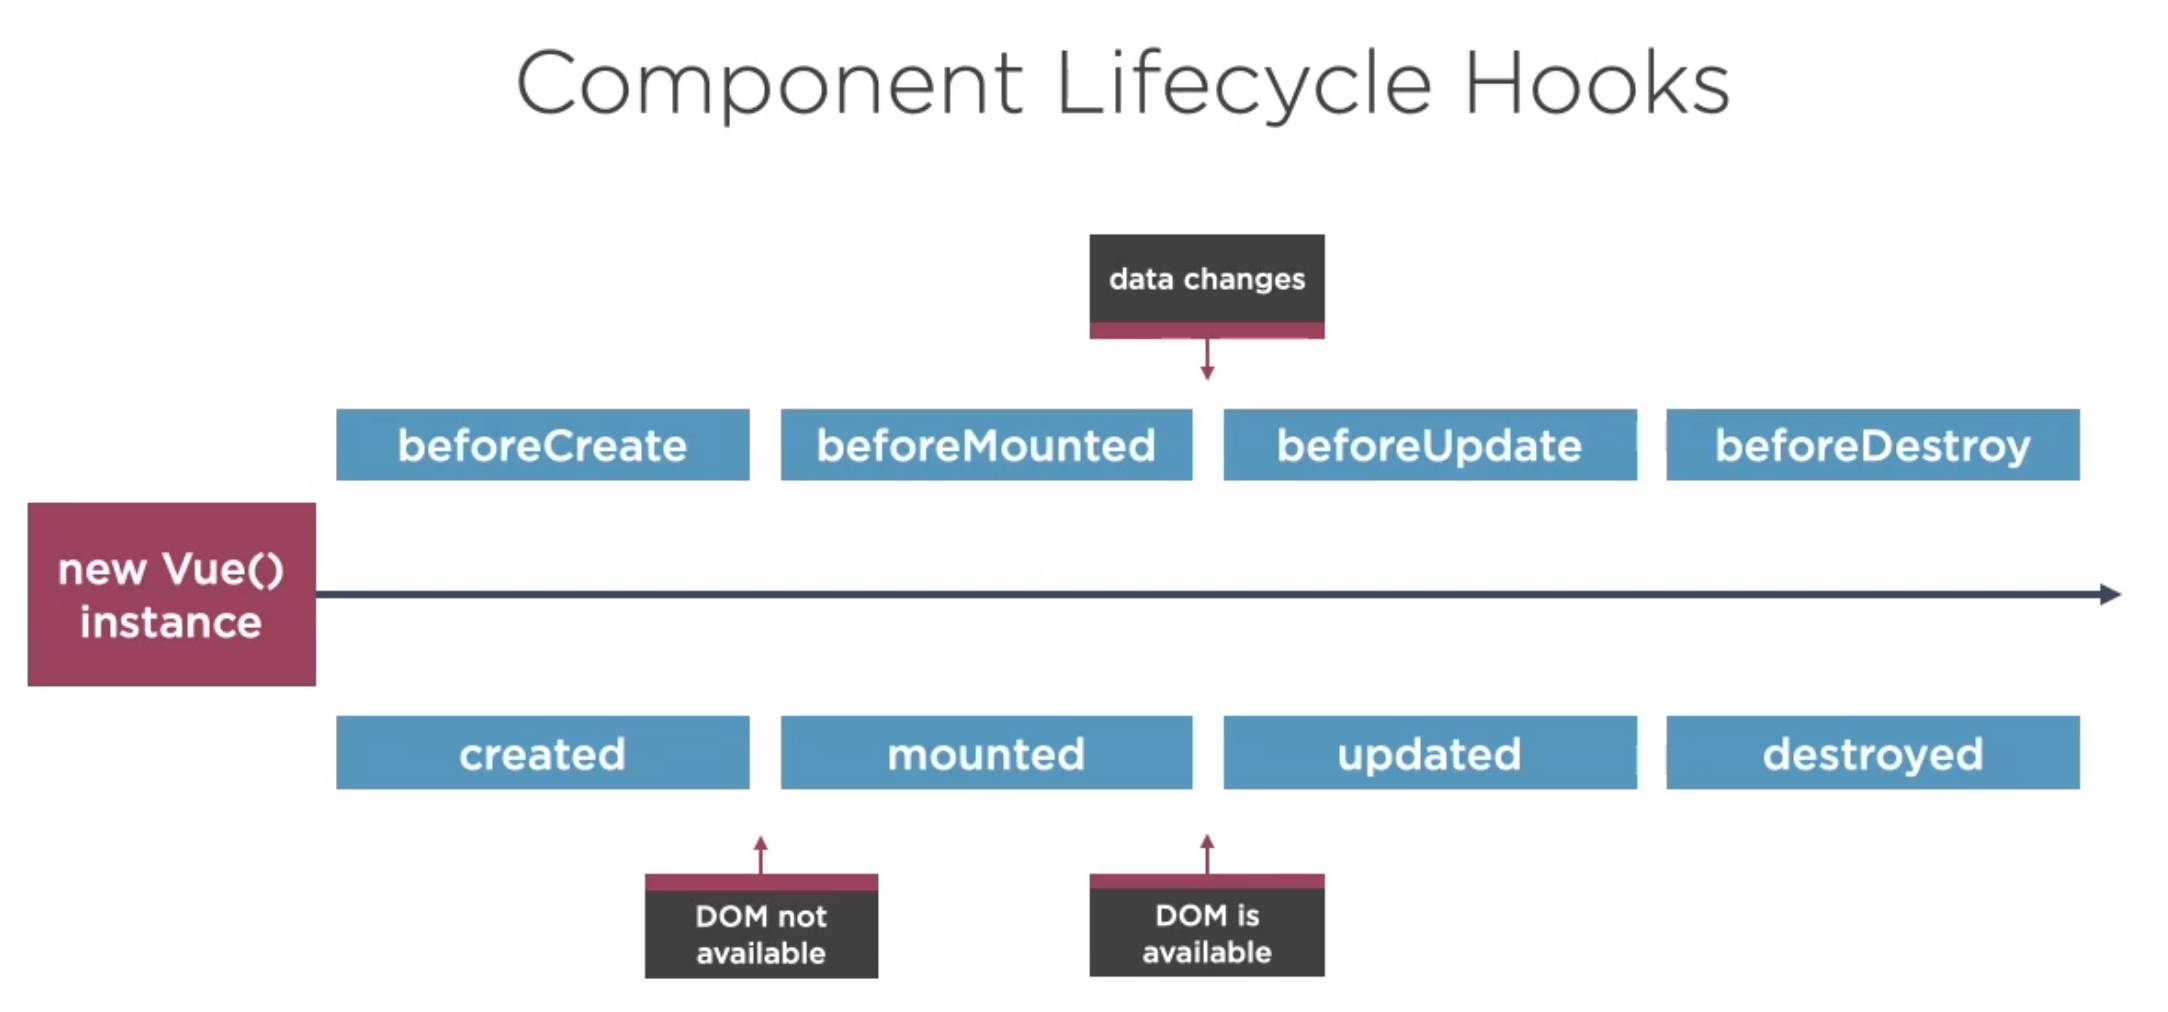
Component Lifecycle Hooks
Here are the component lifecycle hooks for Vue.
 So here is an example of the created below. Note the lifecycle hooks do not go in the methods section but are at the same level as methods: and computed:
<script>
...
  created() {
    this.loadHeroes();
  },
  methods: {
    async getHeroes() {
      return new Promise(resolve => {
        setTimeout(() => resolve(ourHeroes), 1500);
      });
    },
    async loadHeroes() {
      this.heroes = [];
      this.message = 'getting the heroes, please be patient';
      this.heroes = await this.getHeroes();
      this.message = '';
    },
...
</script>
Watchers
These are function which watch properties. When a properties changes you can perform some code. The immediate means it will run on startup up.
<script>
  watch: {
    'selectedHero.capeCounter': {
      immediate: true,
      handler(newValue, oldValue) {
        console.log(`Watcher evalauted. old=${oldValue}, new=${newValue}`);
        this.handleTheCapes(newValue);
      },
    },
  },
</script>
Filters (Example of date-fns too)
Filters are pipes you can use in Vue. Below is a recap of the structure along with the example of a filter (pipe). Note you can define custom pipes.
<template>
...
                <p class="comment">
                  My origin story began on
                  {{ selectedHero.originDate | shortDate }}
                </p>
...
</template>
<script>
import { format } from 'date-fns';
const inputDateFormat = 'YYYY-MM-DD';
const displayDateFormat = 'MMM DD, YYYY';
const ourHeros = [
... // Pseudo Data
]
export default {
   name: 'Heros',
   data() {
   ... // View Data Model
   }
   computed() {
   ... // Computed values
   }
   created() {
   ... // Life Cycle Hook
   }
   methods() {
   ... // Methods
   }
   watch() {
   ... // Watchers
   }
   filters() {
      shortDate: function(value) {
         return format(value, displayDateFormat);
      },
   }
}
<script>
Component Communication
Using sub components
To do this you simple need to import the code, state it as a component in the parent and reference the name
<template>
...
<HeroDetail />
...
</template>

<script>
...
import HeroDetail from '@/components/hero-detail';
...
  components: {
    HeroDetail,
  },
...
</script>
Passing Props
Naming
This is horrible. For passing parameters you must use kebab-case and not camelCase. Argghhhhhhhhhhhhhhhh
<child-component :authorized-user="AuthorizedUser"></child-component>
Types
String, Number, Boolean, Array, Object, Function, Promise
Dynamic and Static
// Dynamic
:title="hero.name"

// Static
title="Mrs Jones"
Defining Child Component Props
In the child component we can define out @Input properties. We can also define defaults and validation on these properties too.
<script>
  props: {
    hero: {
      type: Object,
      default: () => {},
      validator: function (value) {
        // The value must match one of these strings
        return ['success', 'warning', 'danger'].indexOf(value) !== -1
      },
    },
  },
</script>
Child Component Updates
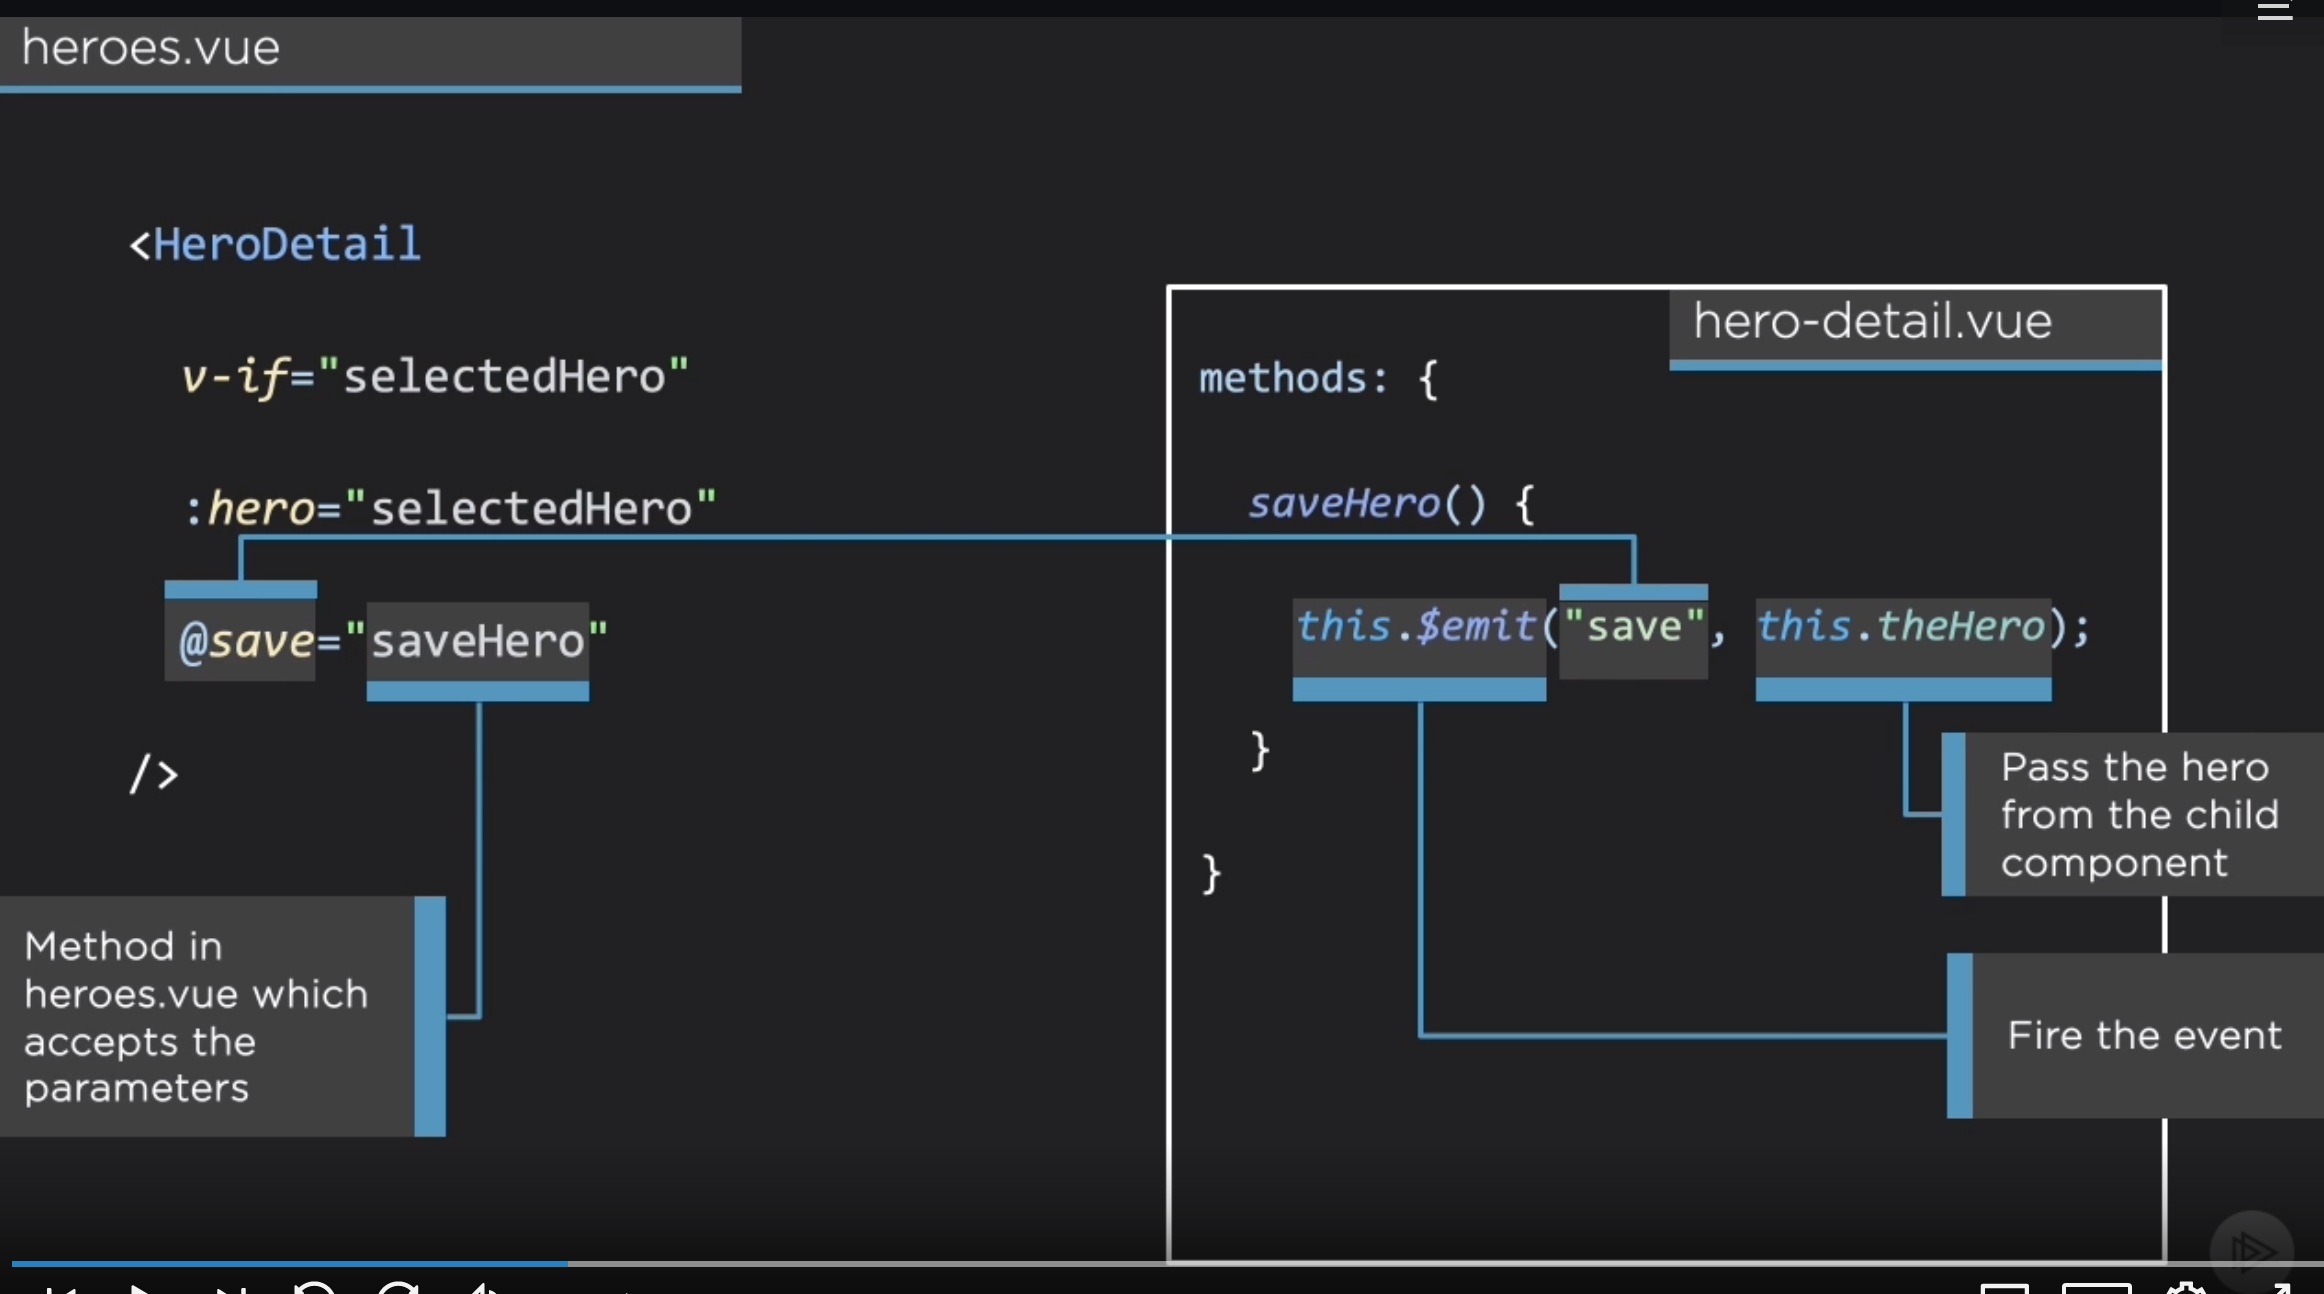
This is much the same as Angular where we emit the changes and pass the new value to the parent. YOU DO NOT MUTATE IN THE CHILD.
 The odd thing is you do not list the parameters on the parent in the template but you do in the method.
Mixins
These are functions you can import into your component. Sound like a nightmare to me but hey.
- Methods, Components and Computes
- Merged, precedence given to the components version
- Data
- Merged superset, precedence given to the components data
- Watch and Hooks
- Both run, with mixins running before components
Example shown below but not convinced yet.
<script>
import { displayDateFormat, lifecycleHooks } from '../shared';
...
mixins: [lifecycleHooks],
...
</script>
And the mixin code
export const lifecycleHooks = {
  // Computeds
  computed: {
    componentName() {
      return `${this.$options.name} component`;
    },
  },
  // LifeCycle Hooks
  created() {
    logger.info(`${this.componentName} created ${hookMessageSuffix}`);
    logger.info('component data', this.$data);
  },
  mounted() {
    logger.info(`${this.componentName} mounted ${hookMessageSuffix}`);
  },
  updated() {
    logger.info(`${this.componentName} updated ${hookMessageSuffix}`);
  },
  destroyed() {
    logger.info(`${this.componentName} destroyed ${hookMessageSuffix}`);
  },
};
Data Access
Axios
This is used within the demos. So we see standard js.
const response = await axios({
  method: 'post',
  url: '/api/heros/717',
  header: {
   'X-Custom-Header': 'foo',
  },
  data: {
     firstName: 'Ella',
     lastName : 'Papa',
  },
})
Config
Again a bit of a disappointment. Nothing other than create a config.js
export const API = process.env.VUE_APP_API;
...
Mapping and Errors
No special approach in Vue, just use map and use try/catch
const getHeroes = async function() {
  // cant just return this, because its not what we want
  // return response.data;
  // but what if there is bad data in the response?
  // let data = response.data;
  // Let's parse it better
  try {
    const response = await axios.get(`${API}/heroes.json`);

    let data = parseList(response);

    const heroes = data.map(h => {
      h.originDate = format(h.originDate, inputDateFormat);
      return h;
    });
    return heroes;
  } catch (error) {
    console.error(error);
    return [];
  }
};

const parseList = response => {
  if (response.status !== 200) throw Error(response.message);
  if (!response.data) return [];
  let list = response.data;
  if (typeof list !== 'object') {
    list = [];
  }
  return list;
};