Android Architecture
Architecture
This was the diagram I liked best for Android Architecture
Good Architecture can
- Incorporate changes quickly
- Reduce cost
- Readability
- Easy Communication and on boarding (like this one)
- Testability
Typical Android apps look like this

And this
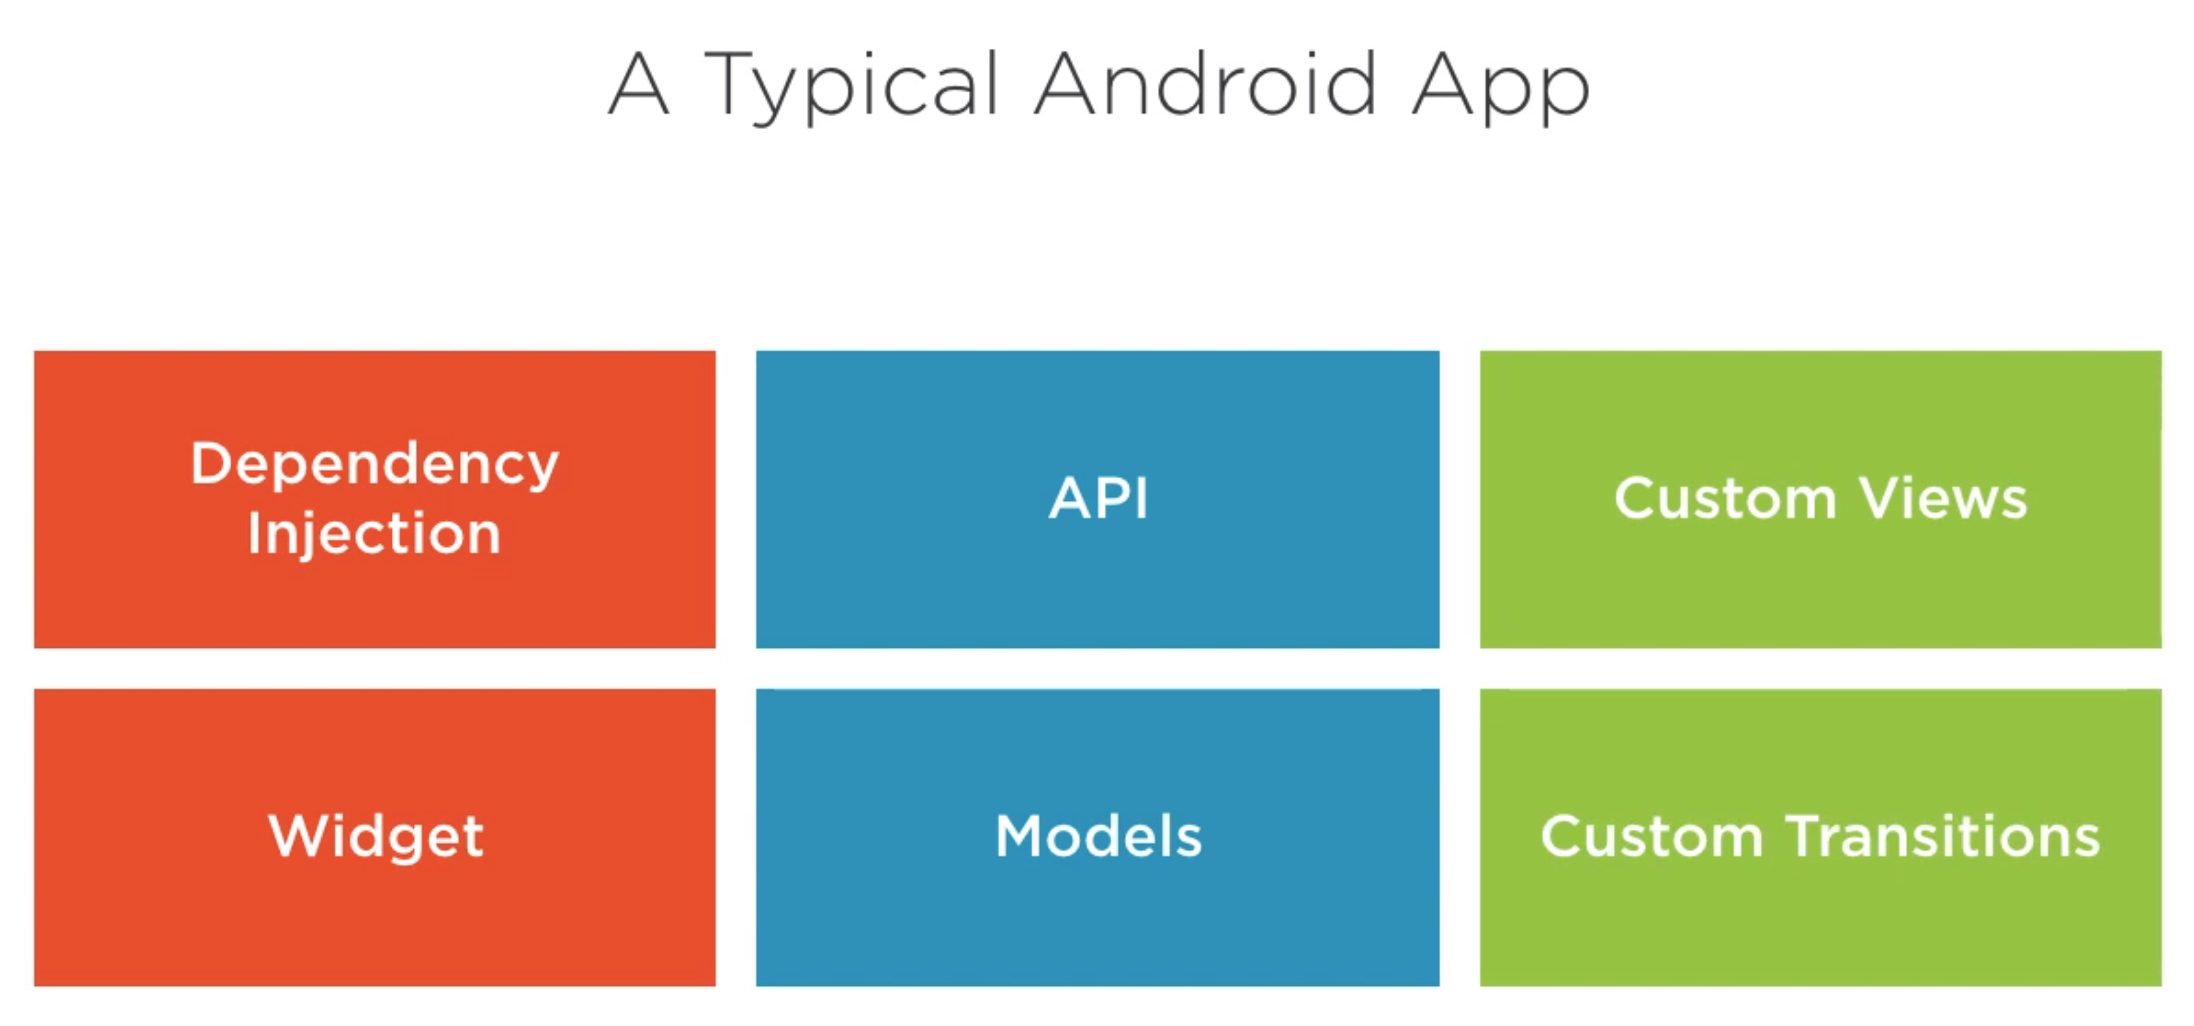
Looking at this I am building an app with the architecture of
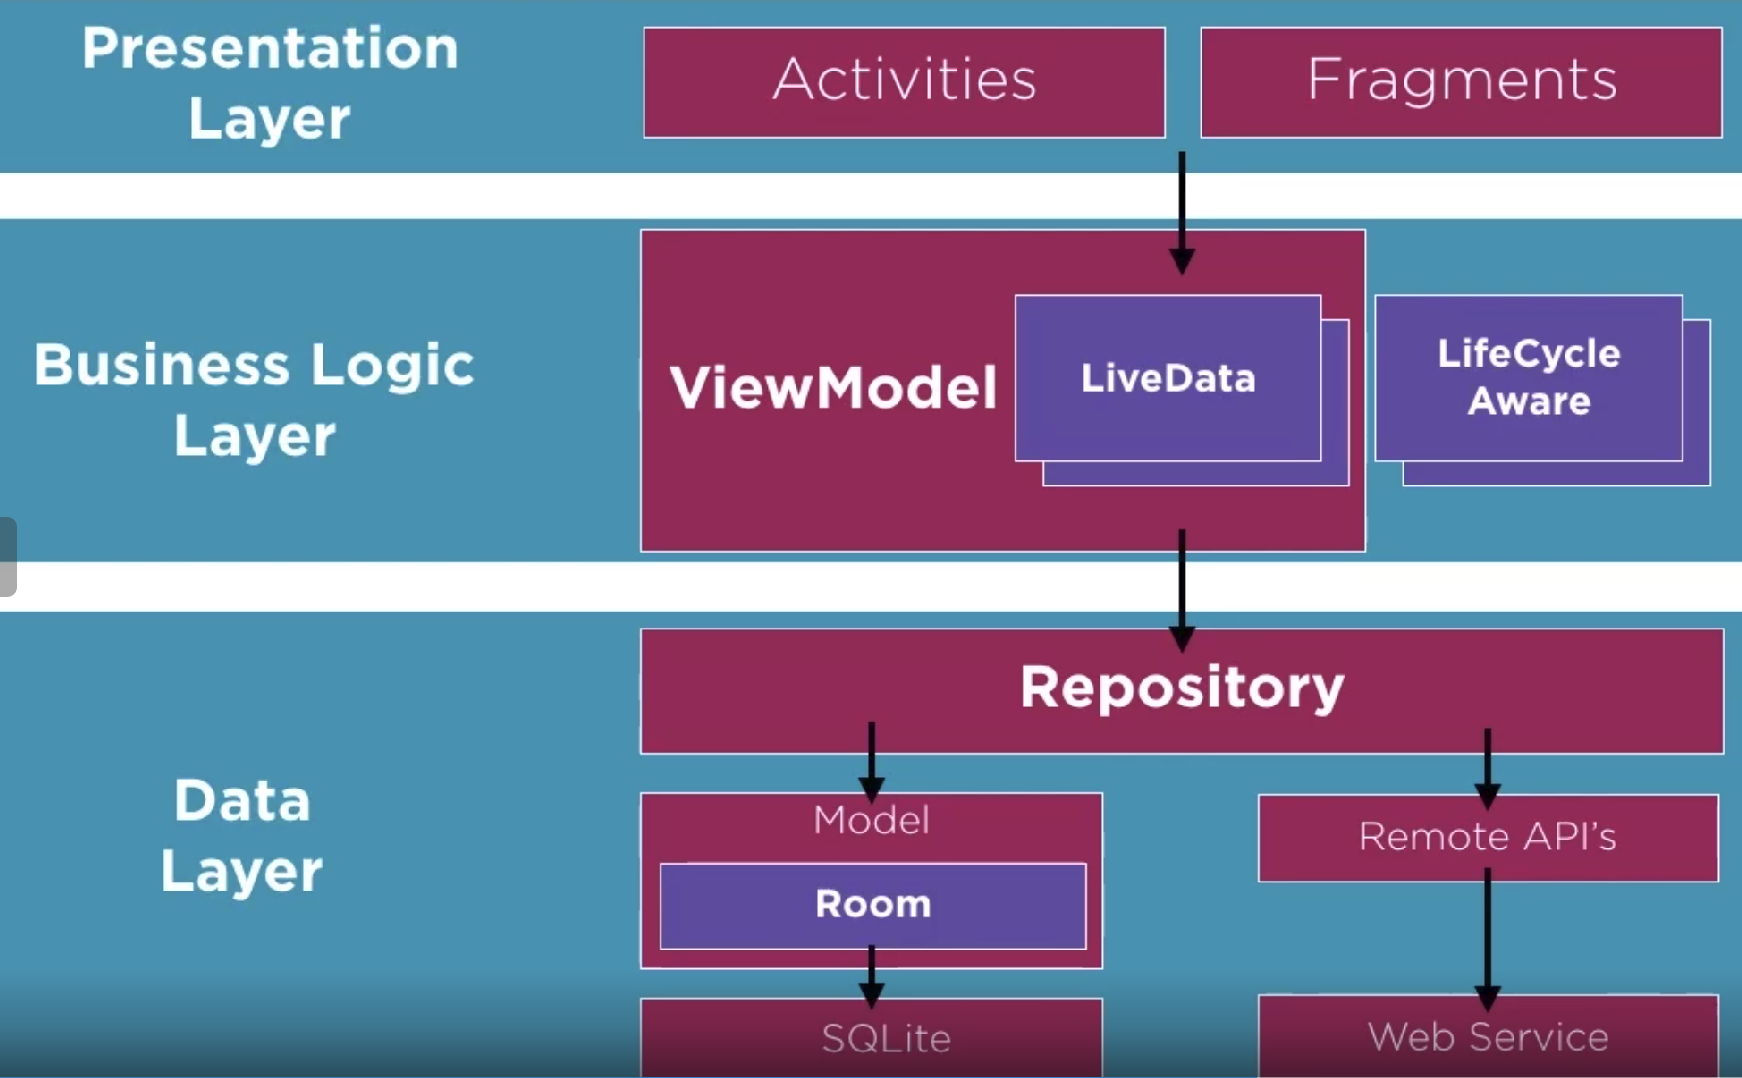
The was discussion on god class which I had not heard before
- Contains a high number of components
- Components are coupled
- Lengthy class
Avoid a all costs or don't cos I like getting rid of them
Design Patterns
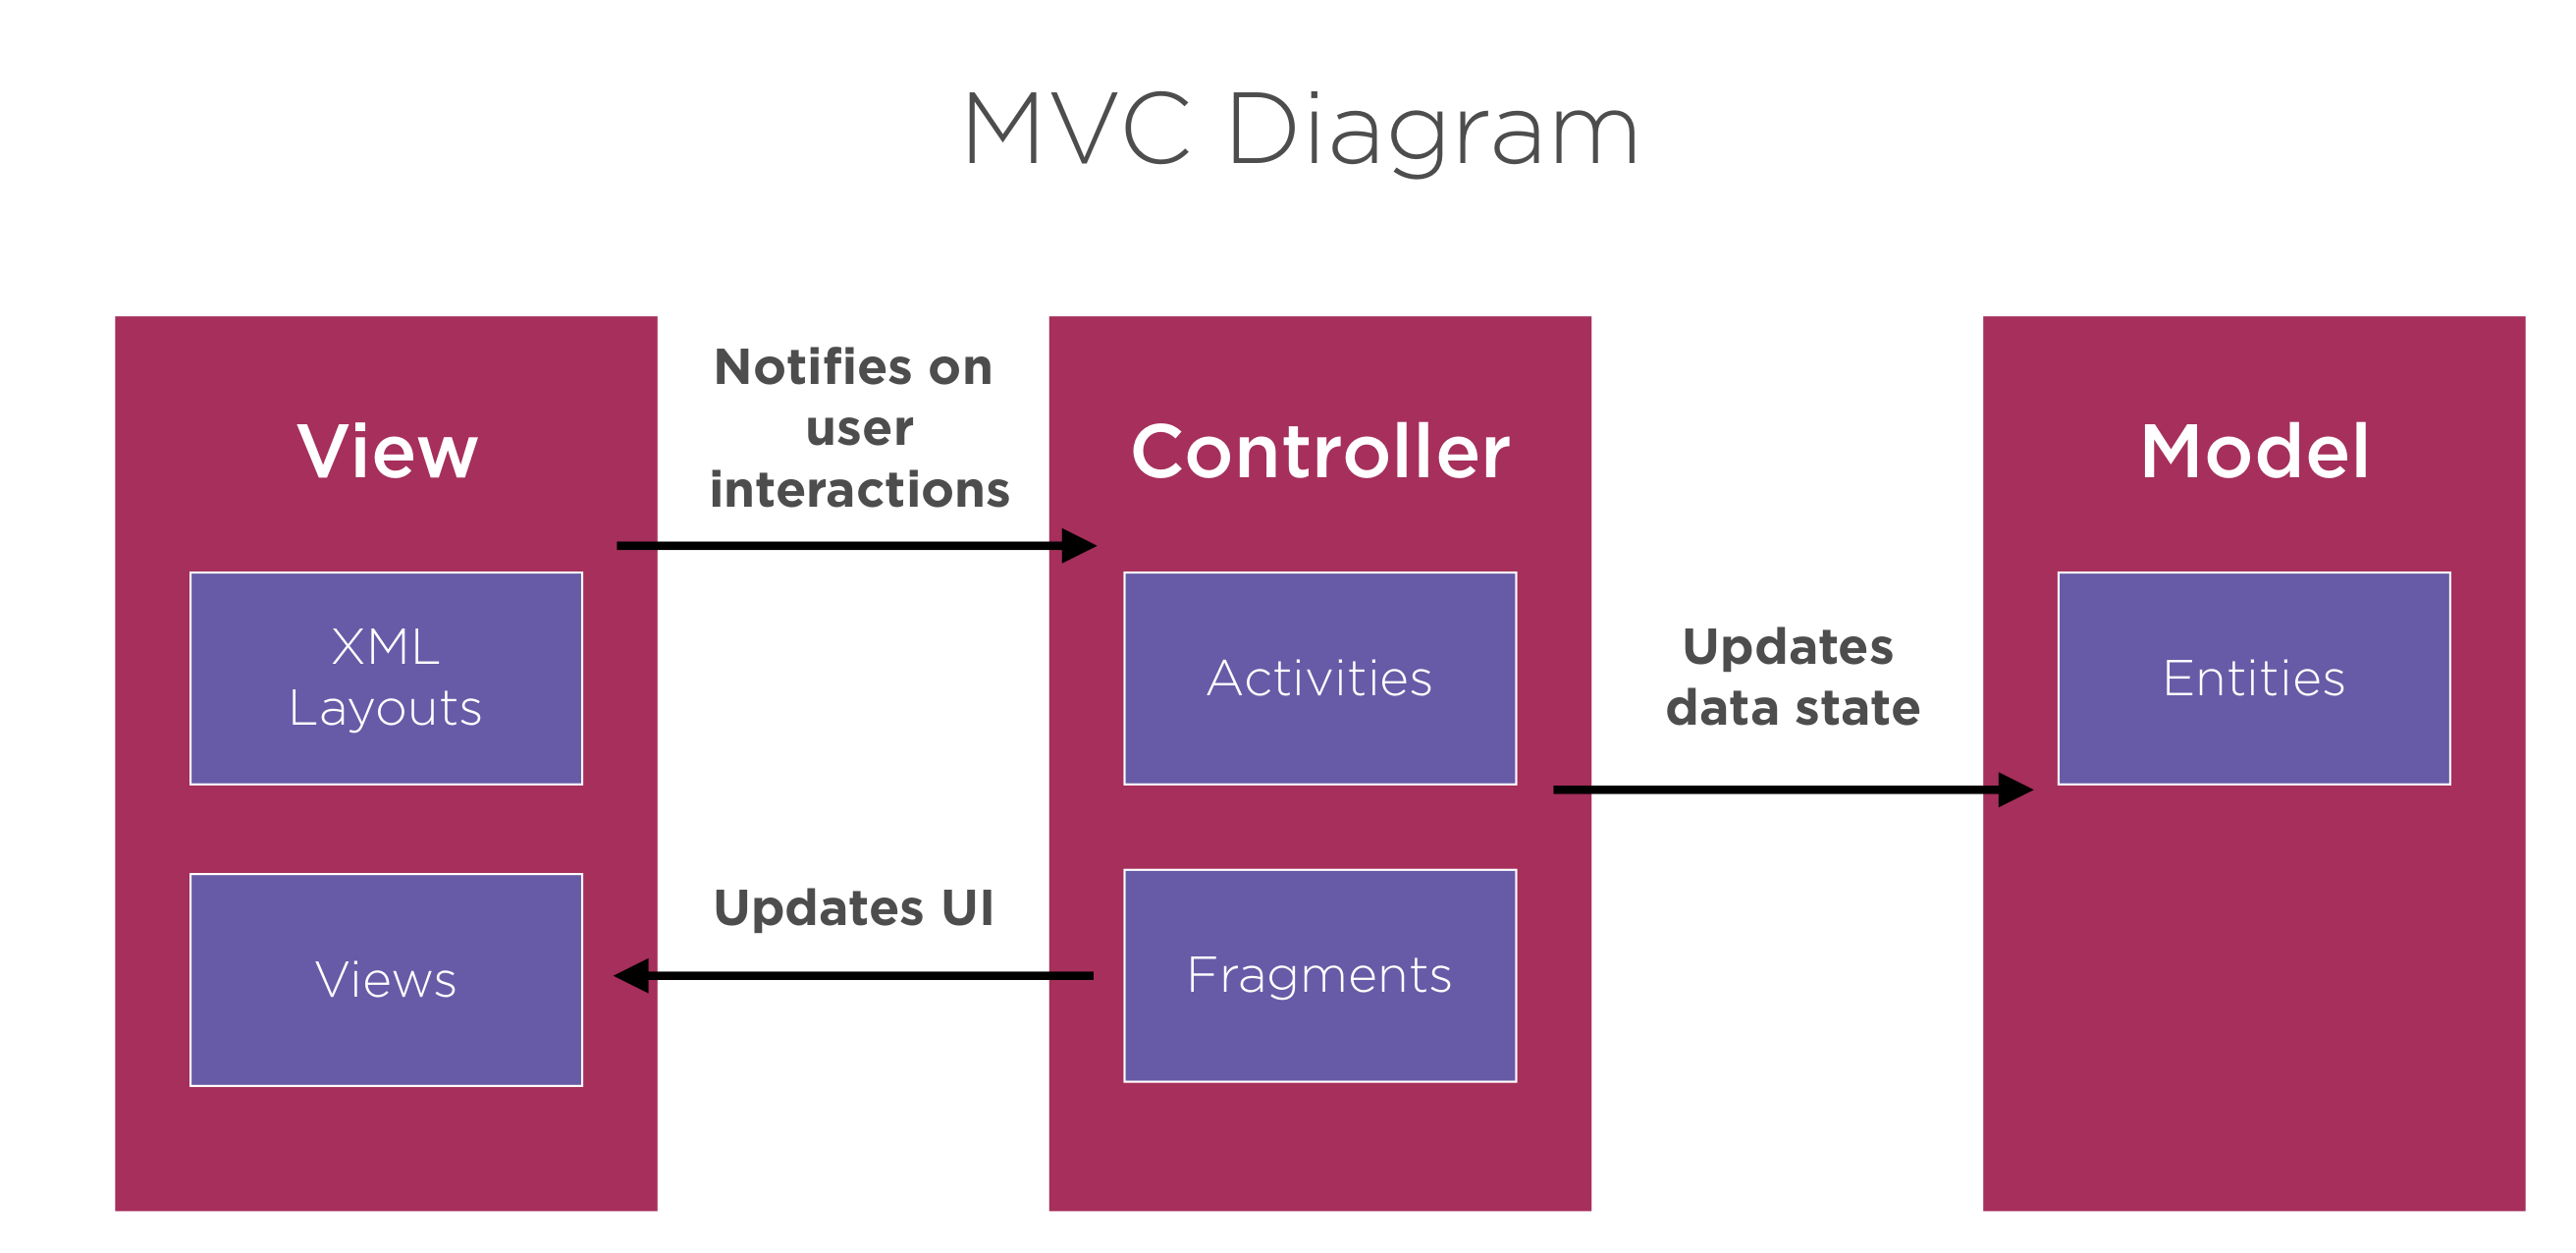
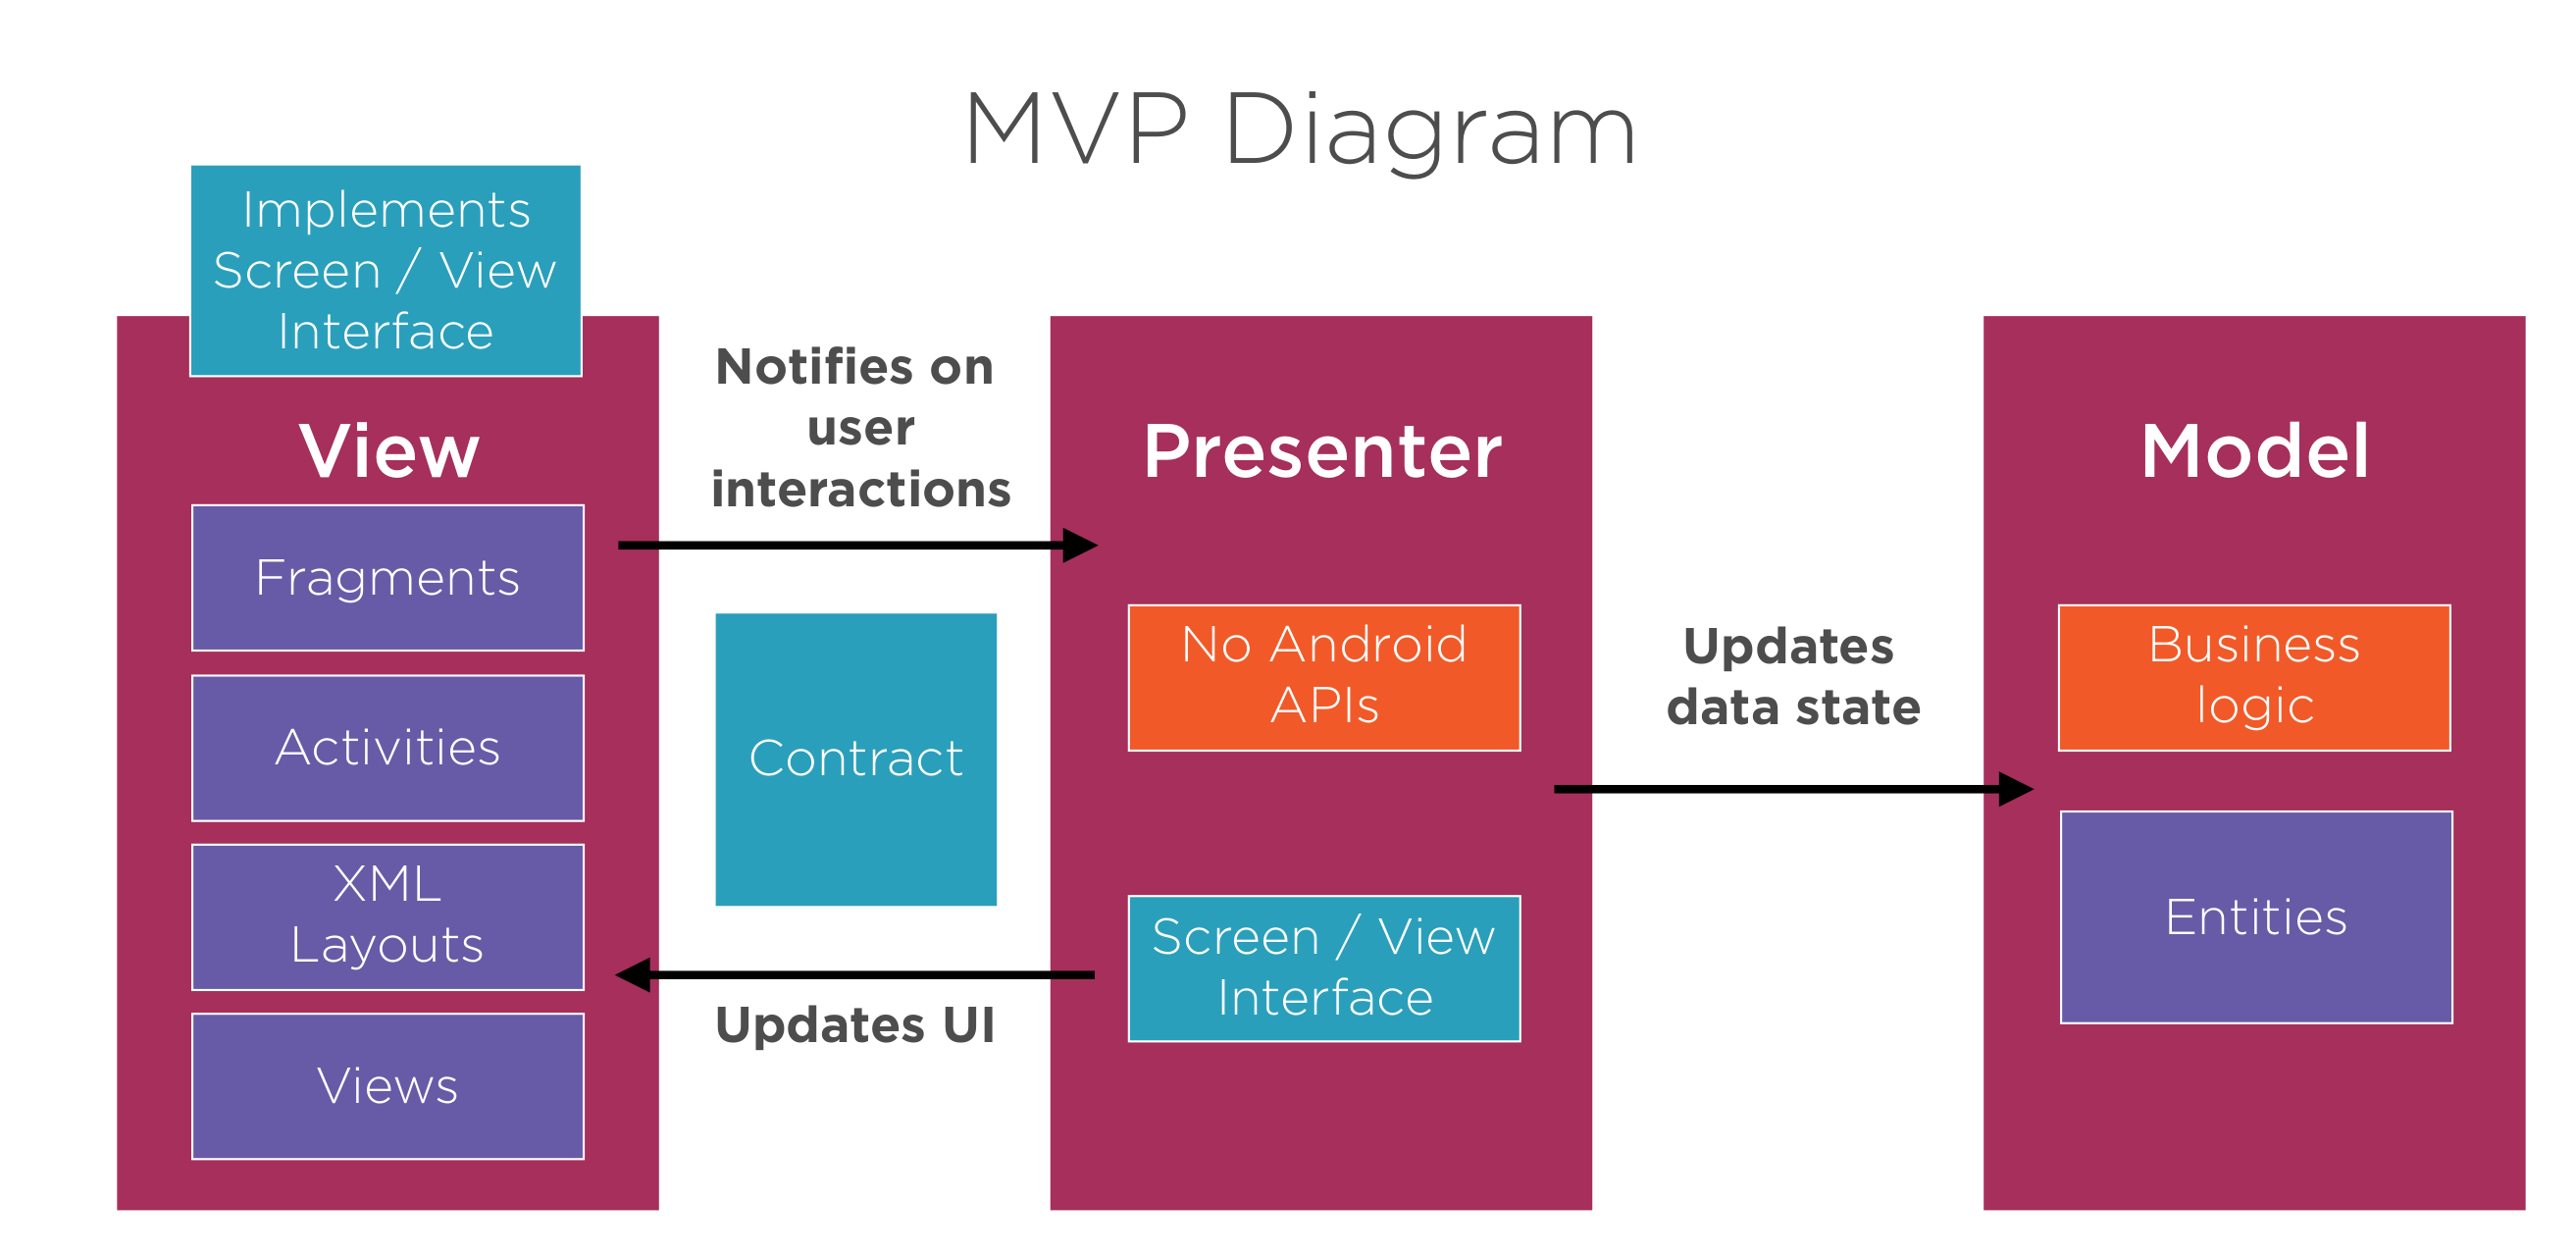
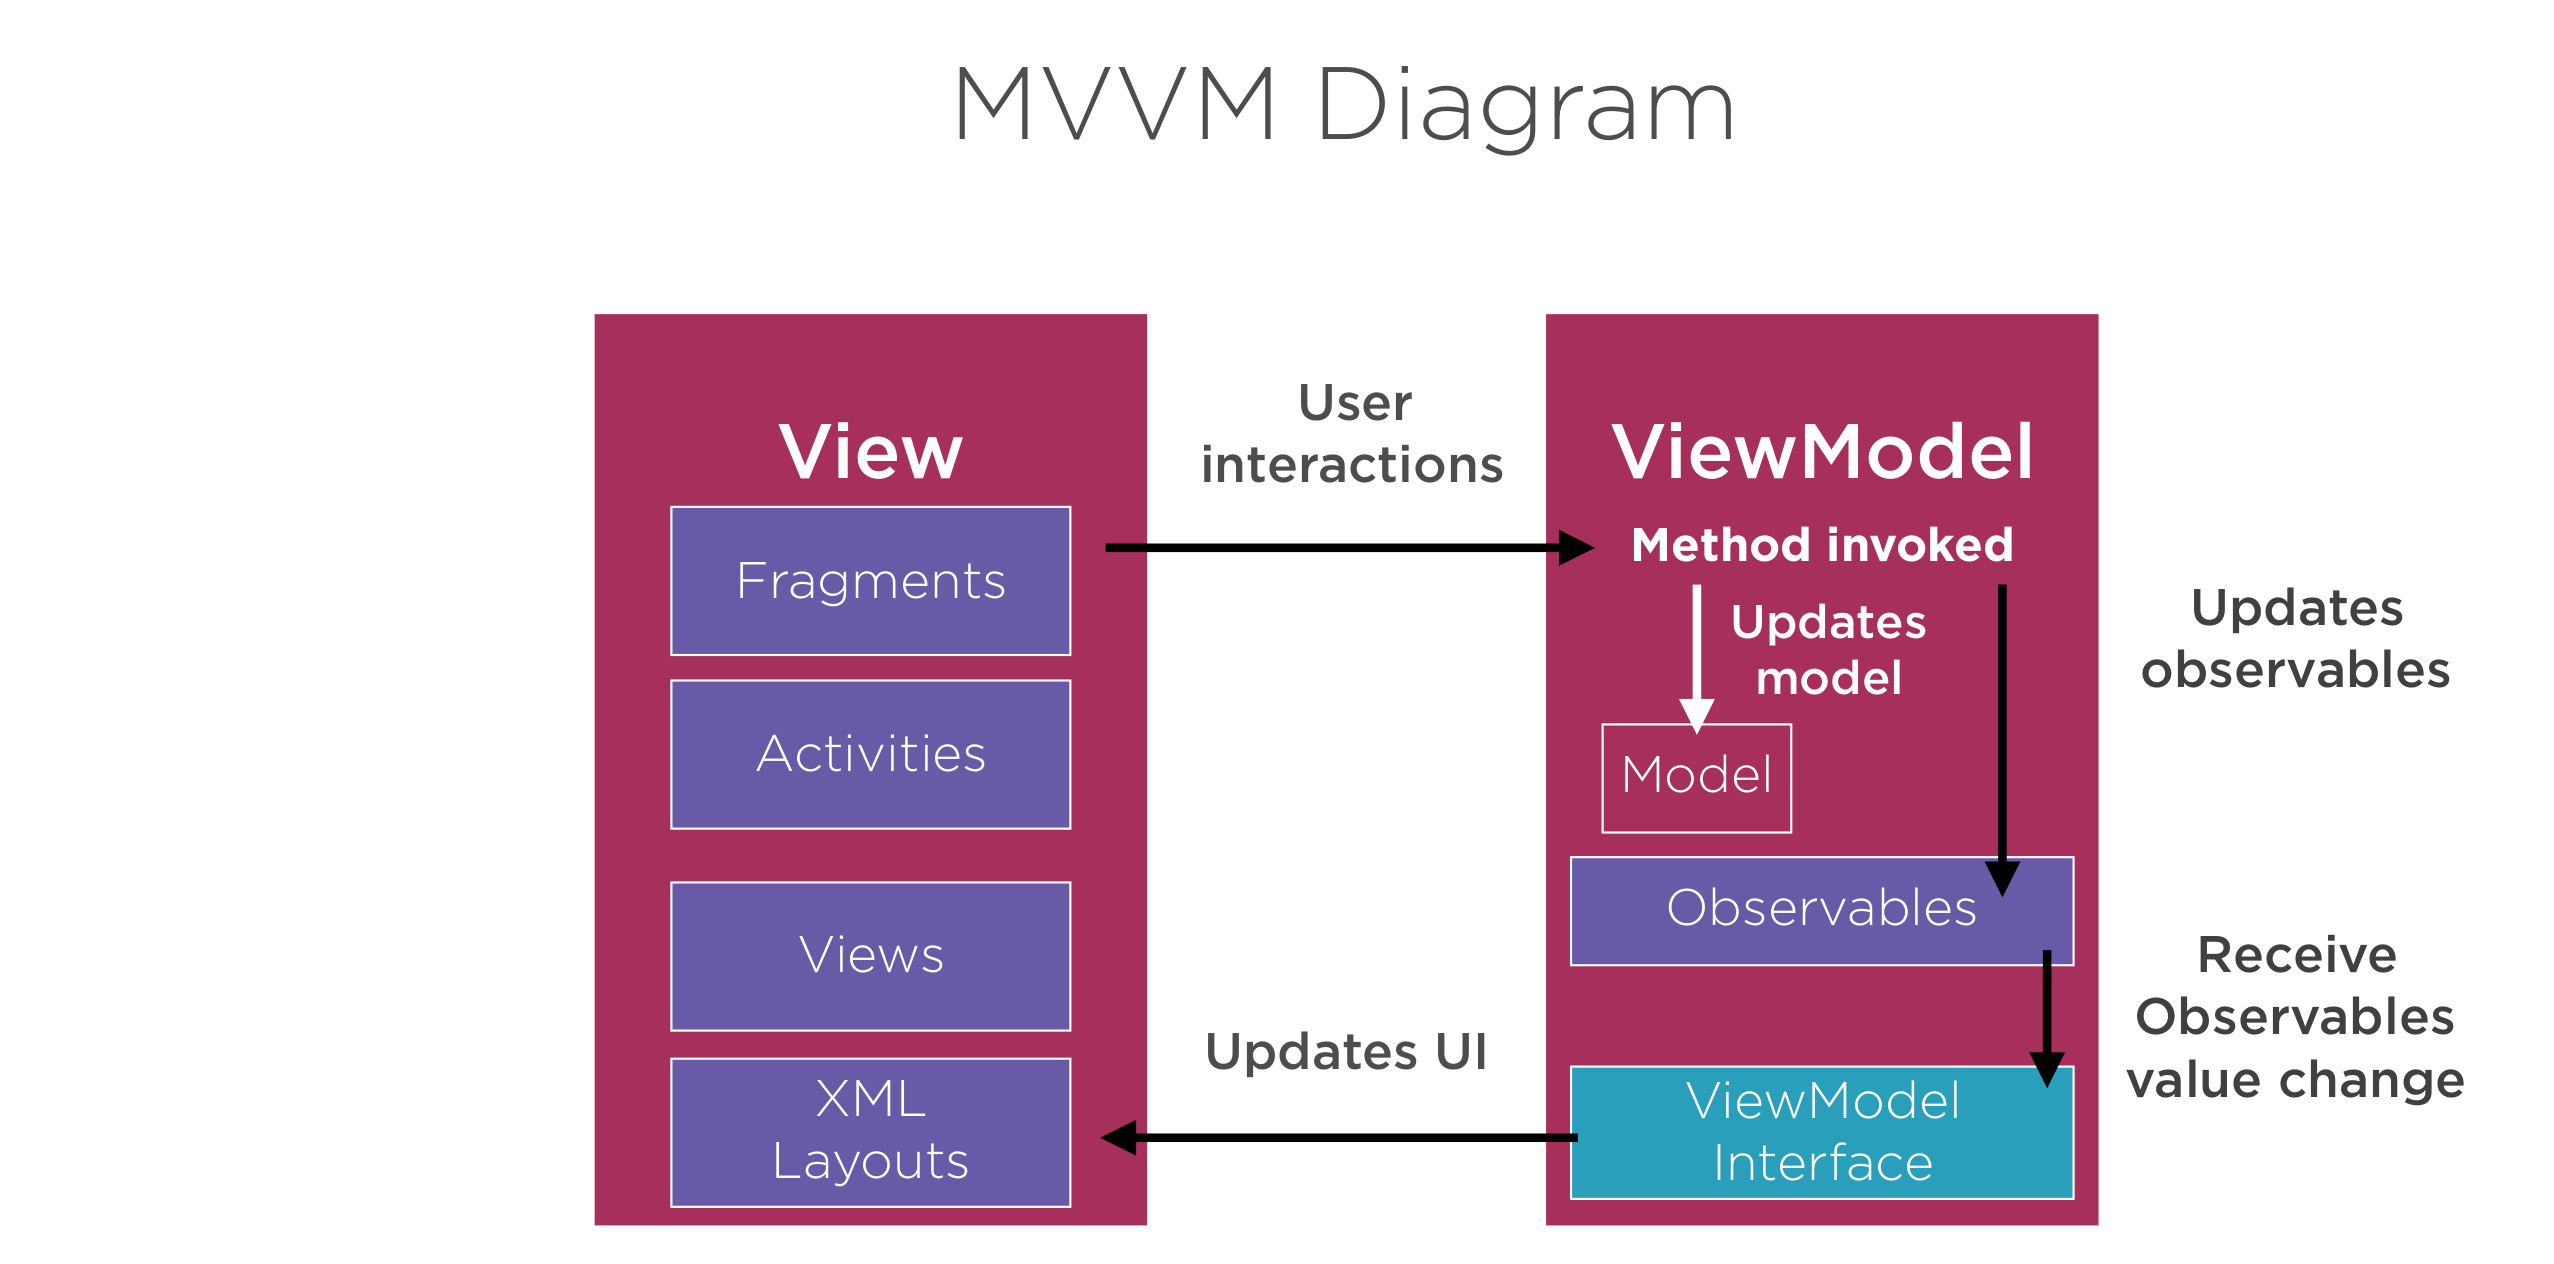
Just a reminder of the design patterns but with maybe a more Android flare.
MVC
MVP
MVVM
MVI
Overview
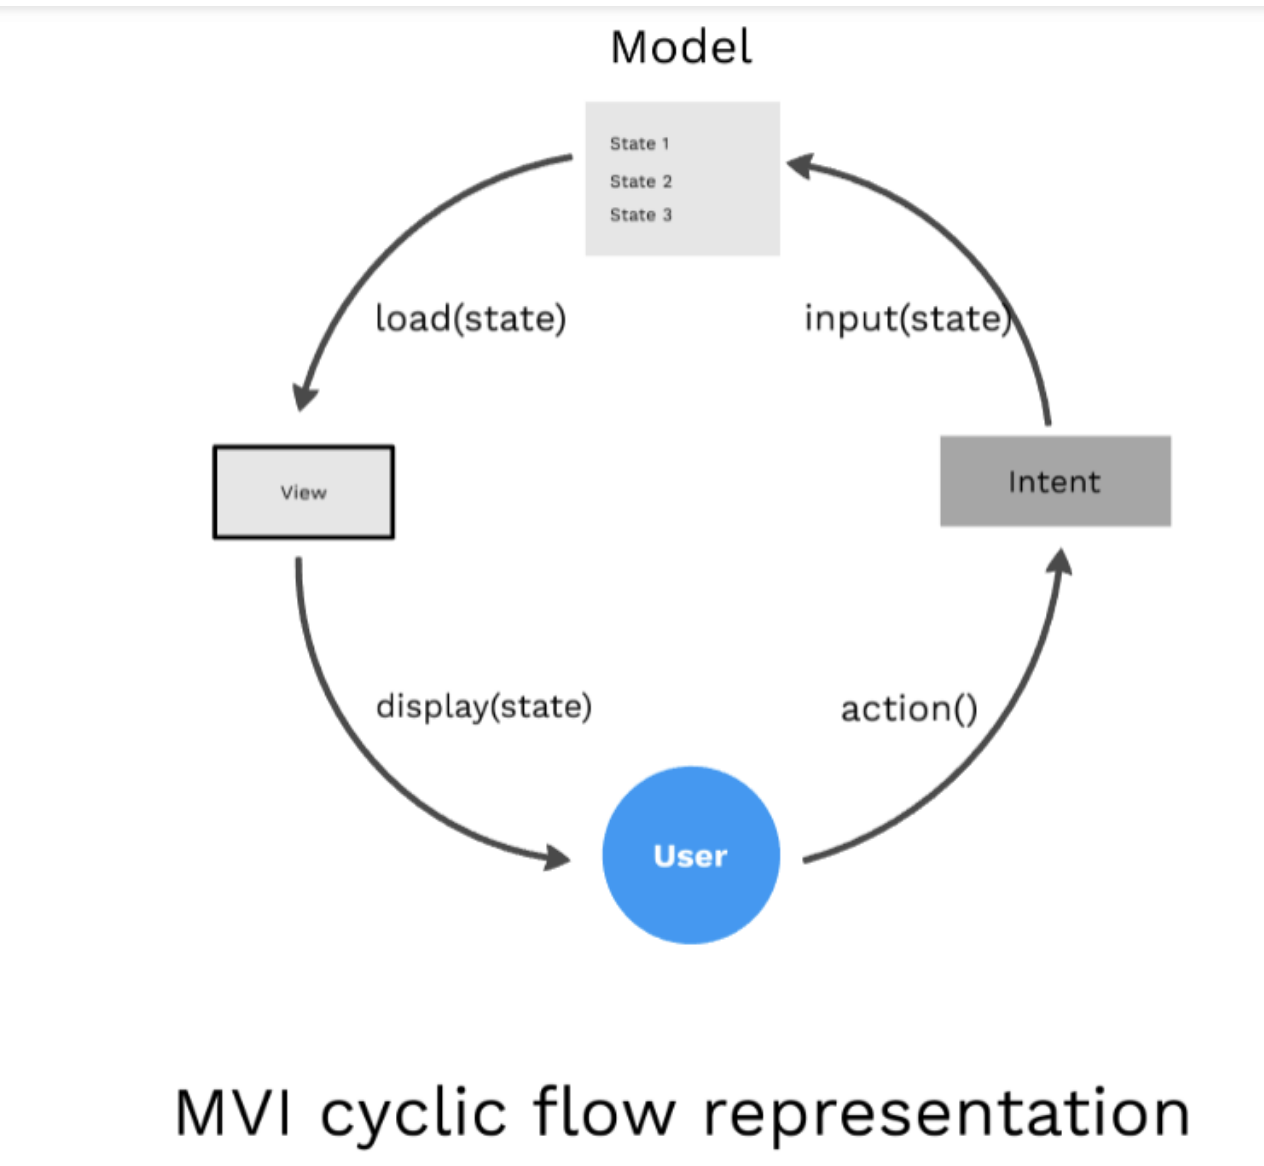 User does an action which will be an Intent → Intent is a state which is an input to model → Model stores state and send the requested state to the View → View Loads the state from Model → Displays to the user. If we observe, the data will always flow from the user and end with the user through intent. It cannot be the other way, Hence its called Unidirectional architecture. If the user does one more action the same cycle is repeated, hence it is Cyclic.
Model
Unlike other patterns, In MVI Model represents the state of the UI. i.e for example UI might have different states like Data Loading, Loaded, Change in UI with user Actions, Errors, User current screen position states. Each state is stored as similar to the object in the model.
View
The View in the MVI is our Interfaces which can be implemented in Activities and fragments. It means to have a container which can accept the different model states and display it as a UI. They use observable intents(Note: This doesn't represent the Android traditional Intents) to respond to user actions.
Intent
Even though this is not an Intent as termed by Android from before. The result of the user actions is passed as an input value to Intents. In turn, we can say we will be sending models as inputs to the Intents which can load it through Views.
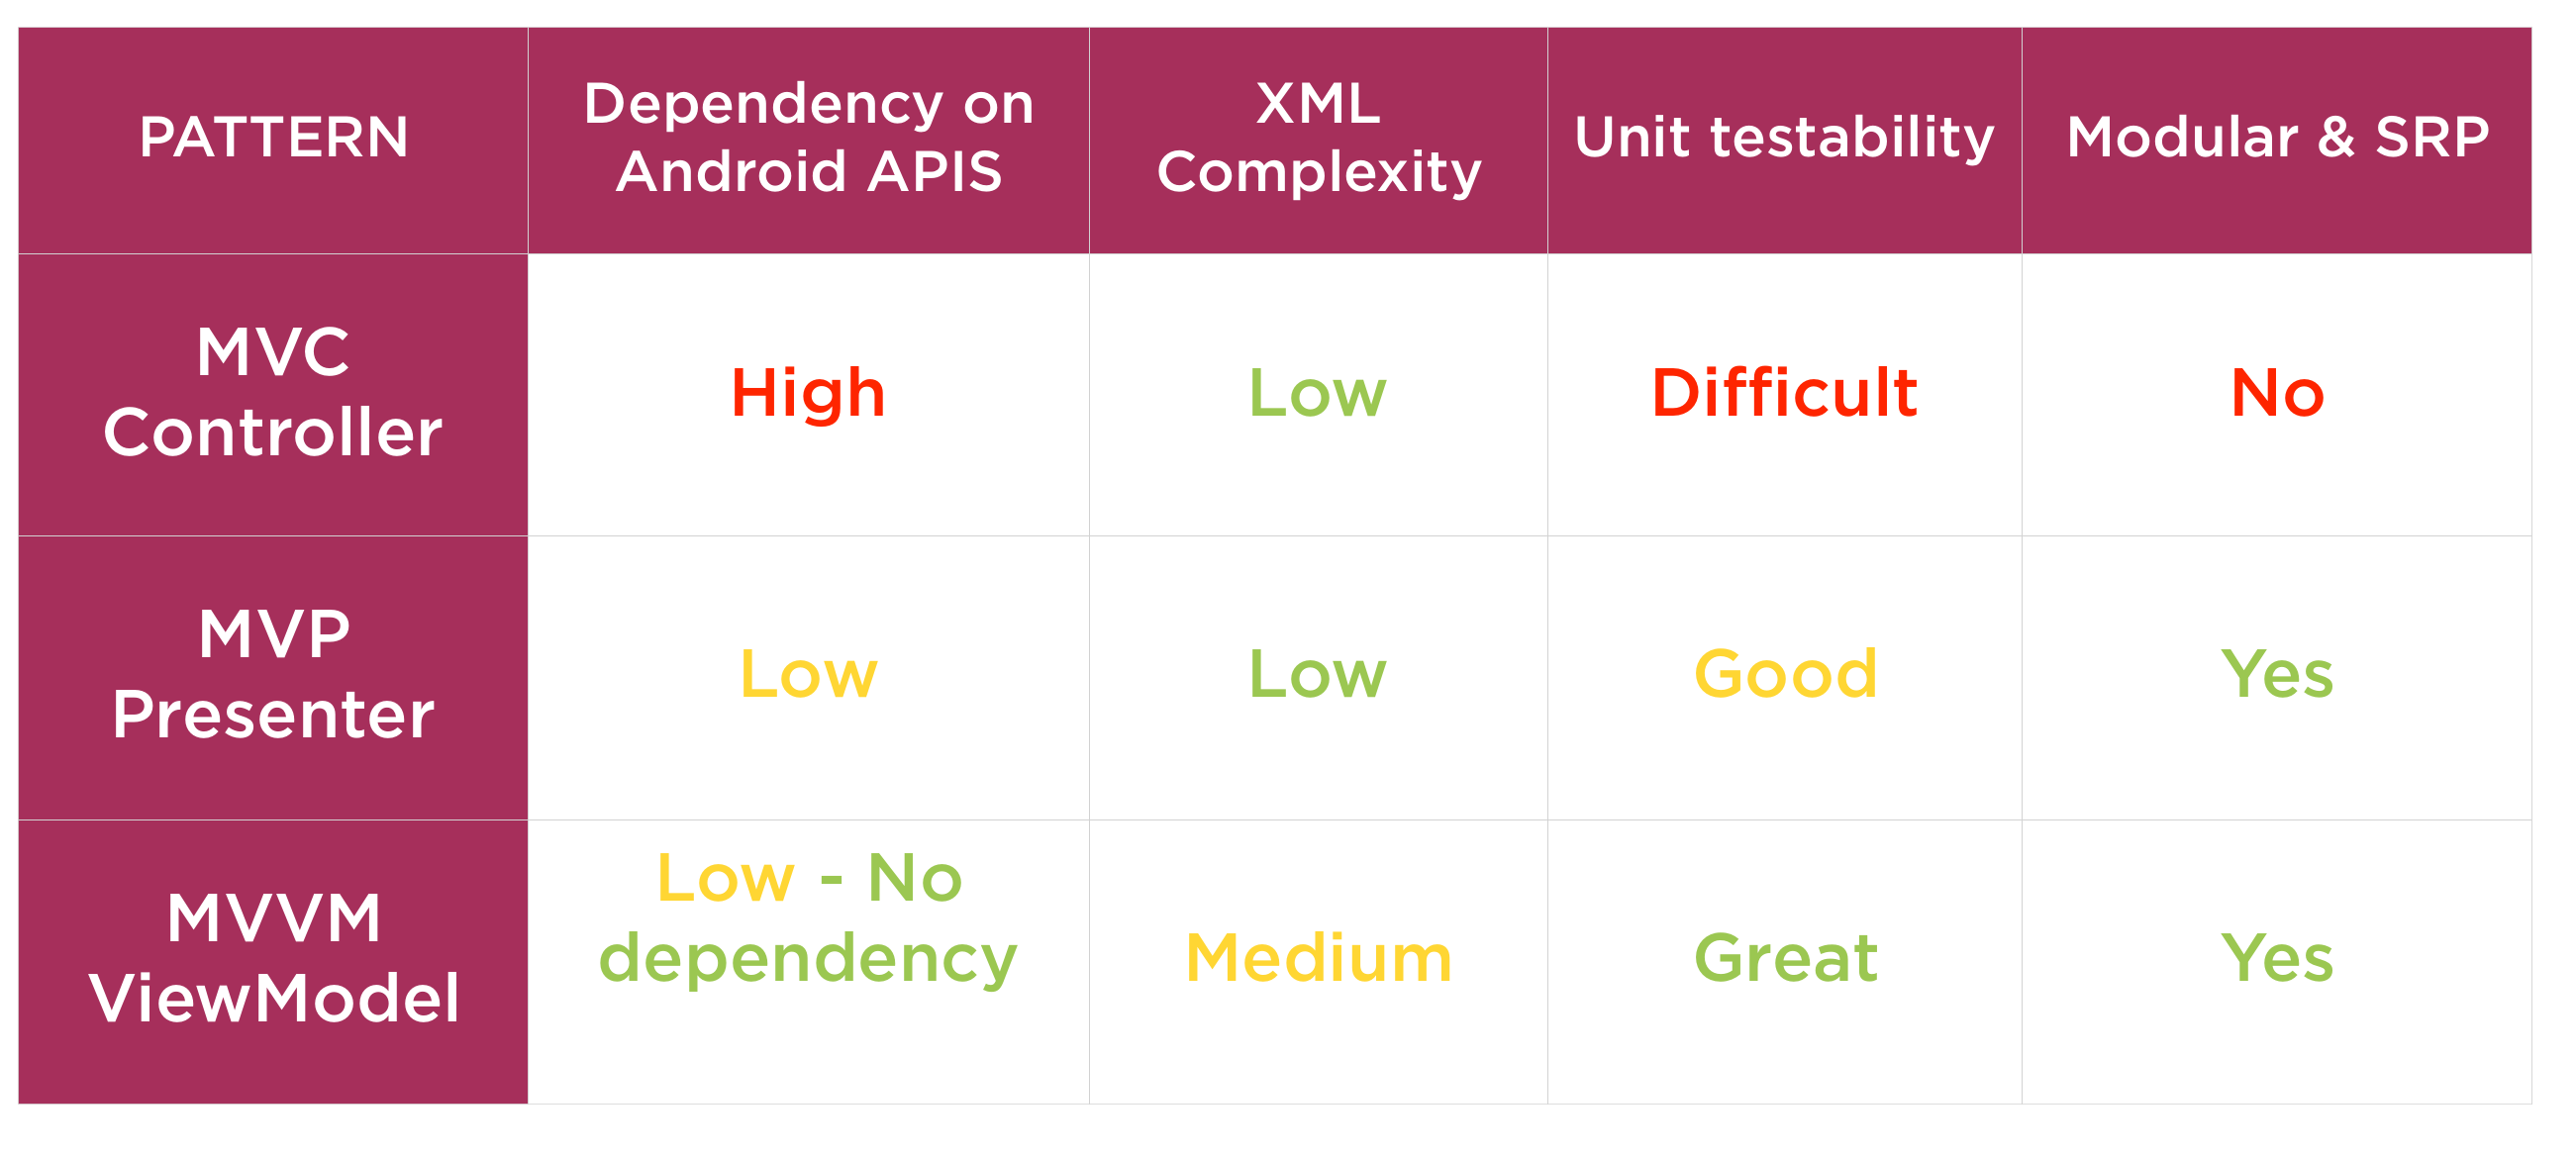
Comparison
Advantages of MVI
- Maintaining state is no more a challenge with this architecture, As it focuses mainly on states.
- As it is unidirectional, Data flow can be tracked and predicted easily.
- It ensures thread safety as the state objects are immutable.*
- Easy to debug, As we know the state of the object when the error occurred.
- It's more decoupled as each component fulfills its own responsibility.
- Testing the app also will be easier as we can map the business logic for each state.
Disadvantages of MVI
- It leads to lots of boilerplate code as we have to maintain a state for each user action.
- As we know it has to create lots of objects for all the states. This makes it too costly for app memory management.
- Handling alert states might be challenging while we handle configuration changes. For example, if there is no internet we will show the snackbar, On configuration change, it shows the snackbar again as its the state of the intent. In terms of usability, this has to be handled.
Revisiting
I had another look at this after doing compose. I love diagrams more than words. Here was a new take on the pattern. I guess they are all drifting towards Web design on android.

I made a page on this which features Orbit MVI and Ktor Andoroid MVI Example
Summary
Clean Architecture
Introduction
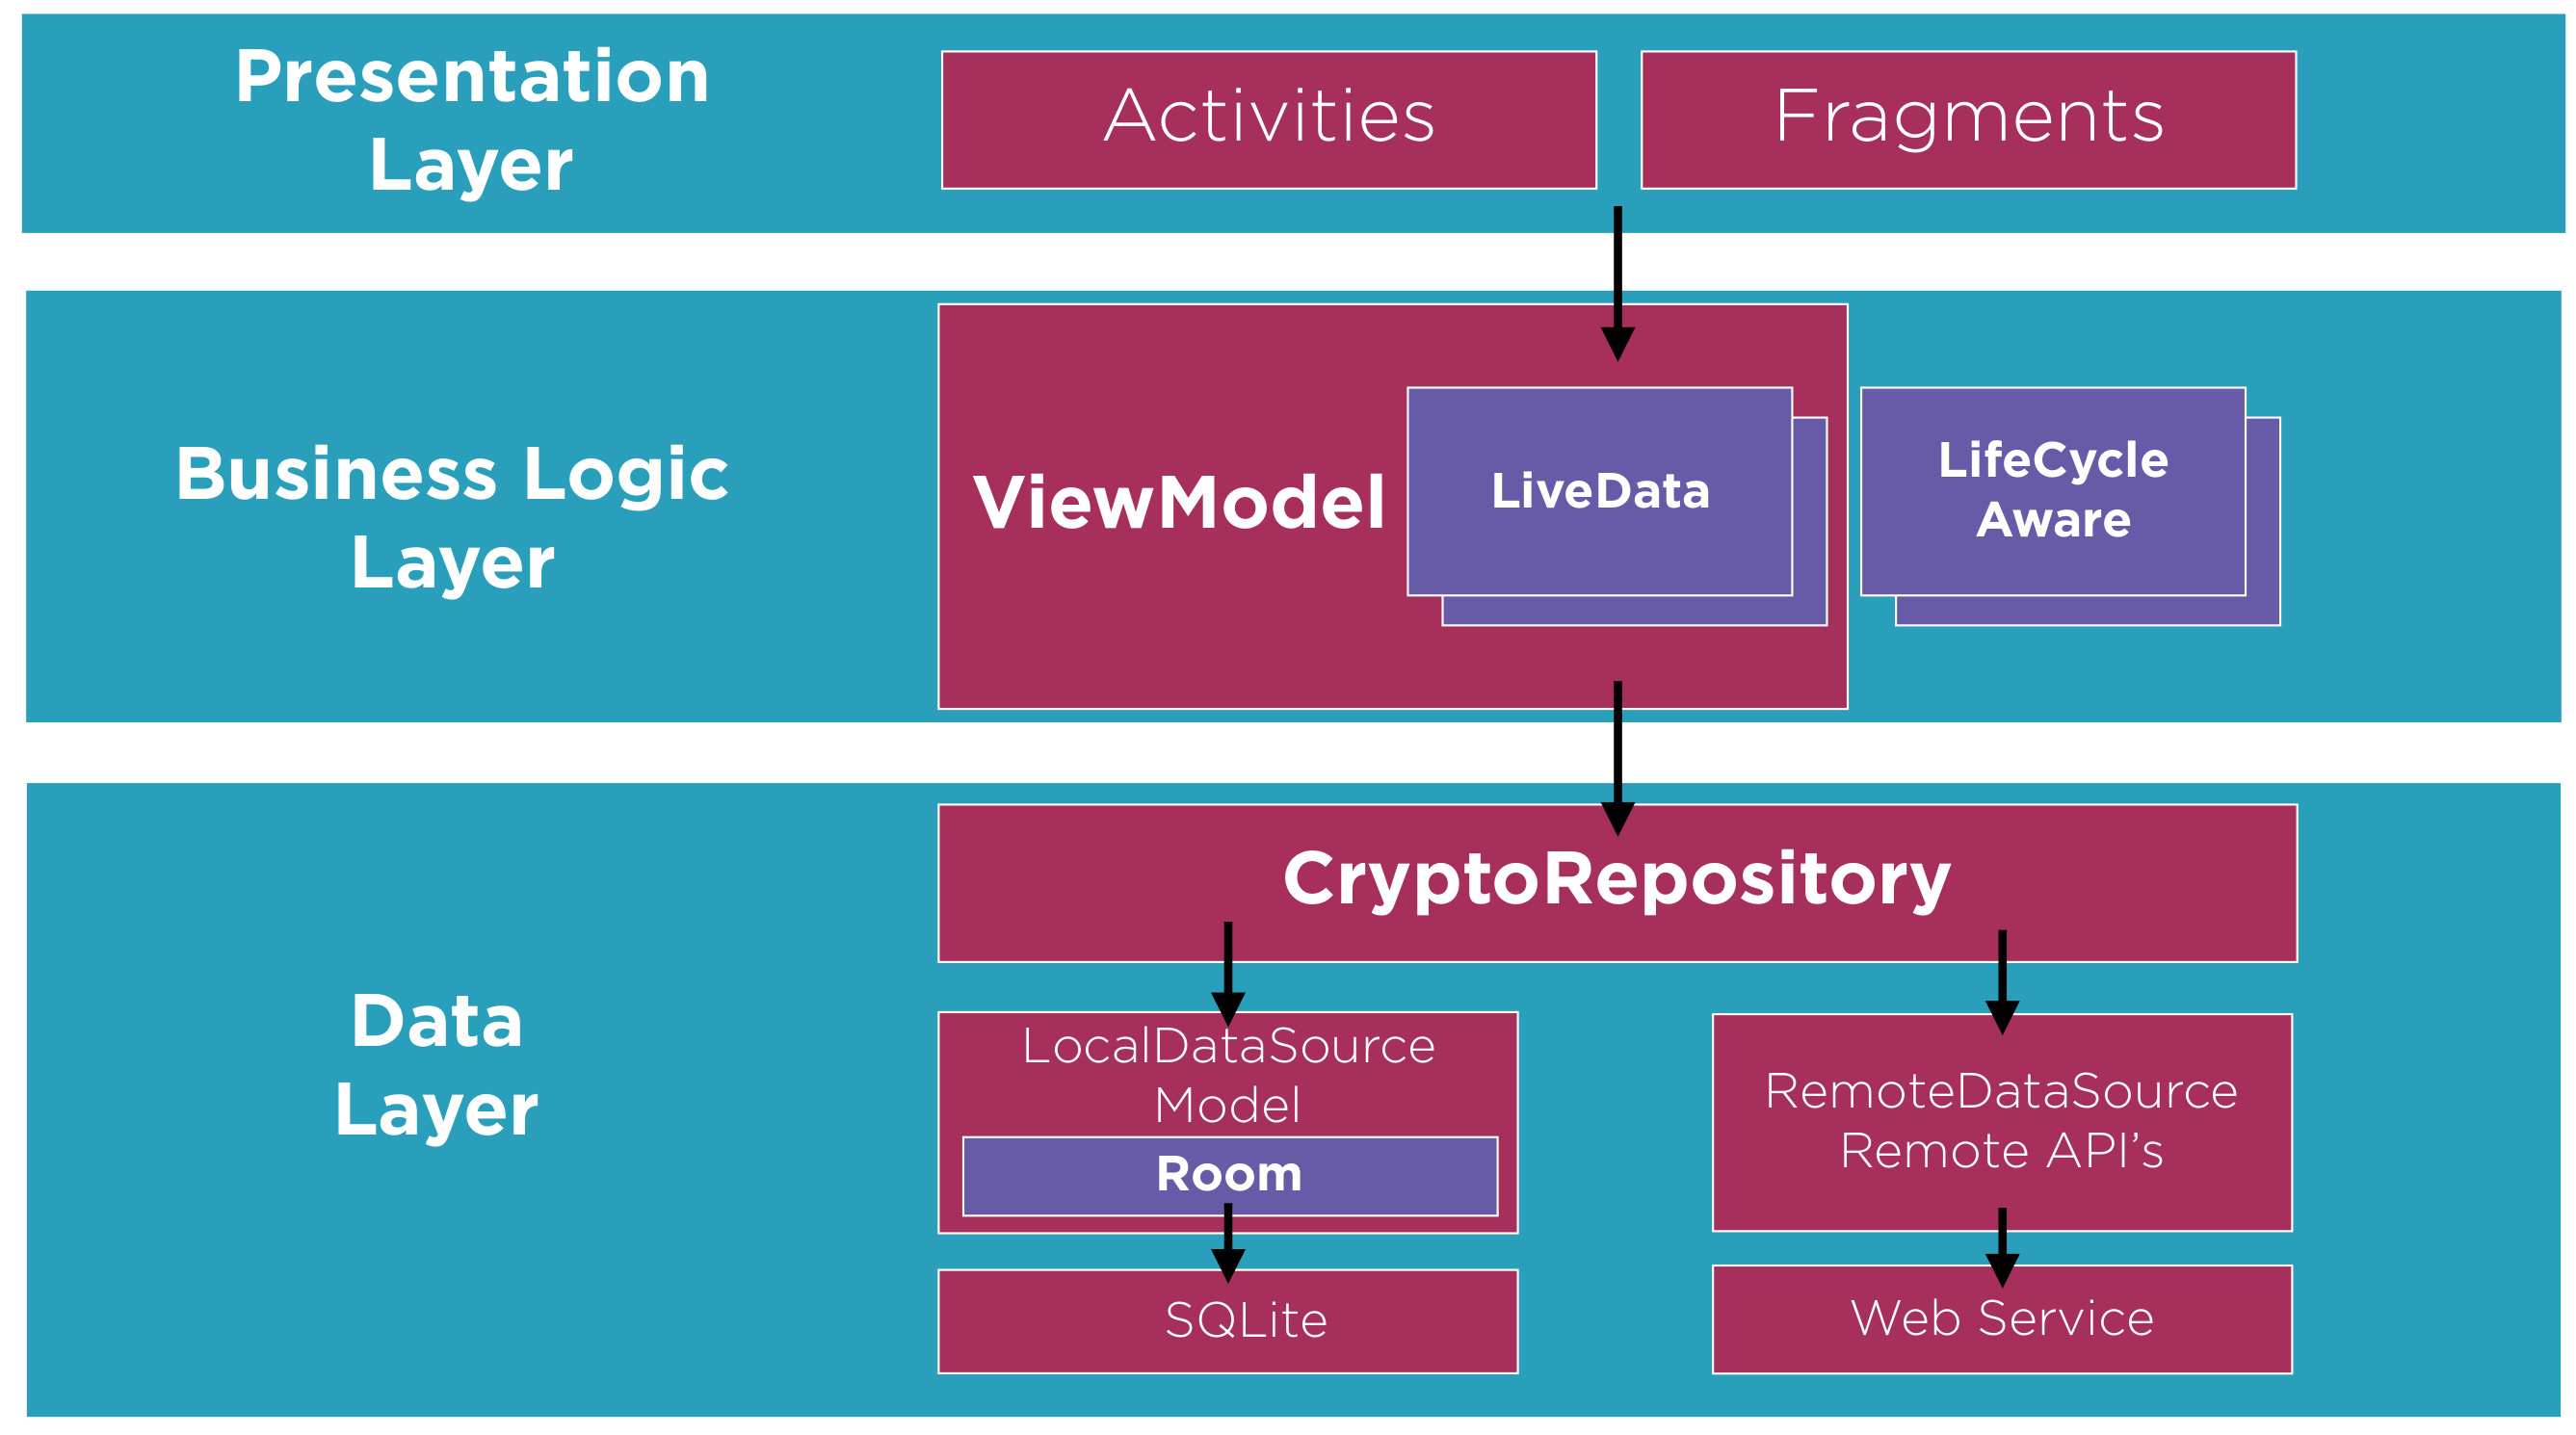
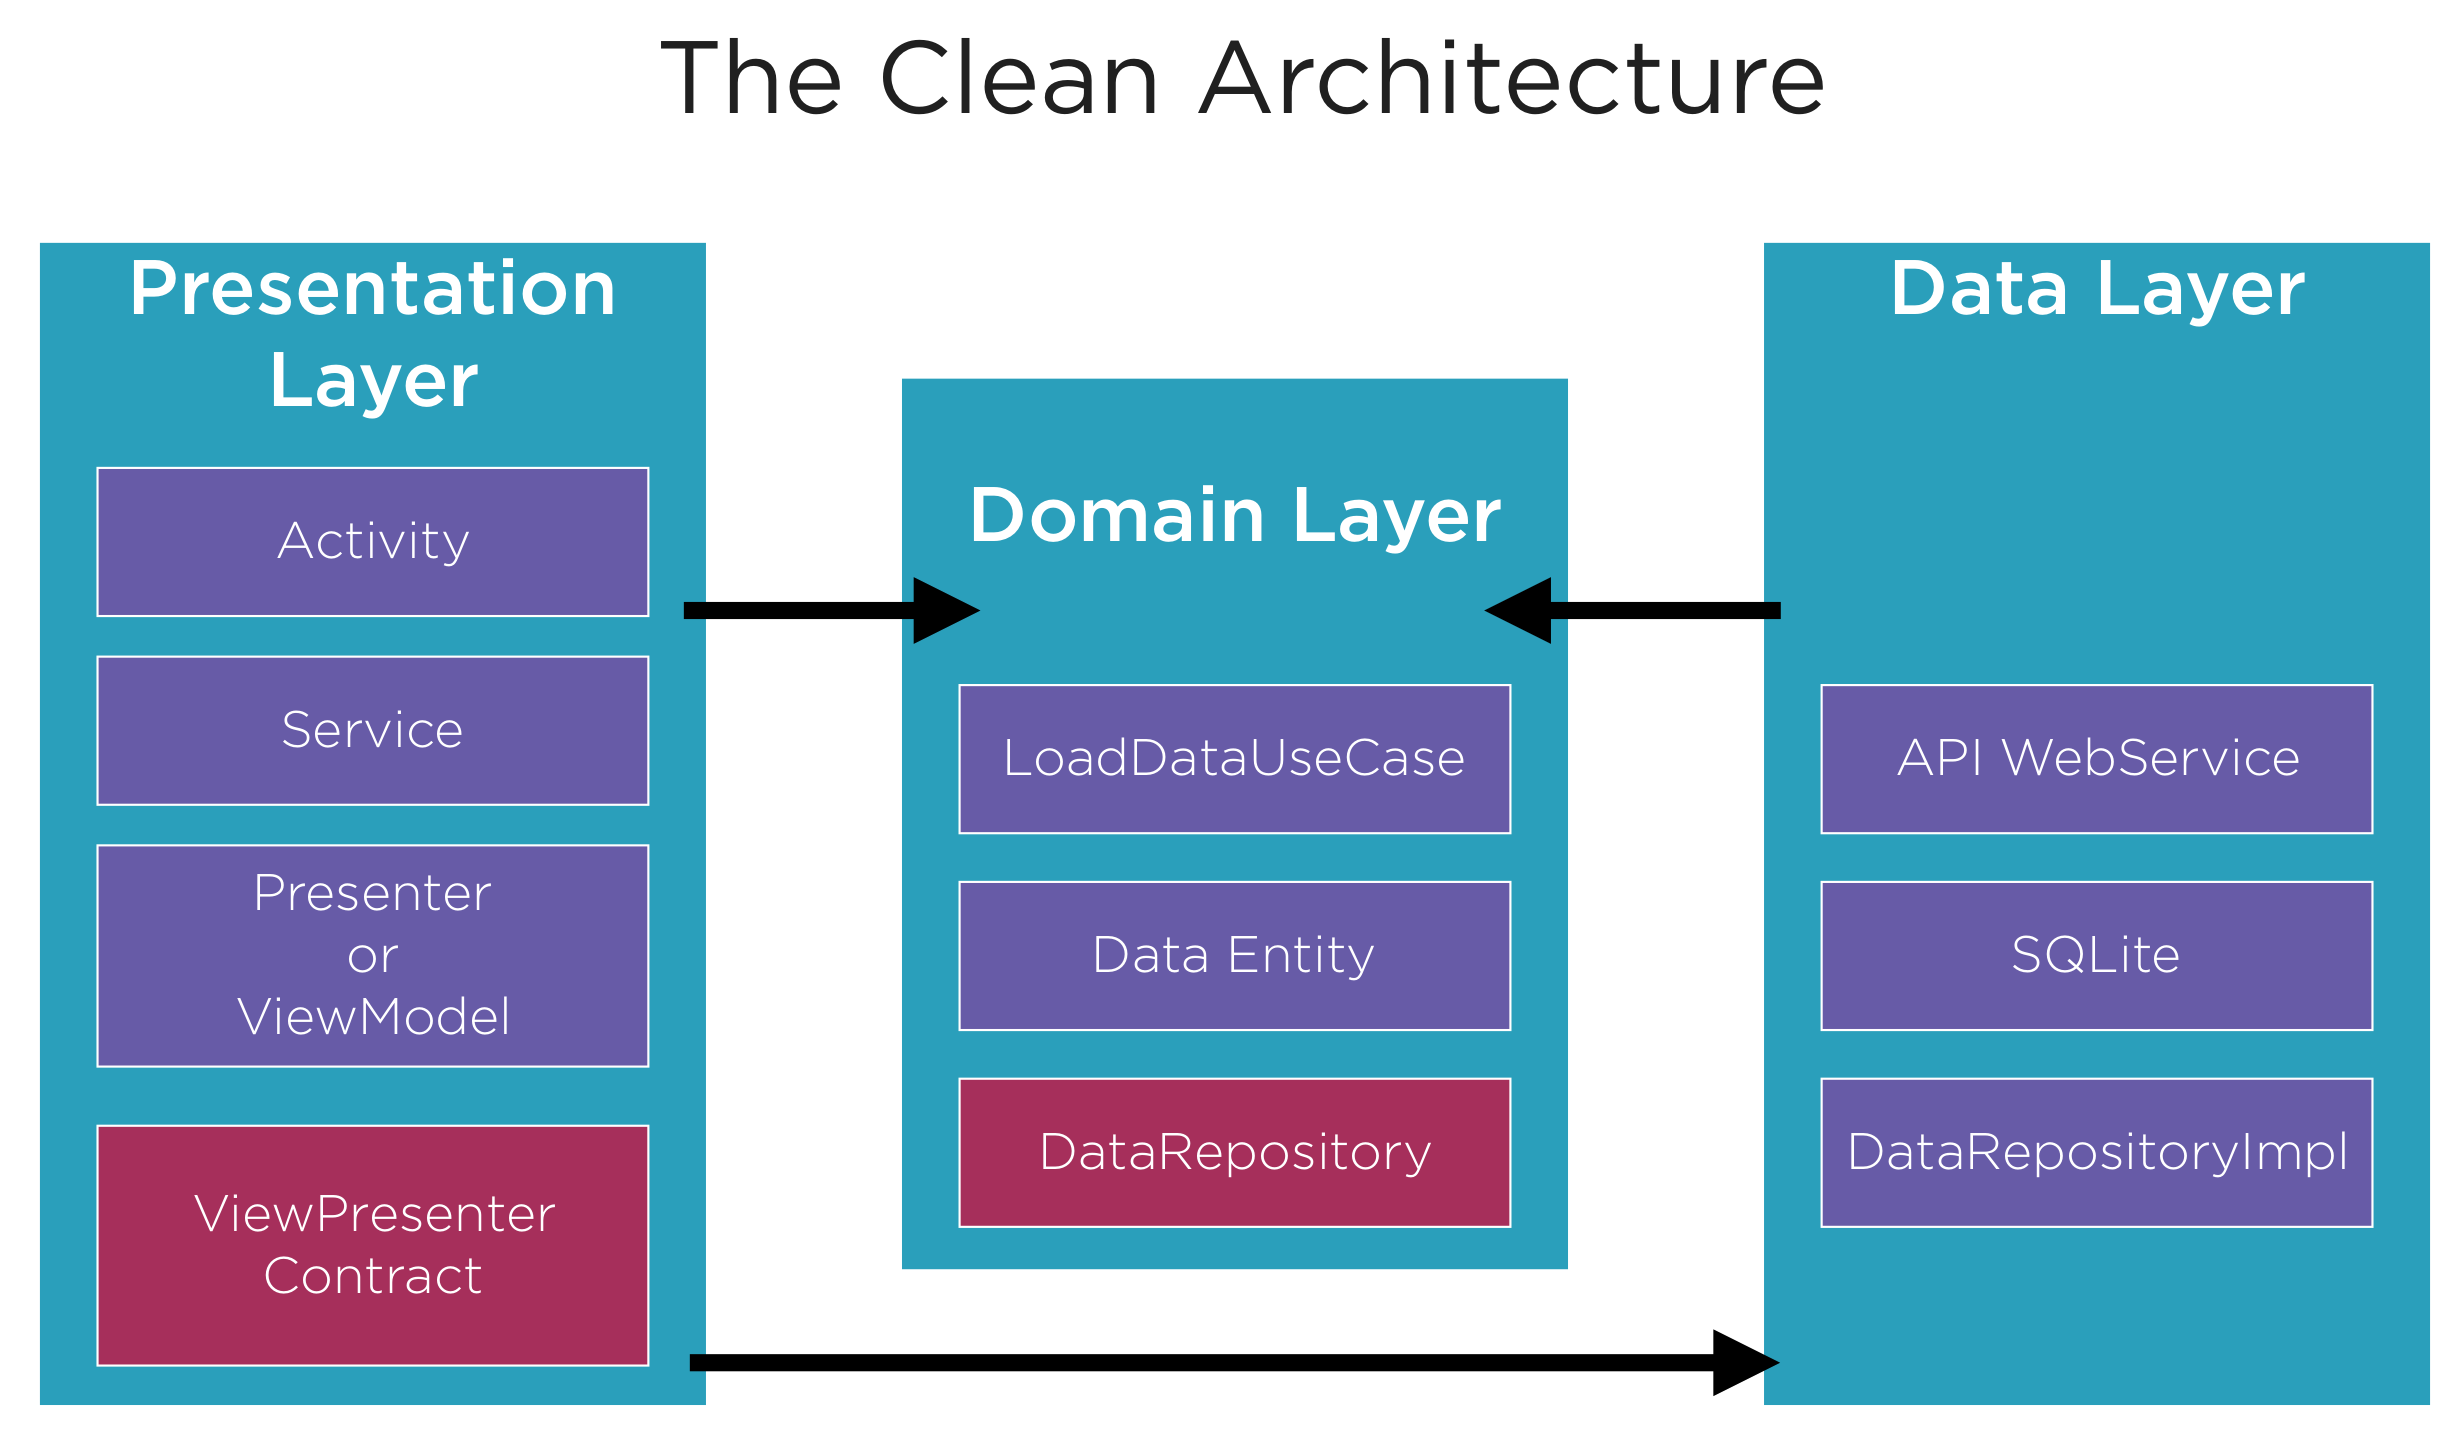
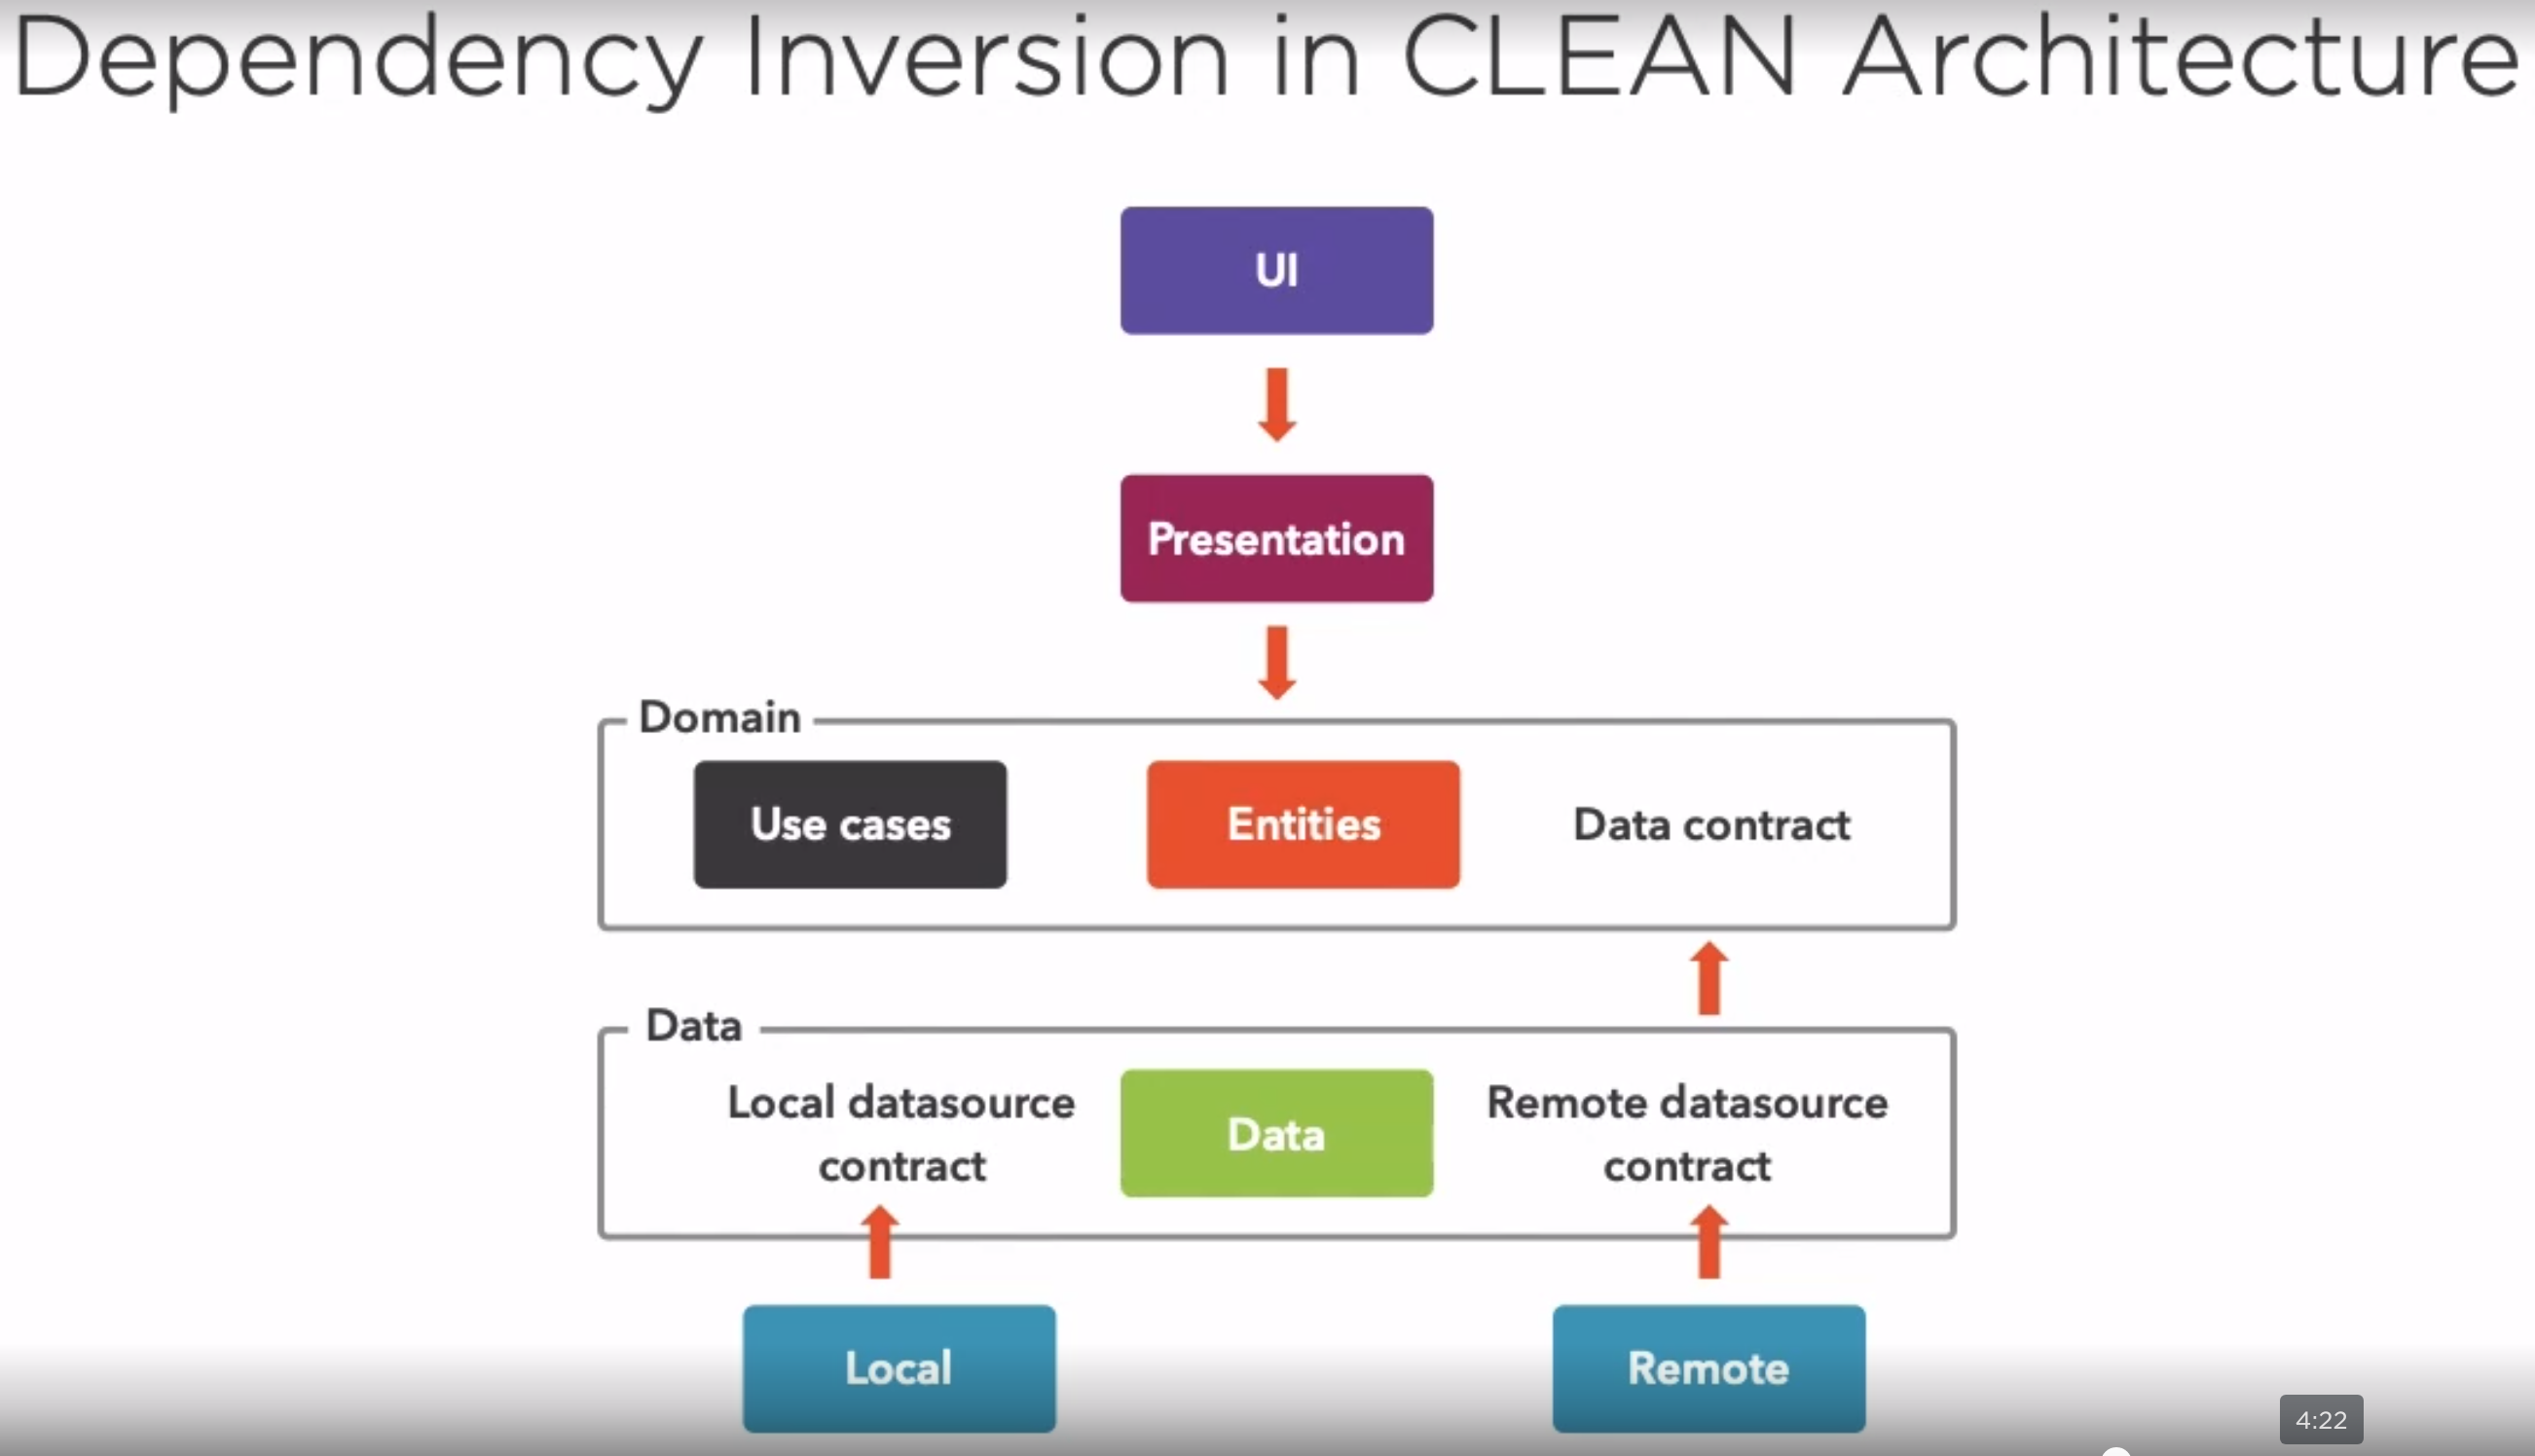
Here is the App using a Clean. The main thrust of the architecture is to layer the solution which of course has it's own problems with performance, duplication.
Implementation
The implementation makes sure we follow the Dependency Rule which States
- Dependence can only point upwards
- Inner layers are rules and policies
- Outer layers are mechanisms and tools
- Inner layers are oblivious to outer layers
- Dependencies must point towards stability and abstraction
Using this approach we can make sure the domain layer is non-android and therefore testable without hardware.
Presentation Layer
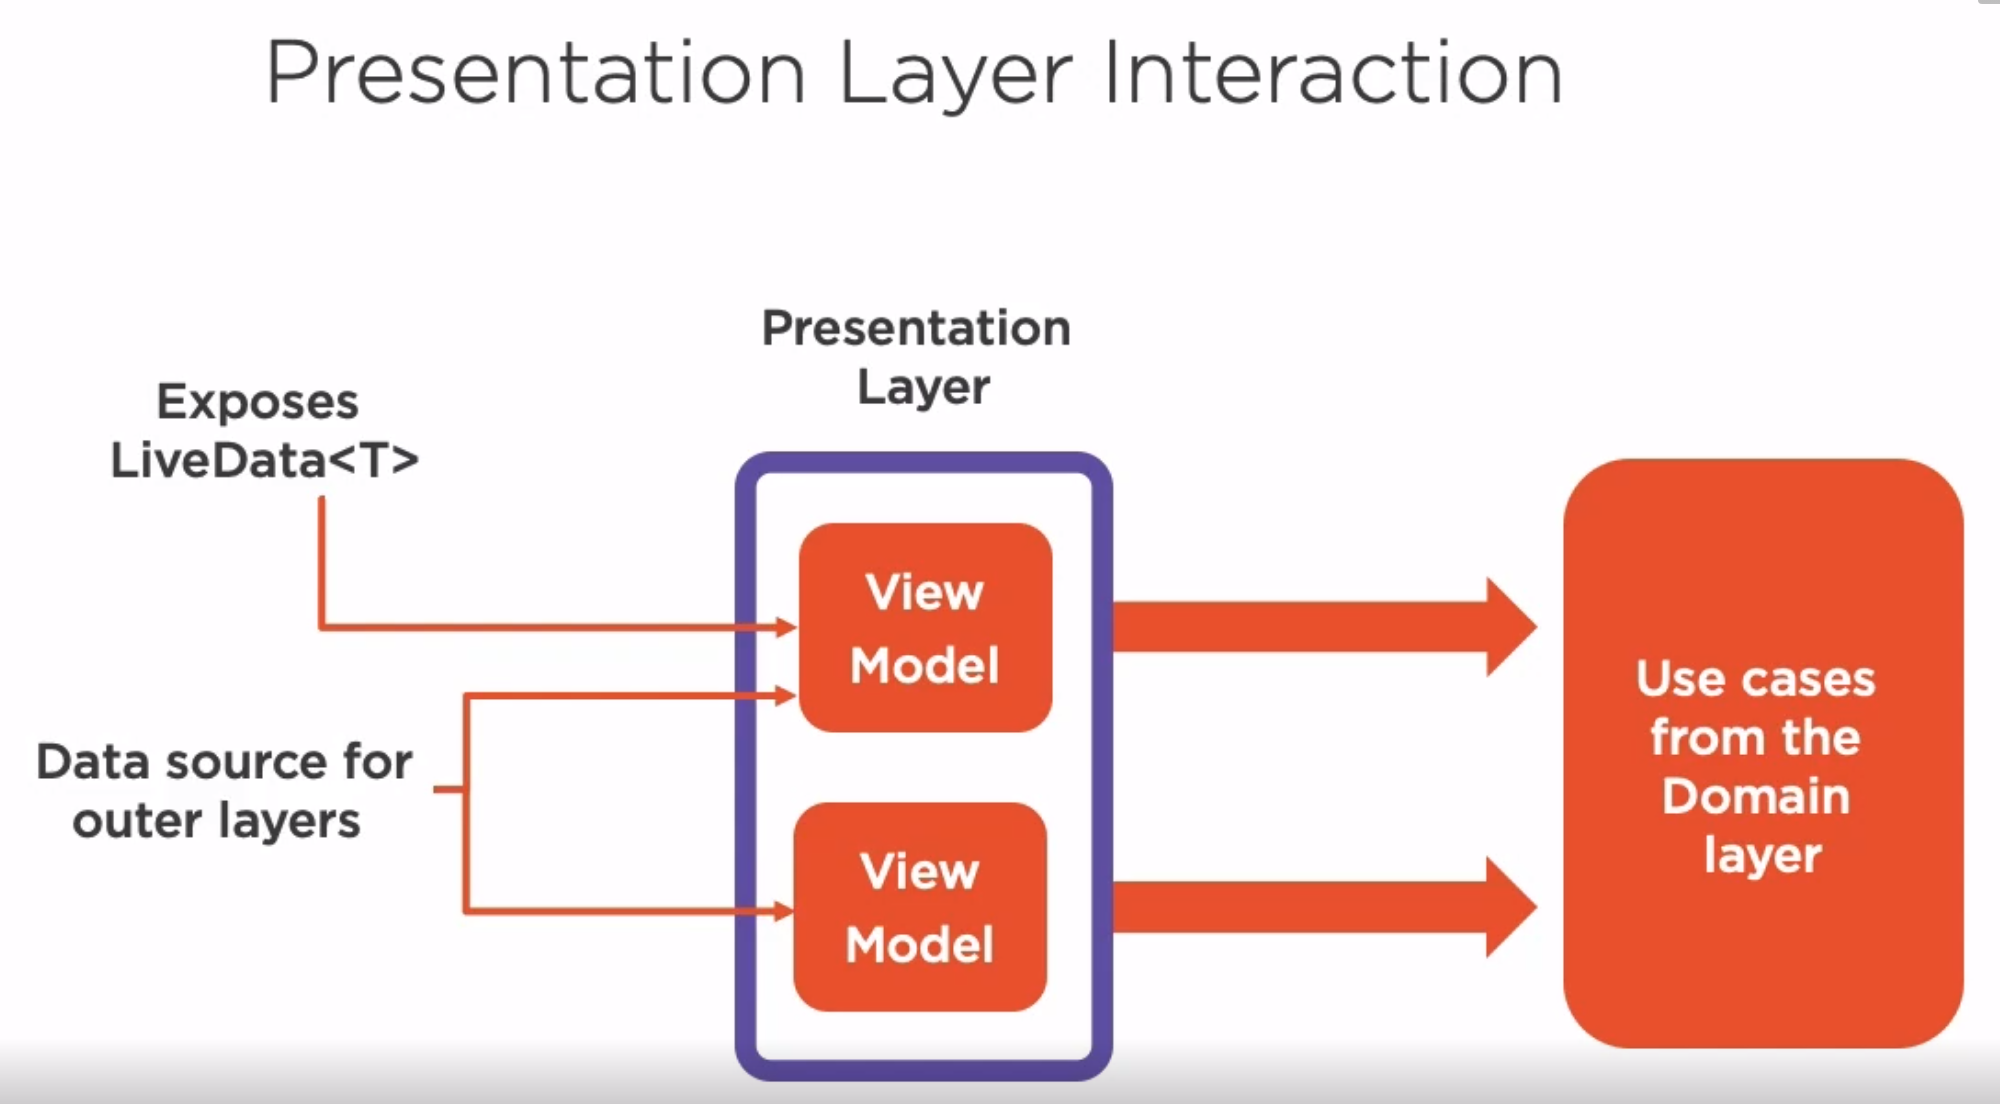
In the presentation layer the demo converted Rx Observables from the domanin layer to LiveData. The presentation layer contained mappers and DTOs to put the domain data in.
Data Layer
Introduction
This is not a CLEAN approach but an implementation.
Repository Pattern
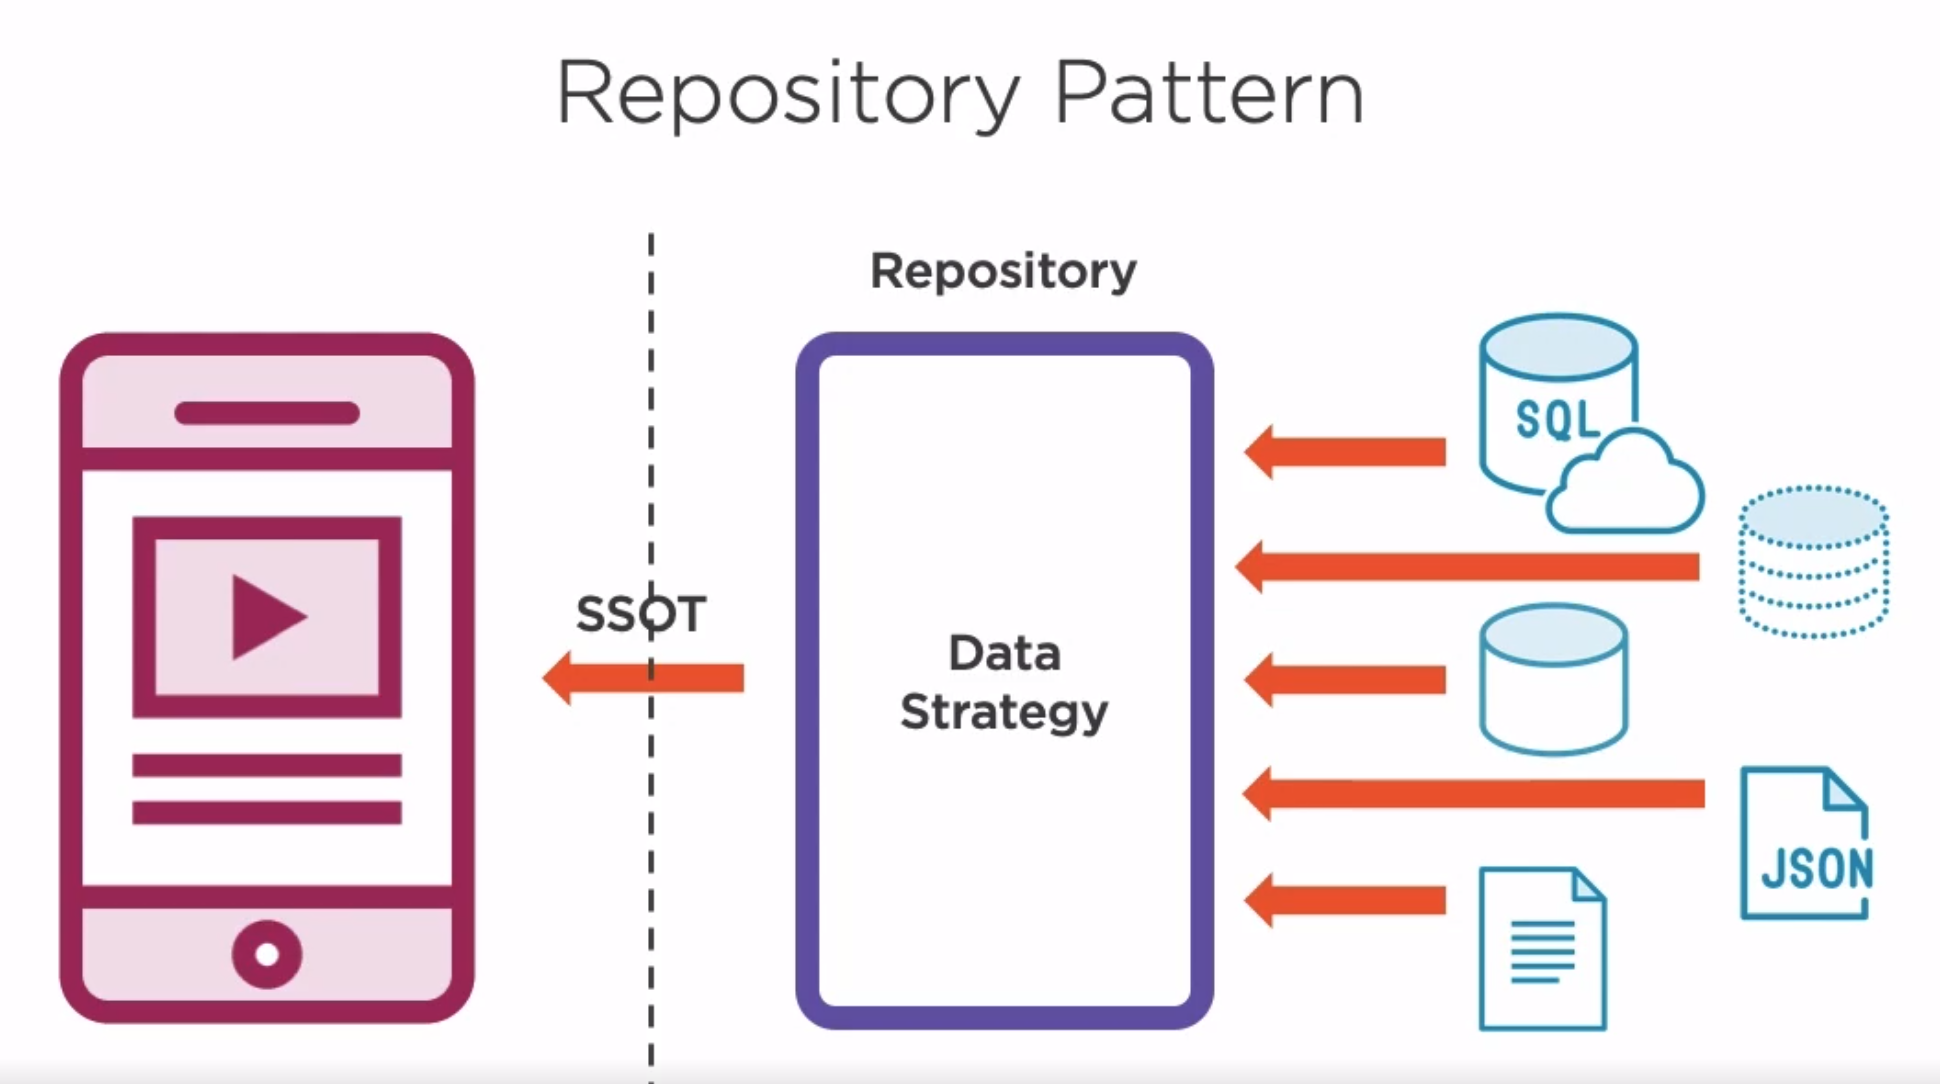
The Repository Responsibilities
- Interacts with datasources
- Isolates user interface and data strategies
- Wraps data strategies and polices
- Data conversion
The repository pattern is where you keep the above responsibilities separate from the presentation layer and just provide an interface outwardly. This always the repository to be mocked.
Activity Lifecycle
Here is a simplified version of the lifecycle
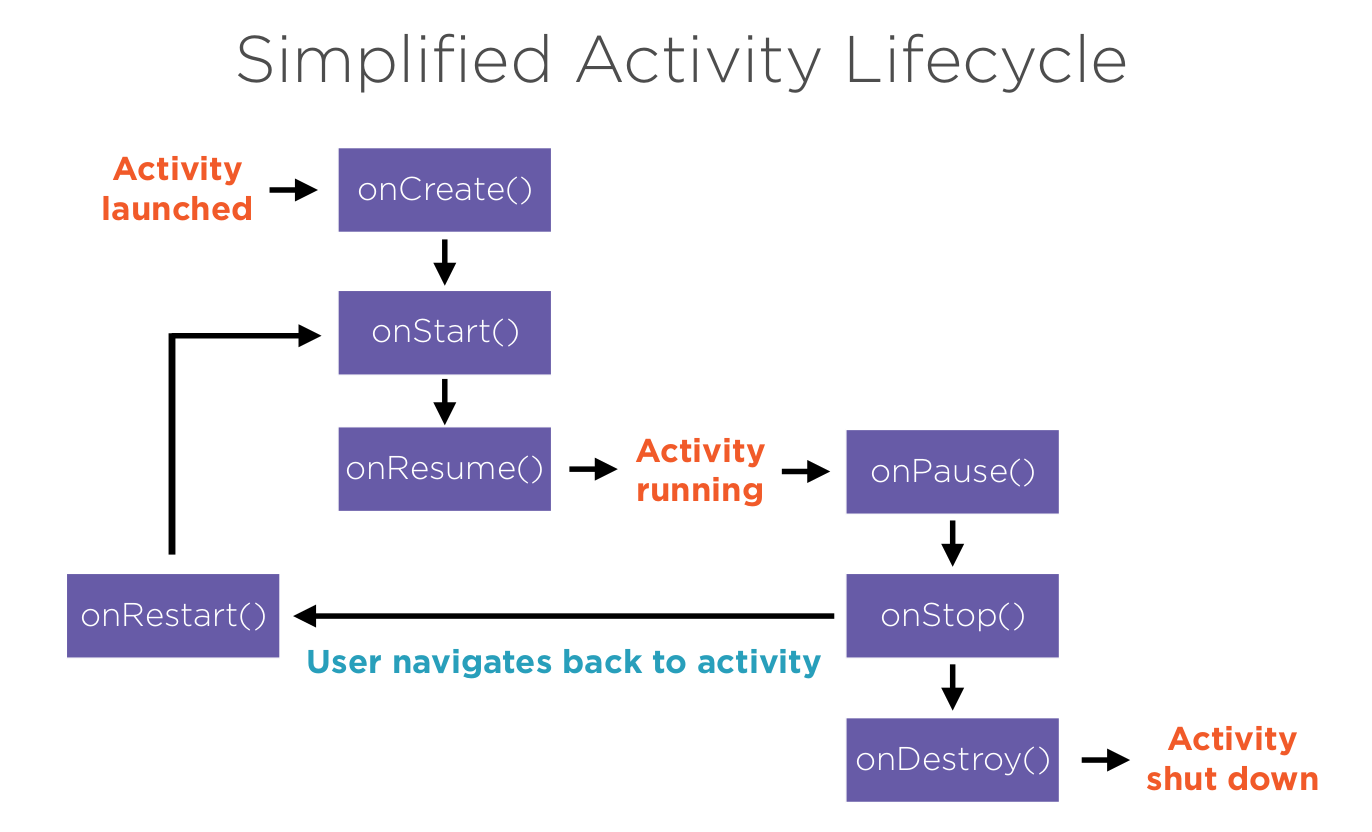
By implementing the addObserver and don't forget the removeObserver the functions in the component (object instance) are envoked.
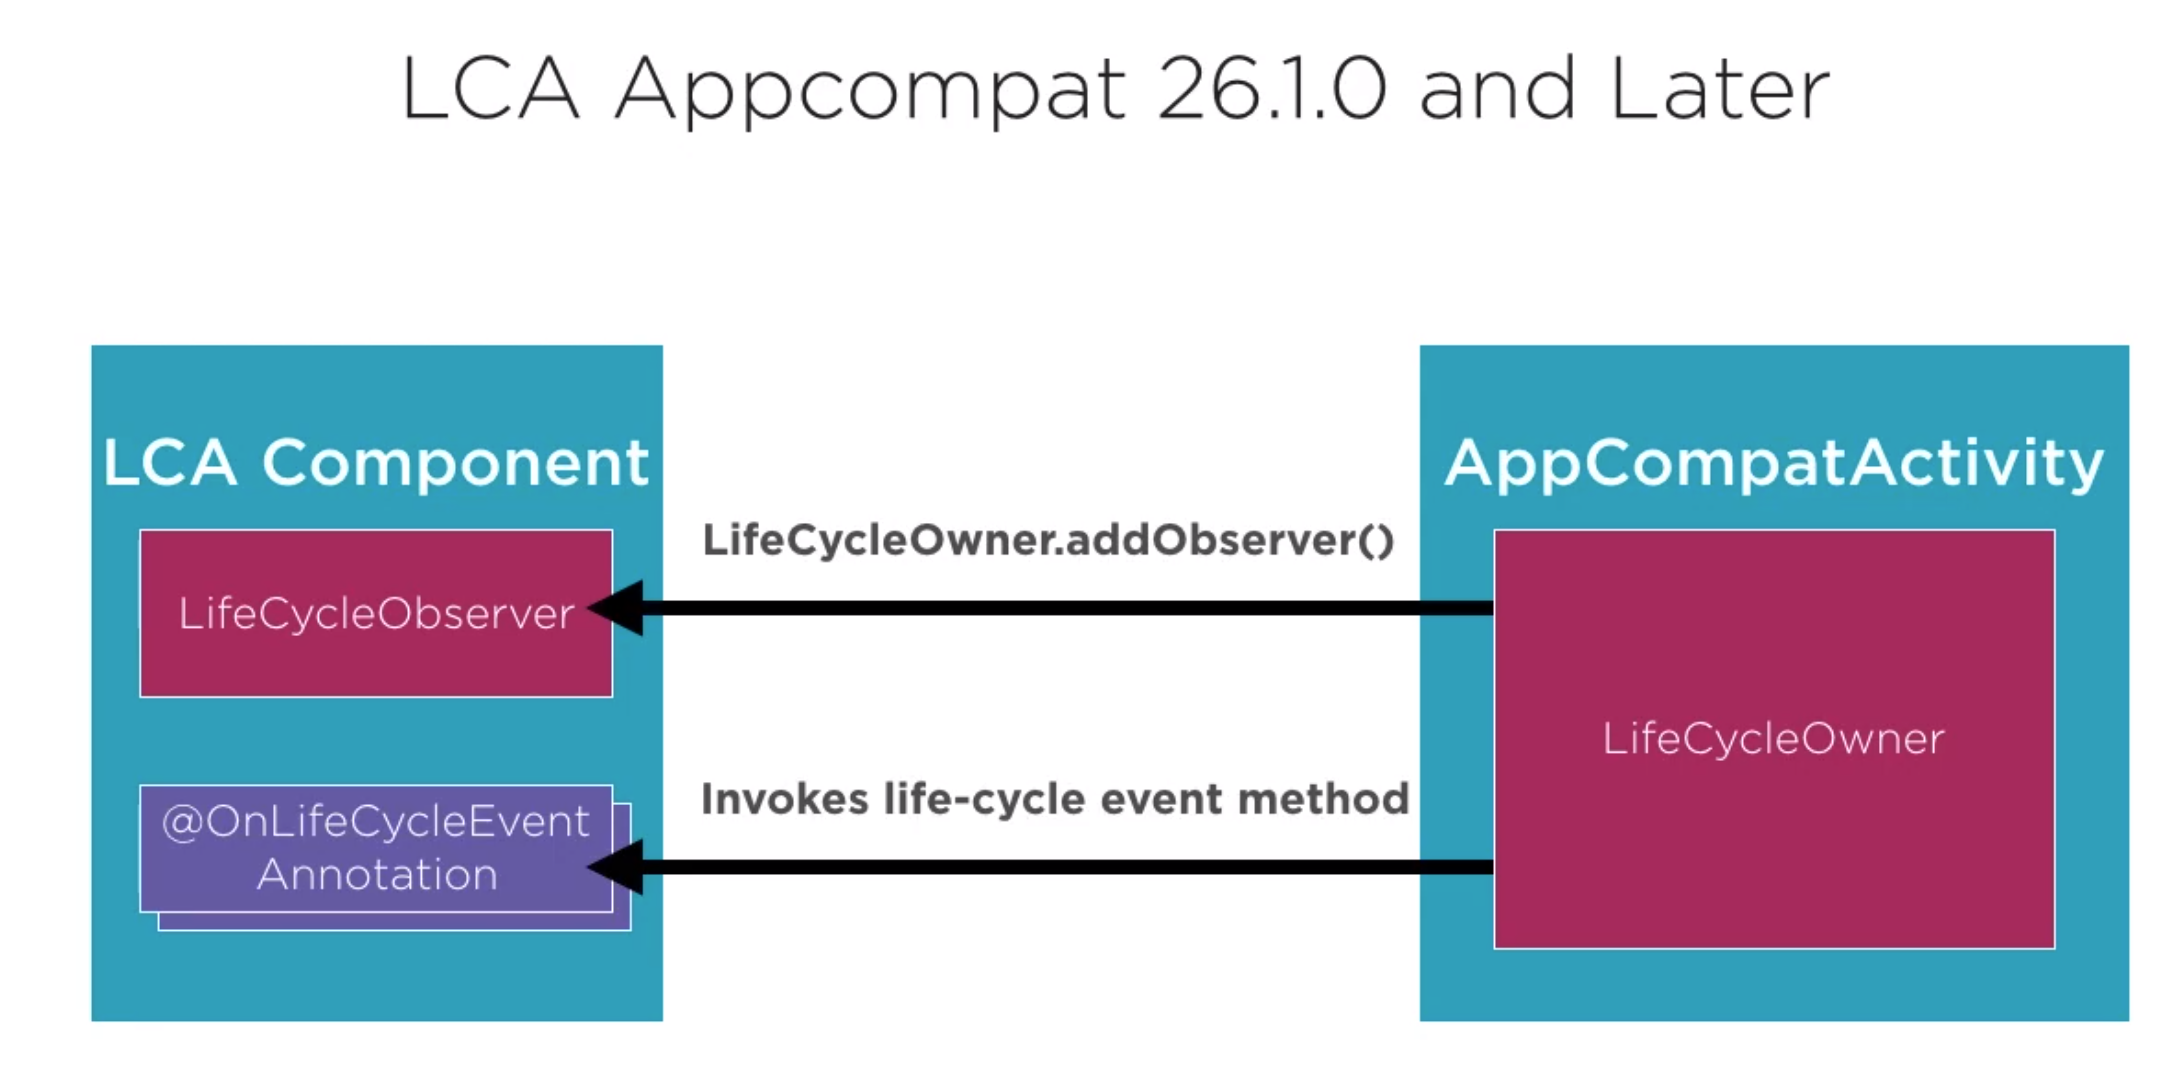 For example add
...
    protected void onCreate(Bundle savedInstanceState) {
        super.onCreate(savedInstanceState);
        myLocationManager = new MyLocationManager(this,mTracker);
        checkLocationPermission();
        getLifecycle().addObserver(myLocationManager);
    }
...
And in the Manager Class the clean() function is called when the lifecycle is STOP.
    @OnLifecycleEvent(Lifecycle.Event.ON_STOP)
    public void clean() {
        Log.d(TAG, "clean() called");
        if(mGoogleApiClient !=null) {
            mGoogleApiClient.disconnect();
        }
        final LifecycleOwner lcOwner = (LifecycleOwner)mCon;
        lcOwner.getLifecycle().removeObserver(this);
        mCon = null;
    }
Application Tidy Up
Introduction
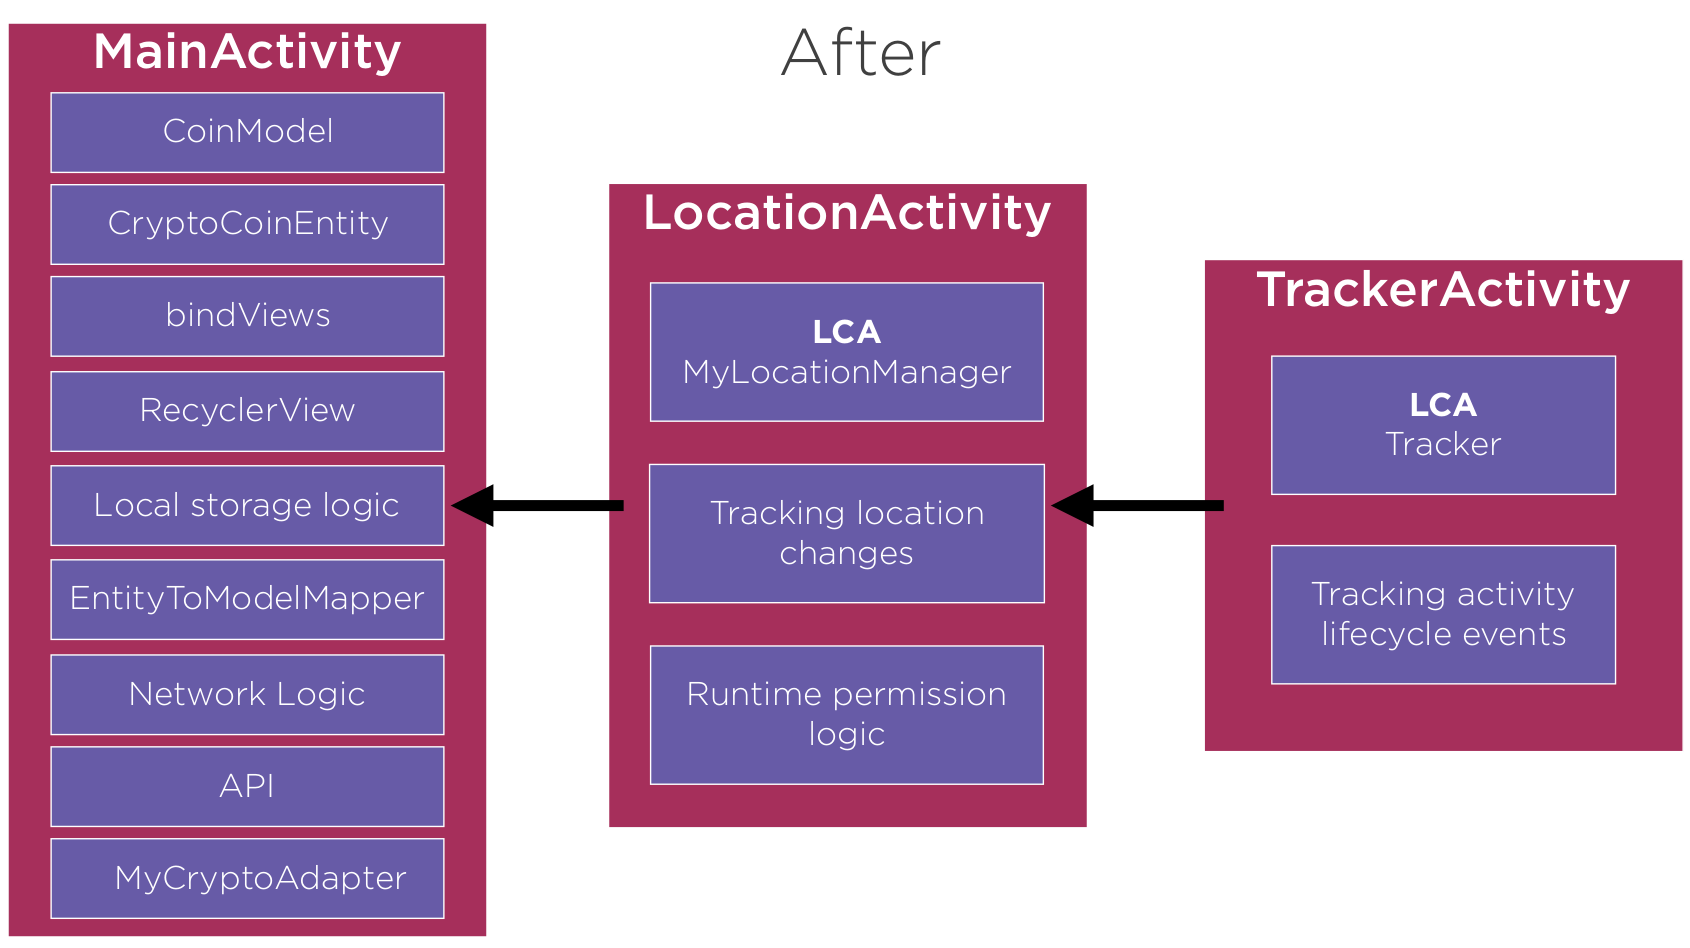
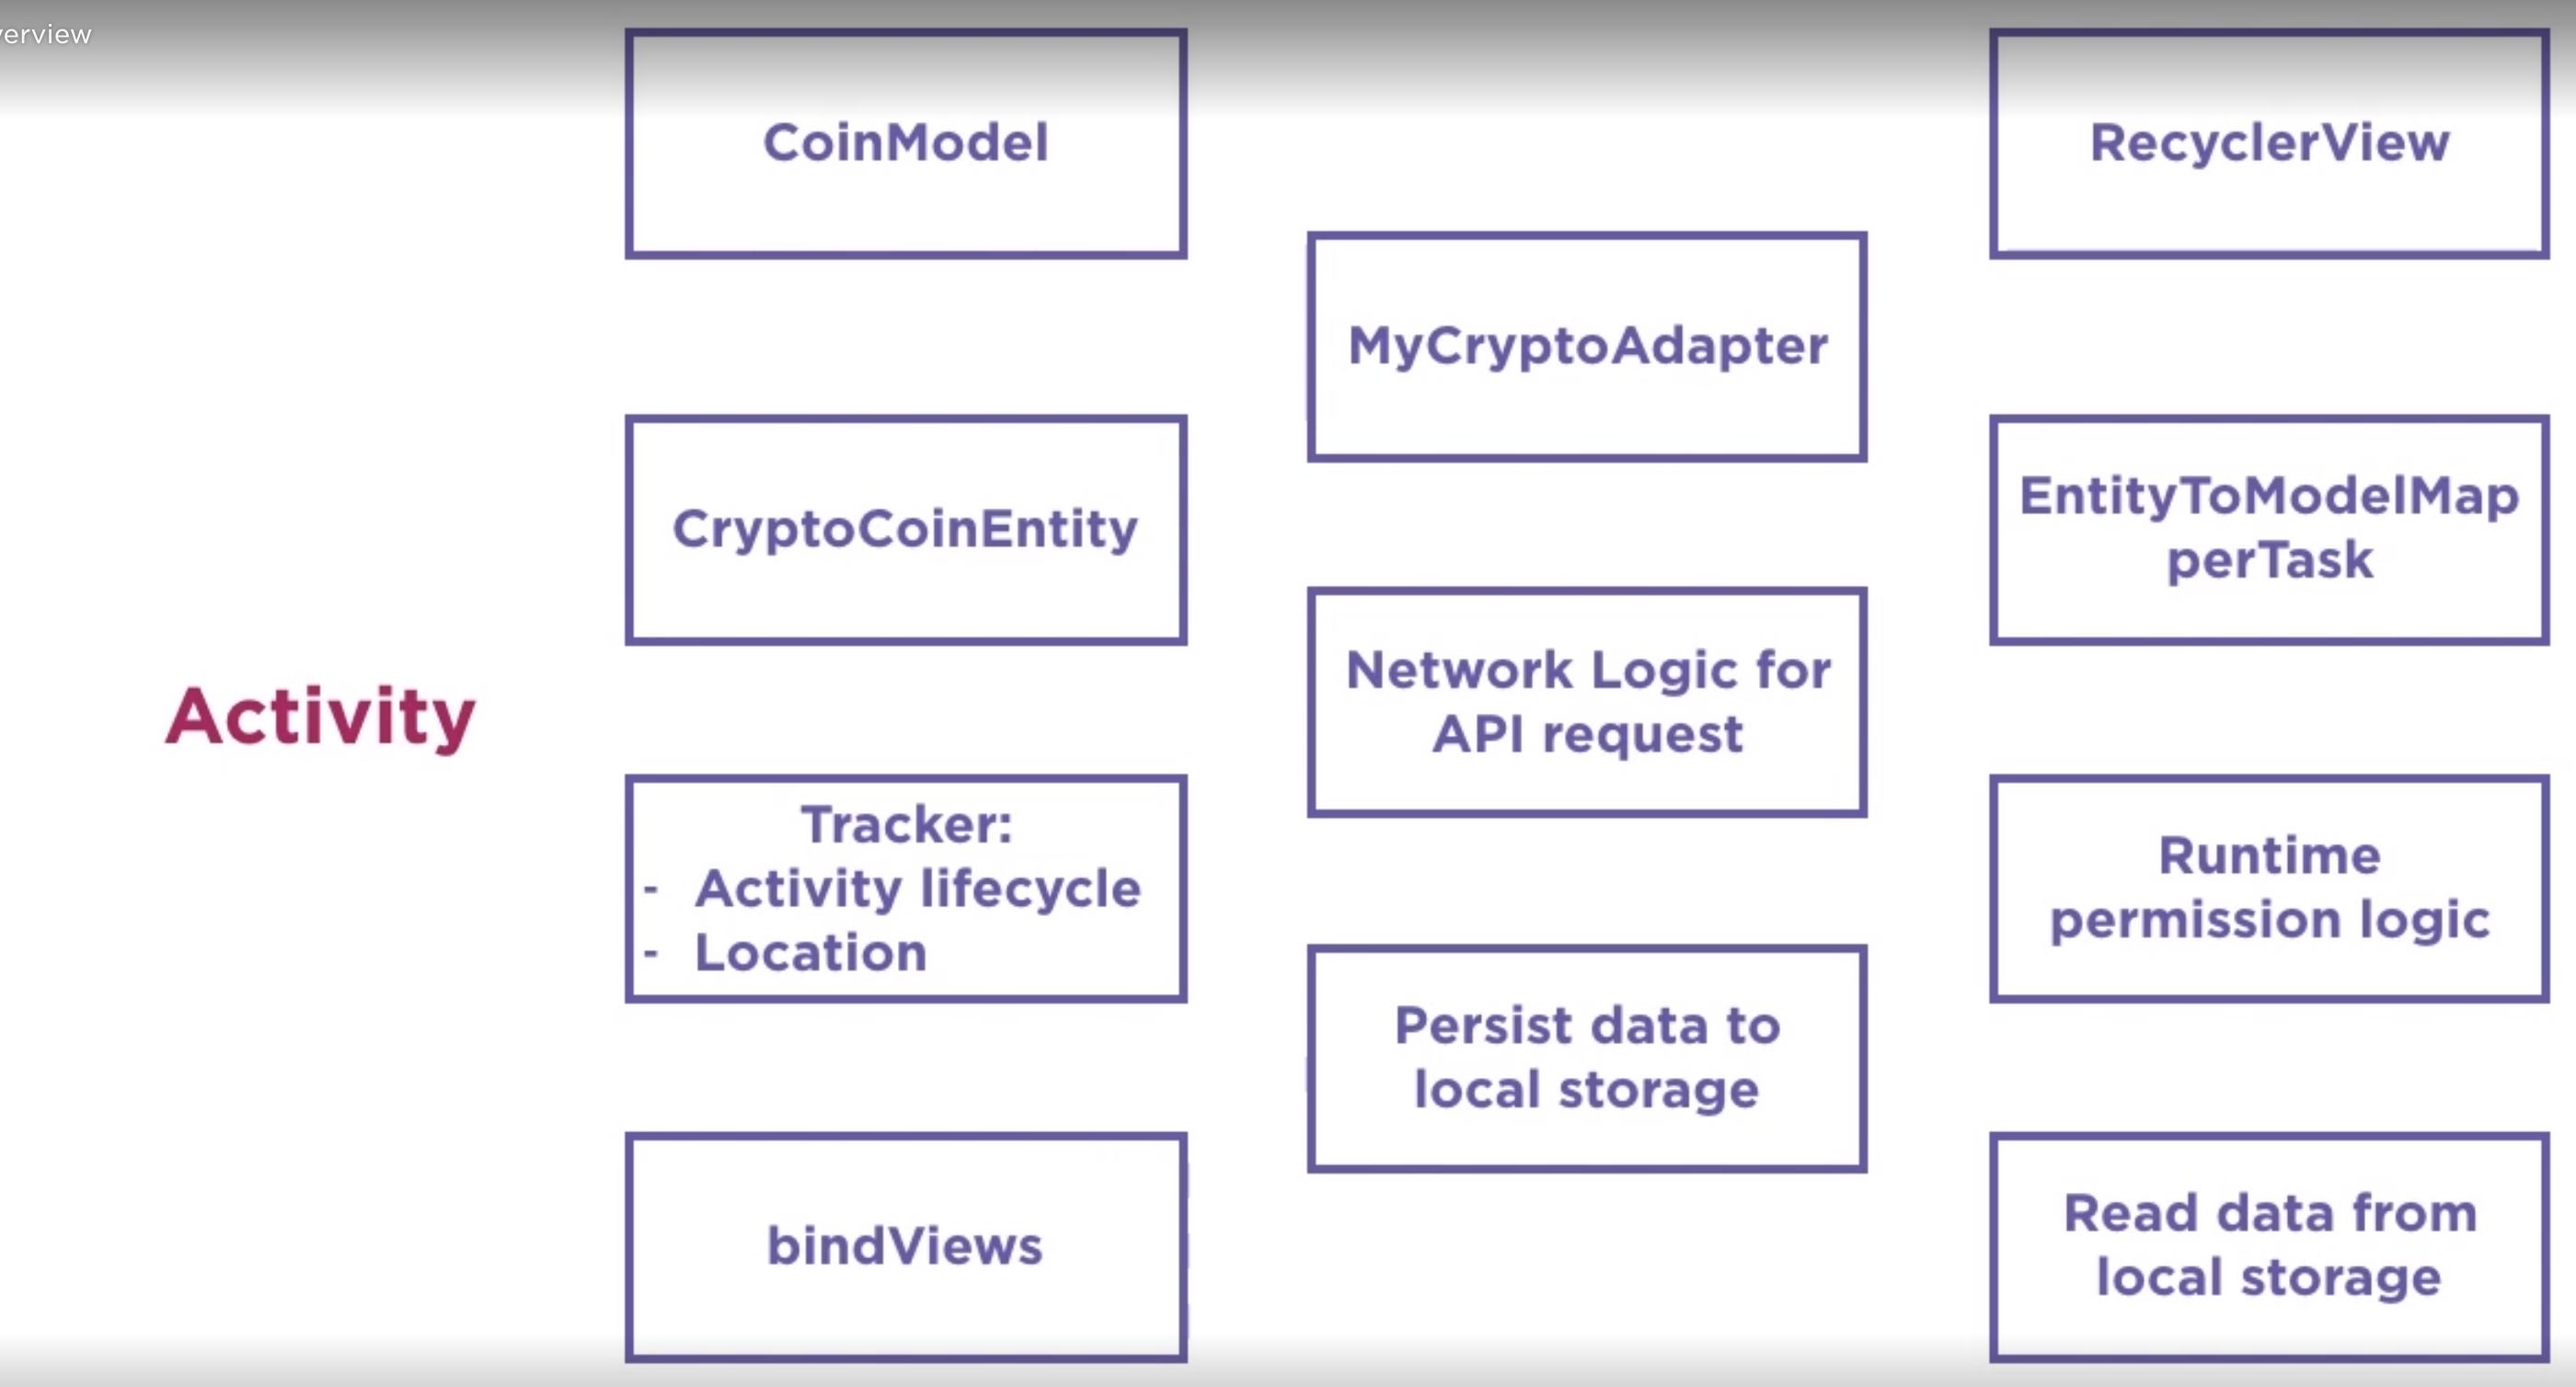
Here is an overview of the app prior to looking at it. All of the code is in on Main Activity
Step 1
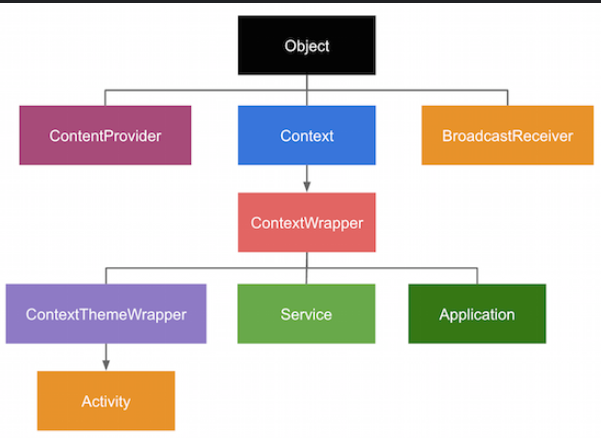
- Created TrackerActivity which extends AppCompatActivity and will be now good for other activities
- Move Tracker to its own class and implement the Lifecycle Observer interface
- When using lifecycle observer we need to remote it on destory
    @OnLifecycleEvent(Lifecycle.Event.ON_DESTROY)
    public void trackOnDestroy() {
        Log.d(TAG, "trackOnDestroy called");
        ((AppCompatActivity) con).getLifecycle().removeObserver(this);
        // mQueue.add(generateTrackingStringRequest("destroy"));
    }
Step 2
- Moved CoinModel, Divider and MyCryptoAdapter to their own files in recview package
- Add LocationManager, implemented lifecycle observer
- Added create and destruction of FusedLocationProviderClient in lifecyle
- Added disconnect of GoogleAPiClient and removal of lifecycle observer
    @OnLifecycleEvent(Lifecycle.Event.ON_START)
    public void init() {
        Log.d(TAG, "init() called");
        mFusedLocationClient = LocationServices.getFusedLocationProviderClient(mCon);
    }

    @OnLifecycleEvent(Lifecycle.Event.ON_STOP)
    public void clean() {
        Log.d(TAG, "clean() called");
        if(mGoogleApiClient !=null) {
            mGoogleApiClient.disconnect();
        }
        final LifecycleOwner lcOwner = (LifecycleOwner)mCon;
        lcOwner.getLifecycle().removeObserver(this);
        mCon = null;
    }
Step 3
- Created a LocationActivity to contain all of the logic for the runtime permission to use Location
- Add LocationManger to LocationActivity
- Change MainActivity to be derived from LocationActivity
Current State 01
Step 4 And Manual View Model and Interface
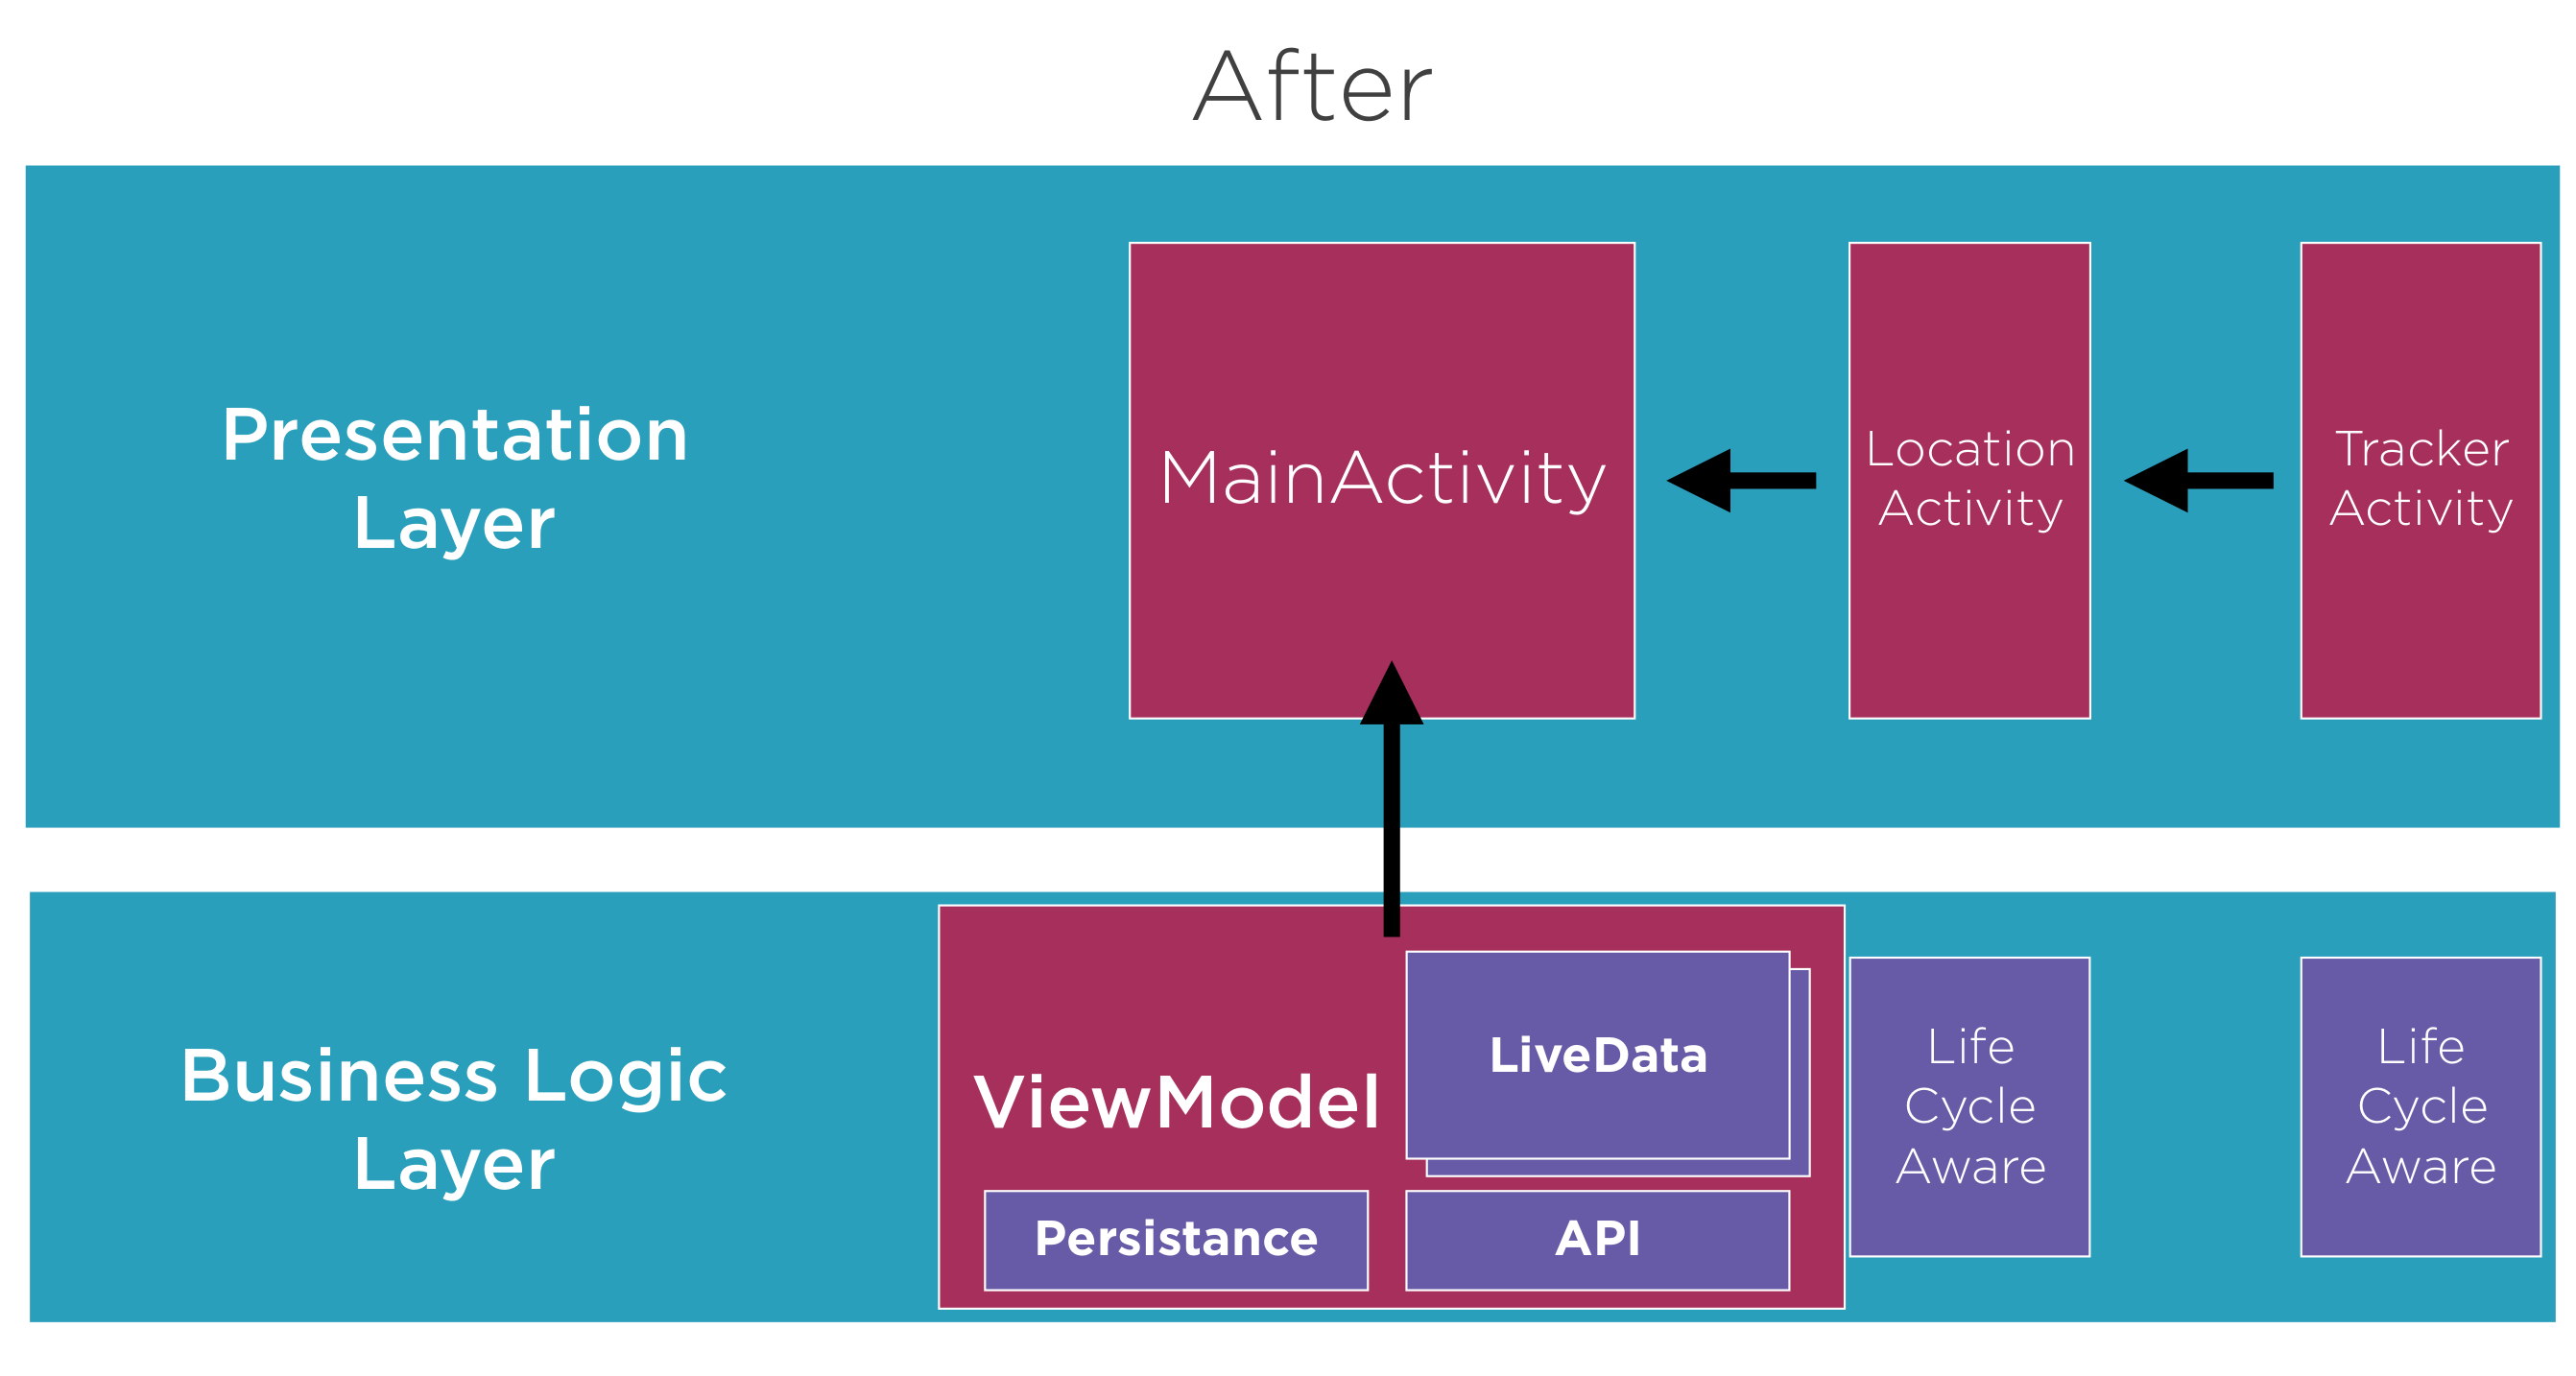
- Create a crypto view model
- Move network calling to ViewModel
- Move storage calls to to ViewModel
- Create an interface from the model to the view with updateData and setError
- MainActivity
- v*Change MainActivity to use ViewModel for fetchData
- Implement interface
    @Override
    public void updateData(List<CoinModel> data) {
        mAdapter.setItems(data);
        mAdapter.notifyDataSetChanged();
        mSwipeRefreshLayout.setRefreshing(false);
    }

    @Override
    public void setError(String msg) {
        showErrorToast(msg);
    }
Step 5 And Android View Model and Interface
- Added package android.arch.lifecycle:extensions
- Extended view model from android ViewModel
- Replace manual viewmodel creation in MainActivity. The ViewModel requires you to pass the lifeCycle owner and the ViewModel class
mViewModel = ViewModelProviders.of(this).get(CryptoViewModel.class);
Using ViewModel we should not reference other Android Components as the LifeCyle of them may differ e.g. MainActivity.
Step 6 LiveData A
With this step we will
- Wrap out data fetching with a LiveData Object
- Add an update interval logic
- Use the Transformations to map our data
- Use out ViewModel and LiveData objects to share data between out activity and a fragment
To achieve this we
- Create two LiveData objects for data and errors
- Created executor service
Once the data is wrapped in LiveData it can be sent to observers with either postValue to setValue depending if it is on the UI thread or not
    public void fetchData() {
        if (mQueue == null)
            mQueue = Volley.newRequestQueue(mAppContext);

        // Request a string response from the provided URL.
        final JsonObjectRequest jsonObjReq = new JsonObjectRequest(
                Request.Method.GET,
                ENDPOINT_FETCH_CRYPTO_DATA,
                null,
                response -> {
...
                    List<CoinModel> mappedData = mapEntityToModel(data);
                    // UI thread so setValue
                    mDataApi.setValue(mappedData);
                },
                error -> {
                    Log.d(TAG, "Thread->" +
                            Thread.currentThread().getName() + "\tGot some network error");
                    mError.setValue(error.toString());
                    // mView.setError(error.toString());
                    mExecutor.execute(() -> {
                        try {
                            JSONArray dataNew = readDataFromStorage();
                            ArrayList<CryptoCoinEntityNew> entitiesNew = parseJSON(dataNew.toString());
                            ArrayList<CryptoCoinEntity> entities = convertNewToOld(entitiesNew);
                            List<CoinModel> mappedData = mapEntityToModel(entities);
                            // Background thread so postValue
                            mDataApi.postValue(mappedData);
                        } catch (JSONException e) {
                            e.printStackTrace();
                        }
                    });
                }) {

            @Override
            public Map<String, String> getHeaders() throws AuthFailureError {
...
            }

            @Override
            protected Map<String, String> getParams() {
...
            }

        };

        // Add the request to the RequestQueue.
        mQueue.add(jsonObjReq);
    }
Step 6 LiveData B
We now need to observe the live data being sent via postValue and setValue. To do this we
- Add observers
- Build a Error fragment to display the error
The frame must pass the activity and not this when using the ViewModelProviders
public class UILessFragment extends Fragment {
    private static final String TAG = UILessFragment.class.getSimpleName();
    private CryptoViewModel mViewModel;
    private final Observer<Double> mObserver= totalMarketCap ->
            Log.d(TAG, "onChanged() called with: aDouble = [" +totalMarketCap + "]");

    @Override
    public void onActivityCreated(@Nullable Bundle savedInstanceState) {
        super.onActivityCreated(savedInstanceState);

        //mViewModel = ViewModelProviders.of(this).get(CryptoViewModel.class);

        mViewModel = ViewModelProviders.of(getActivity()).get(CryptoViewModel.class);

        mViewModel.getTotalMarketCap().observe(this,mObserver);
    }
In the Activity we use this with
        getSupportFragmentManager().beginTransaction()
                .add(new UILessFragment(),"UILessFragment").commit();
Current State 02
Step 7 Separating Data
Hmmm api vs Implementation
Before going into the a side step
Suppose the MyLibrary build.gradle uses api configuration in dependencies{} like this:
dependencies {
    api project(':InternalLibrary')
}
You want to use MyLibrary in your code so in your app's build.gradle you add this dependency:
dependencies {
    implementation project(':MyLibrary')
}
Creating the Data Source and Classes
In this step we
- created data module
- moved CoinModel and CryptoCoinEntity to data CoinModel
- created an object mapper class to hold mapper functions
- created datasource interface
- created local datasource for the reading/writing from local storage
- created remote datasource for the network
Creating the Repository
In this step we create a repository interface which is the interface our app using when requiring data
public interface CryptoRepository {

    LiveData<List<CoinModel>> getCryptoCoinsData();
    LiveData<String> getErrorStream();
    LiveData<Double> getTotalMarketCapStream();
    void fetchData();
}
The implementation of this interface creates on change methods for each of the live data streams.
...
    private final RemoteDataSource mRemoteDataSource;
    private final LocalDataSource mLocalDataSource;
...
    MediatorLiveData<List<CoinModel>> mDataMerger = new MediatorLiveData<>();
    MediatorLiveData<String> mErrorMerger = new MediatorLiveData<>();

    private CryptoRepositoryImpl(RemoteDataSource mRemoteDataSource, LocalDataSource mLocalDataSource, CryptoMapper mapper) {
        this.mRemoteDataSource = mRemoteDataSource;
        this.mLocalDataSource = mLocalDataSource;
        mMapper = mapper;
        mDataMerger.addSource(this.mRemoteDataSource.getDataStream(), entities ->
                mExecutor.execute(new Runnable() {
                    @Override
                    public void run() {
                        mLocalDataSource.writeData(mMapper.mapEntitiesToString(entities));
                        List<CoinModel> list = mMapper.mapEntityToModel(entities);
                        mDataMerger.postValue(list);

                    }
                })
        );
        mDataMerger.addSource(this.mLocalDataSource.getDataStream(), json ->
                mExecutor.execute(new Runnable() {
                    @Override
                    public void run() {
                        List<CryptoCoinEntity> entities = mMapper.mapJSONToEntity(json.toString());
                        List<CoinModel> models = mMapper.mapEntityToModel(entities);
                        mDataMerger.postValue(models);
                    }
                })

        );
        mErrorMerger.addSource(mRemoteDataSource.getErrorStream(), errorStr -> {
                    mErrorMerger.setValue(errorStr);
                    Log.d(TAG, "Network error -> fetching from LocalDataSource");
                    mLocalDataSource.fetch();
                }
        );
        mErrorMerger.addSource(mLocalDataSource.getErrorStream(), errorStr -> mErrorMerger.setValue(errorStr));
    }
Hooking up the ViewModel
Now we have an interface into the data we can change the View Model to utilize this with accessors to to the LiveData and the ability to initialize a fetch of the data.
public class CryptoViewModel extends AndroidViewModel {

    private static final String TAG = CryptoViewModel.class.getSimpleName();

    // Repository Interface
    private CryptoRepository mCryptoRepository;

    // Live Data Access
    public LiveData<List<CoinModel>> getCoinsMarketData() {
        return mCryptoRepository.getCryptoCoinsData();
    }
    public LiveData<String> getErrorUpdates() {
        return mCryptoRepository.getErrorStream();
    }
    public CryptoViewModel(@NonNull Application application) {
        super(application);
        mCryptoRepository= CryptoRepositoryImpl.create(application);
    }

    @Override
    protected void onCleared() {
        Log.d(TAG, "onCleared() called");
        super.onCleared();
    }

    public void fetchData() {
        mCryptoRepository.fetchData();
    }

    public LiveData<Double>getTotalMarketCap()
    {
        return mCryptoRepository.getTotalMarketCapStream();
    }
}
Summary
This is rather a big step and maybe the code in https://gitlab.com/bibble235/cryptoboom is the real documentation. The key points are hopefully made here.
Step 8 Persistence
For Persistence we are going to use Room. Which is a library which helps up persist data. Benefits are
- Supported by Google
- No SQL for simple DB Operations
- No Boilerplate for converting Data Classes
- SQL Query validate at compile time
- Live updates with LiveData<T>
- Supports RxJava Observables
- Easy Testing
To use room do this we will
- Define the Entity
- Define the Data Access Object DAO for Room
- Define the database
Room Packages
These were the packages required
    implementation "android.arch.persistence.room:runtime:1.1.1"
    annotationProcessor "android.arch.persistence.room:compiler:1.1.1"
Entity
Fairly self explanatory so read the docs for more
@Entity(tableName = "coins",
        indices = {@Index("symbol"),
                   @Index("total_supply"),
                   @Index({"id","symbol"})})

public class CryptoCoinEntity {
    //We are going to get a list of these entities from our api call - this entity is immutable
    @JsonProperty("id")
    @ColumnInfo(name="id")
    private String id;

    @JsonProperty("name")
    @ColumnInfo(name="n")
    private String name;

    @JsonProperty("symbol")
    @PrimaryKey
    @NonNull
    private String symbol;
Data Access Object
There is syntax checking whilst editing and at compile time. Like the integration into LiveData. Must checkout if they support RxJava.
@Dao
public interface CoinDao {

    @Insert(onConflict = OnConflictStrategy.REPLACE)
    void insertCoins(List<CryptoCoinEntity> coins);

    @Query("SELECT * FROM coins")
    LiveData<List<CryptoCoinEntity>> getAllCoinsLive();

    @Query("SELECT * FROM coins")
    List<CryptoCoinEntity> getAllCoins();

    @Query("SELECT * FROM coins LIMIT :limit")
    LiveData<List<CryptoCoinEntity>>getCoins(int limit);

    @Query("SELECT * FROM coins WHERE symbol=:symbol")
    LiveData<CryptoCoinEntity>getCoin(String symbol);
}
Database
Note changing the entity will result in errors without managing the version. There are options but read the docs.
@Database(entities = {CryptoCoinEntity.class}, version = 1)
public abstract class RoomDb extends RoomDatabase {

    static final String DATABASE_NAME = "market_data";
    private static RoomDb INSTANCE;
    public abstract CoinDao coinDao();
    public static RoomDb getDatabase(Context context) {
        if (INSTANCE == null) {
            INSTANCE= Room.databaseBuilder(context.getApplicationContext(),
                    RoomDb.class, DATABASE_NAME).build();
        }
        return INSTANCE;
    }
}
Implementation
- Add the RoomDb to the Local DataSource and initialize it with app context
- Replace the read/write with db calls
...
    @Override
    public LiveData<List<CryptoCoinEntity>> getDataStream() {
        return mDb.coinDao().getAllCoinsLive();
    }

    public void writeData(List<CryptoCoinEntity> coins) {
        try {
            mDb.coinDao().insertCoins(coins);
        }catch(Exception e)
        {
            e.printStackTrace();
            mError.postValue(e.getMessage());
        }
    }

    public List<CryptoCoinEntity> getALlCoins() {
        return mDb.coinDao().getAllCoins();
    }
...
Current State 03
Testing
UI Testing
We and use
- Exerciser Monkey
This will provide random stress testing for our app. Simply run from the adb the following command
sudo adb shell monkey -p com.bibble.mypackage -v 1000
Almost free apart from the bugs. The -p is the package and -v is the number of events to run<
