Android Fragments
Introduction
Introduced in API 11. They are a small piece of UI and must have an Activity. Fragments can be added or removed from the Activity. They allow you to capture the UI functionality where you may need to share it across different activities. If we look at phone vs tablet we might this it more appropriate to use to activities but the UI code will remain the same.

Creating Fragment
- Create layout
- Create a subclass and Link layout with Fragment
- Place the Fragment inside an Activity
Create layout
<?xml version="1.0" encoding="utf-8"?>
<LinearLayout xmlns:android="http://schemas.android.com/apk/res/android"
                          android:layout_width="match_parent"
                          android:layout_height="match_parent"
                          android:background="#FF0"
                          android:orientation="vertical">

        <TextView
                android:layout_width="wrap_content"
                android:layout_height="wrap_content"
                android:layout_margin="10dp"
                android:text="Hello From Fragment"
                android:textColor="@android:color/black"/>

</LinearLayout>
Create layout and Link layout with Fragment
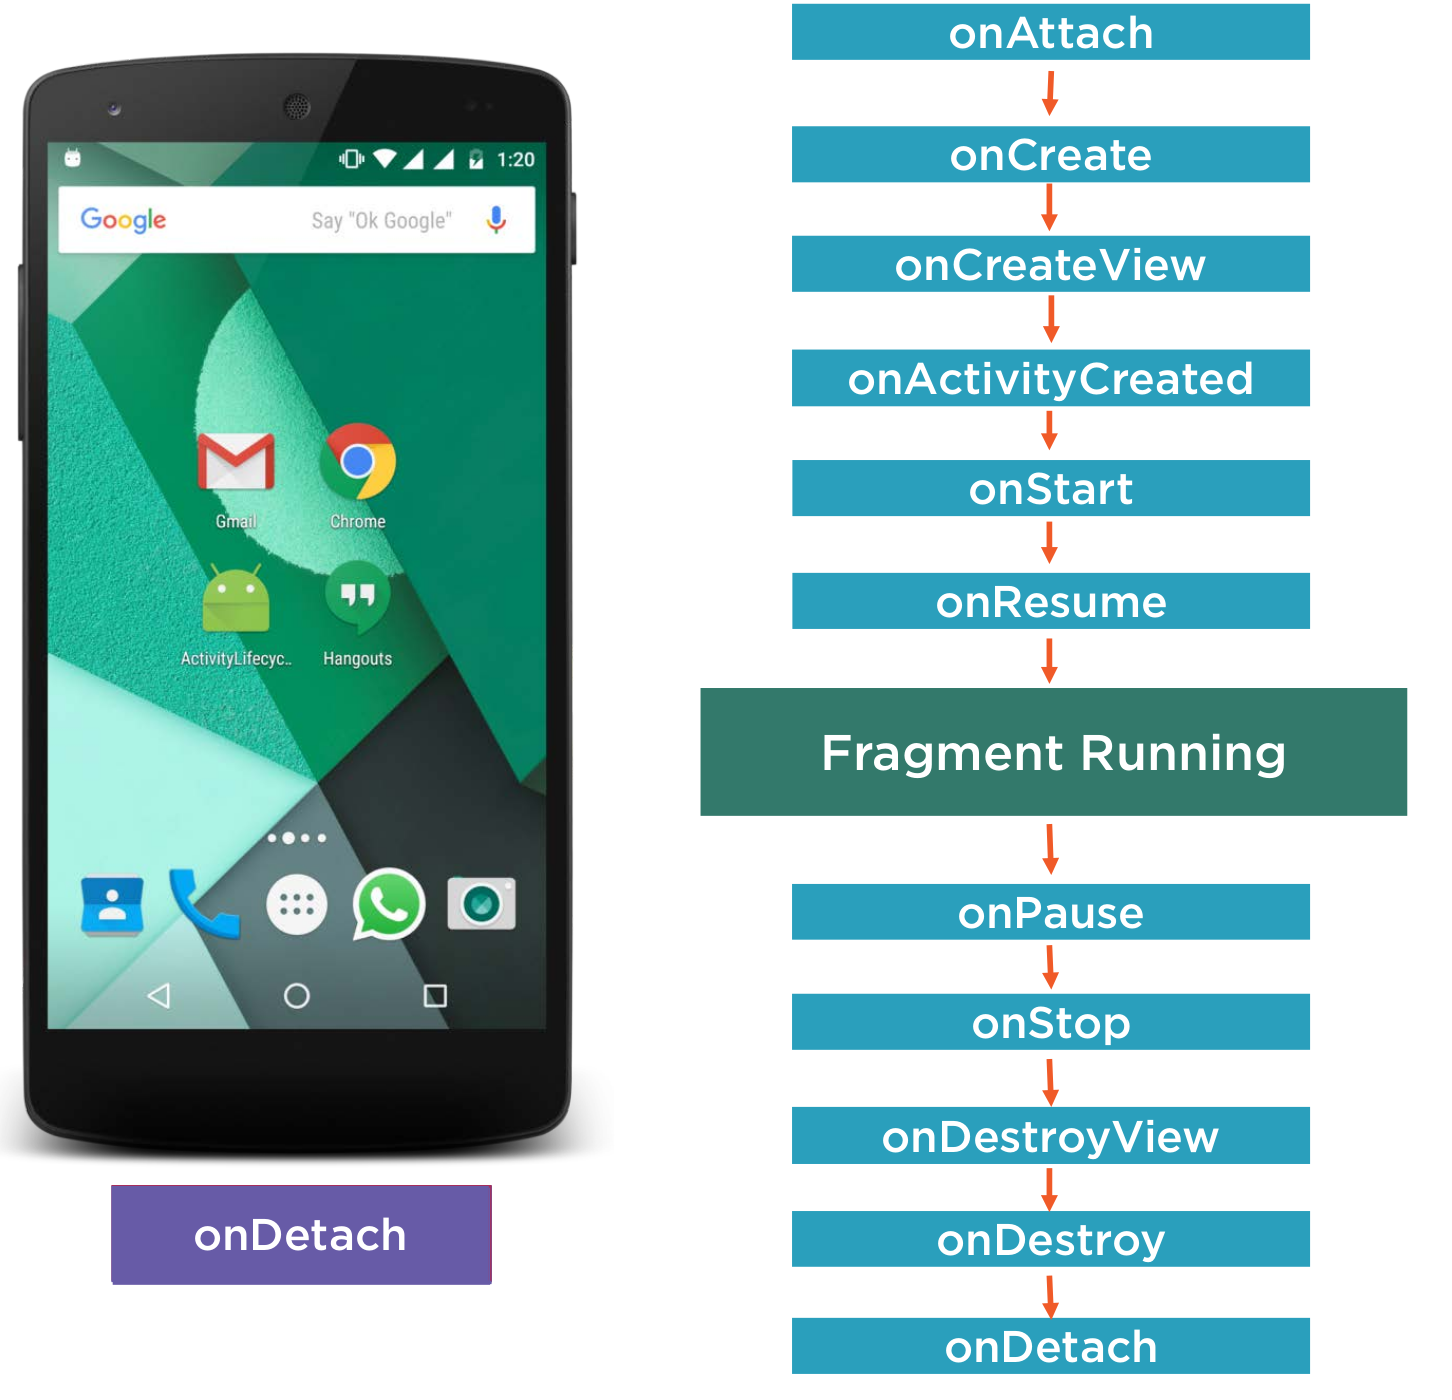
We create a subclass of Fragment and override the onCreateView to link the layout with the view.
public class HelloFragment extends Fragment {
        private static final String TAG = HelloFragment.class.getSimpleName();
        @Override
        public void onAttach(Context context) {
                super.onAttach(context);
                Log.i(TAG, "onAttach");
        }
        @Override
        public void onCreate(Bundle savedInstanceState) {
                super.onCreate(savedInstanceState);
                Log.i(TAG, "onCreate");
        }
        @Nullable
        @Override
        public View onCreateView(LayoutInflater inflater, ViewGroup container, Bundle savedInstanceState) {
                Log.i(TAG, "onCreateView");
                return inflater.inflate(R.layout.fragment_hello, container, false);
        }
        @Override
        public void onActivityCreated(Bundle savedInstanceState) {
                super.onActivityCreated(savedInstanceState);
                Log.i(TAG, "onActivityCreated");
        }
        @Override
        public void onStart() {
                super.onStart();
                Log.i(TAG, "onStart");
        }
        @Override
        public void onResume() {
                super.onResume();
                Log.i(TAG, "onResume");
        }

....
Place the Fragment inside an Activity
Fragment Manager
We use a Fragment manager to manager the fragments transaction which are methods which add, remove or replace fragments for an activity.
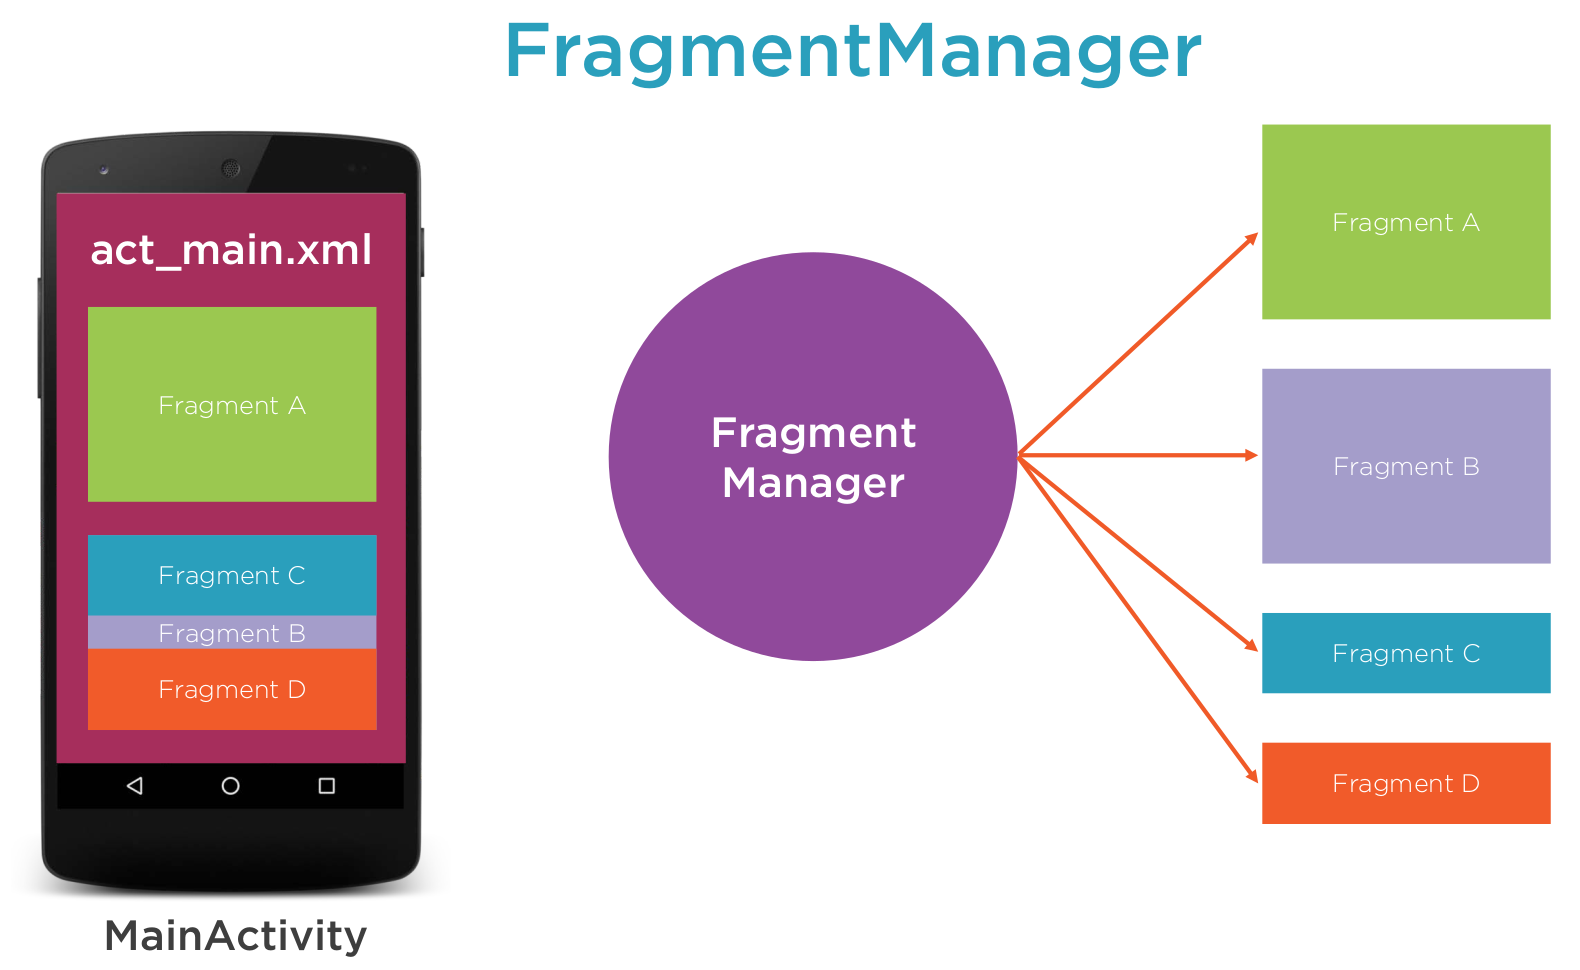 ==Using Fragment Manager
To get this working we need to
- Initialize Fragment Manager
- Initialize Fragment Transaction
- Start/add/Removereplace operation
- Commit Transaction
Using the add we can name the container to add the fragment to.
public class MainActivity extends AppCompatActivity {

        private static final String TAG = MainActivity.class.getSimpleName();

        private FragmentManager manager;

        @Override
        protected void onCreate(Bundle savedInstanceState) {
                super.onCreate(savedInstanceState);
                setContentView(R.layout.activity_main);

                manager = getFragmentManager();
        }

        public void addFragmentA(View view) {

                FragmentA fragmentA = new FragmentA();

                FragmentTransaction transaction = manager.beginTransaction();
                transaction.add(R.id.container, fragmentA, "fragA");
                transaction.commit();
        }
...
Fragment Lifecyle
Fragments are lifecycle aware.
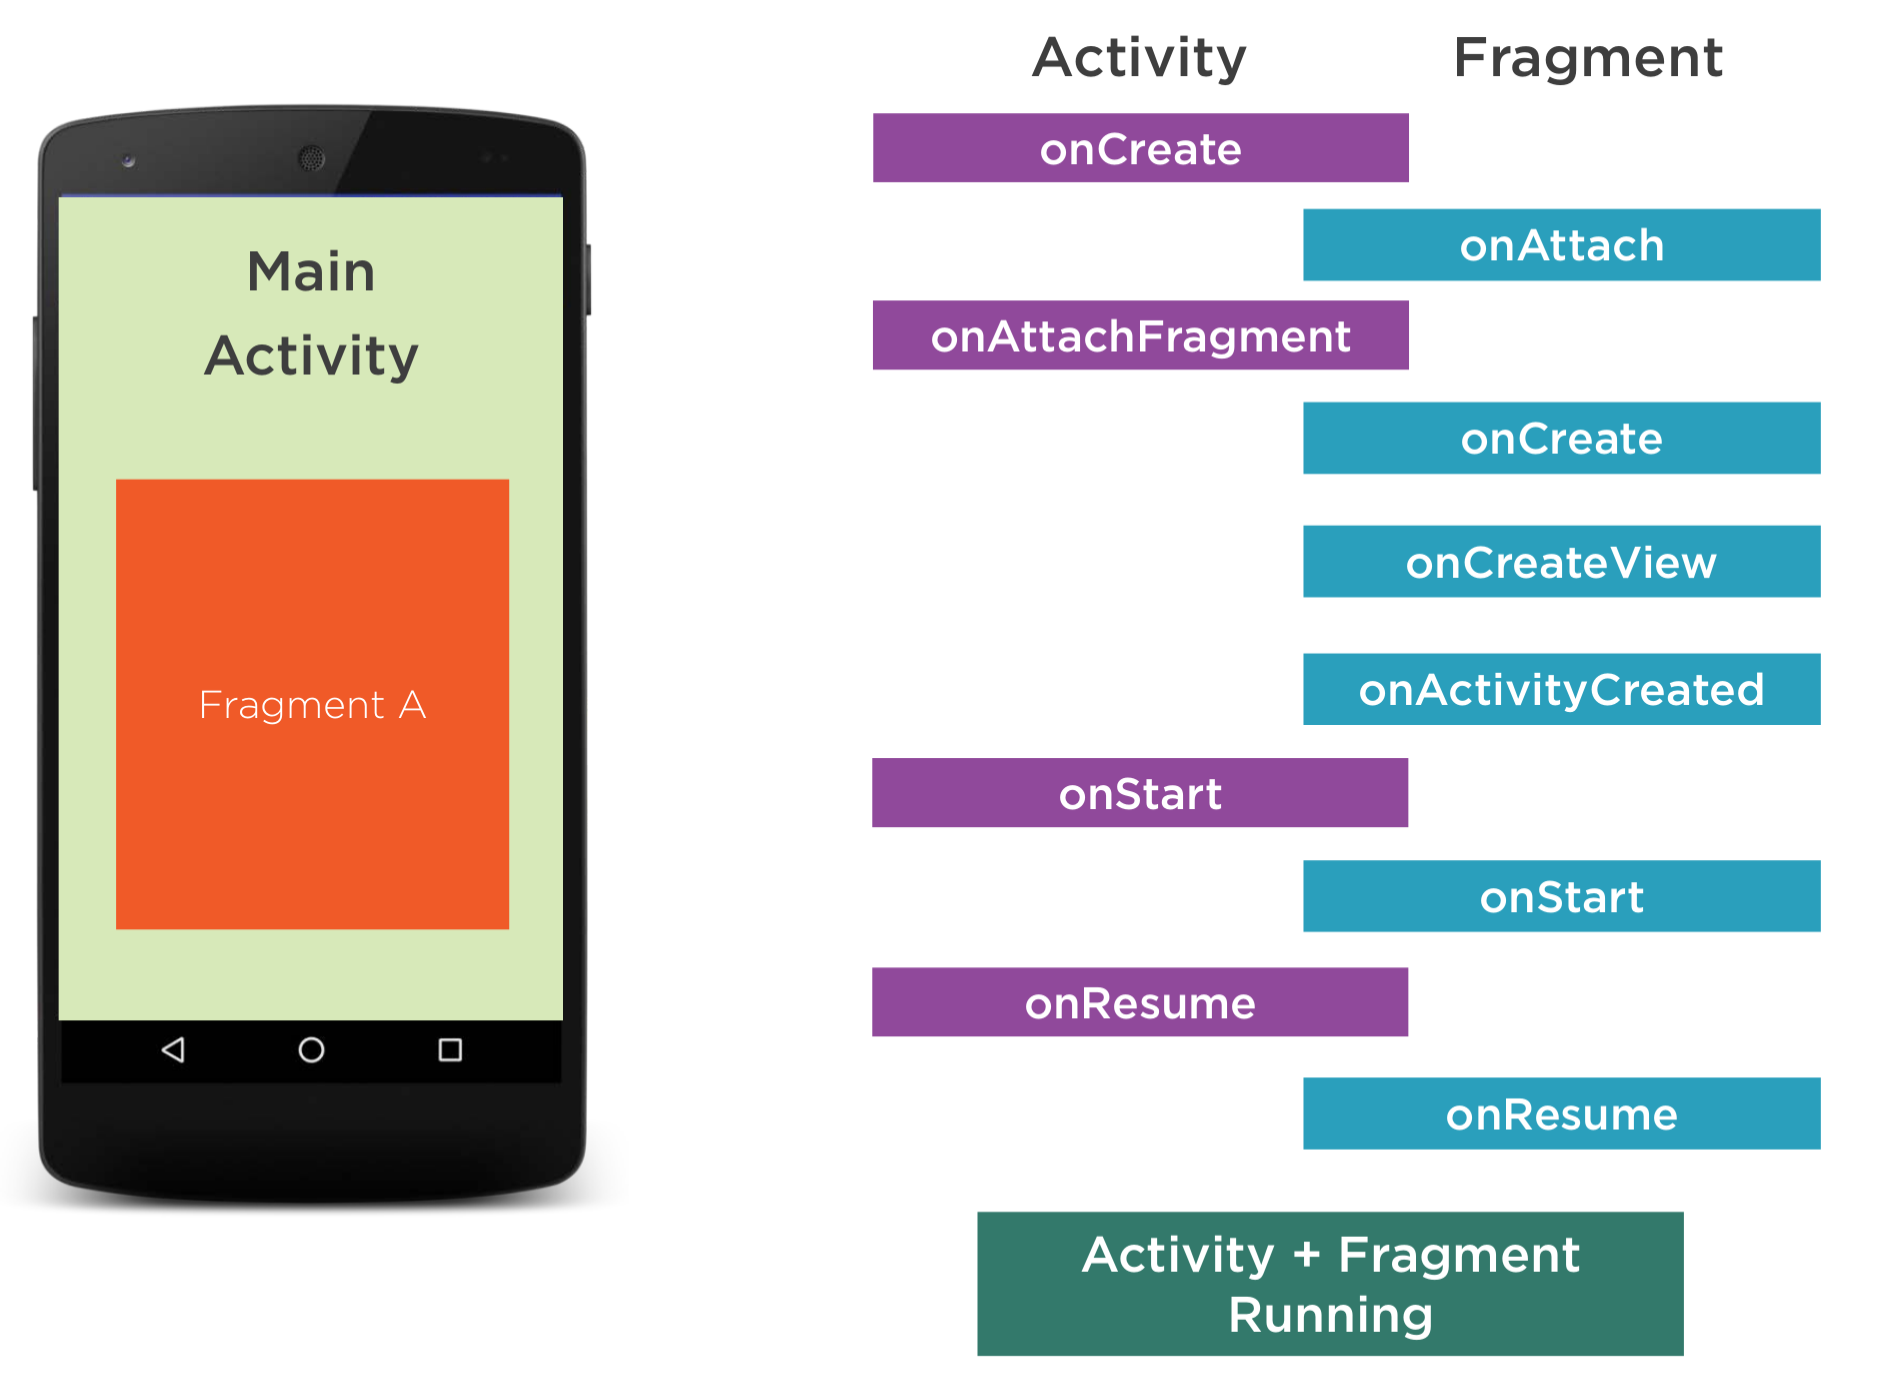
 Here is the overall startup order
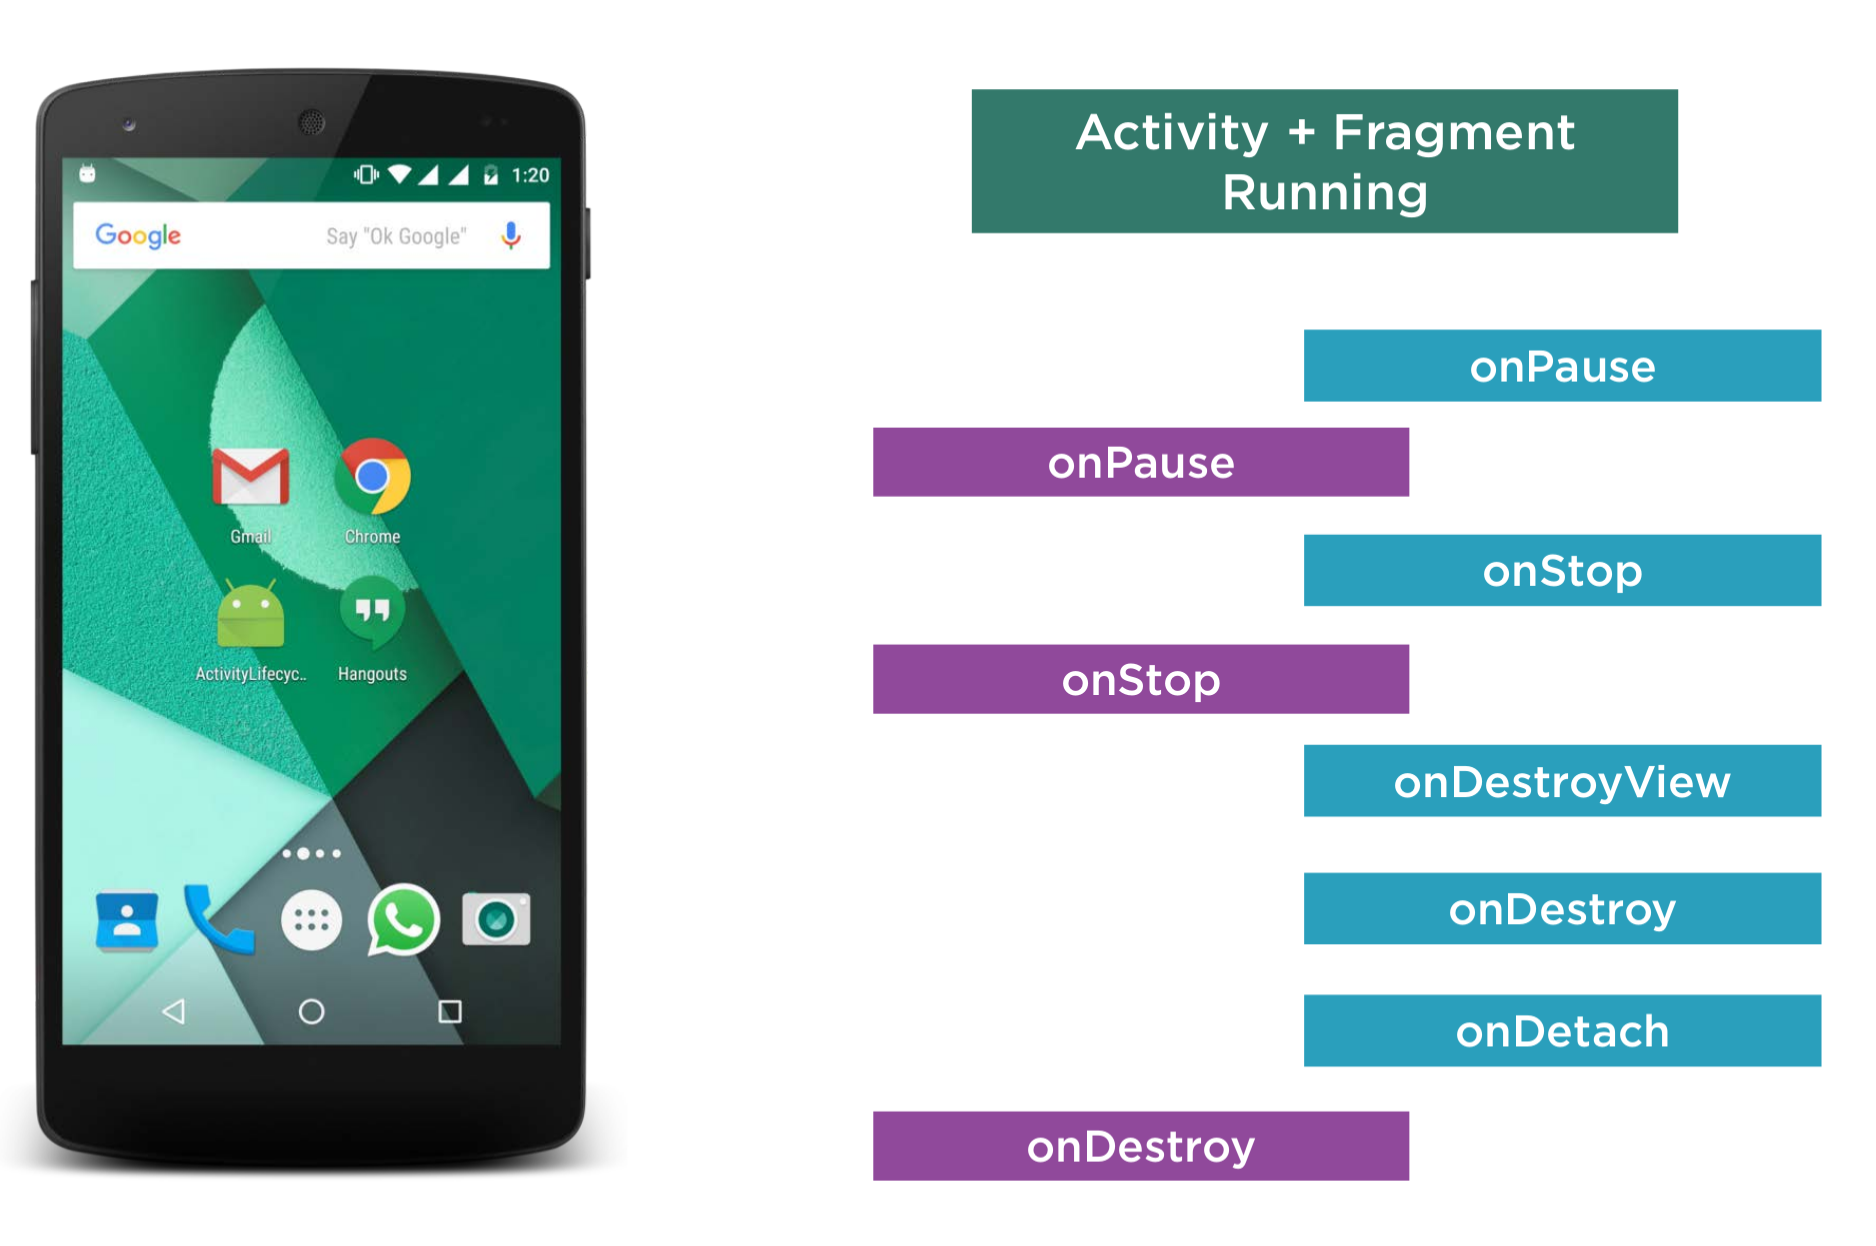
 Here is the overall shutdown order
Sending Data to and from a Fragment
Using a Bundle Object
Main Activity
int firstNumber = Integer.valueOf(eFirstNumber.getText().toString());
int secondNumber = Integer.valueOf(eSecondNumber.getText().toString());
Bundle bundle = new Bundle();
bundle.putInt("first_number",firstNumber);
bundle.putInt("second_number",secondNumber);

FragmentA fragmentA = new FragementA();
fragmentA.setArguments(bundle);
Fragment
public View onCreateView(LayoutInflater inflater, ViewGroup container, Bundle savedInstanceState) {
...
Bundle bundle = getArguments();
int firstNumber  = bundle.getInt("first_number",0) // default 0
int secondNumber  = bundle.getInt("second_number",0) // default 0
Using Fragment Object
Main Activity
       public void sendDataToFragmentB(View view) {

                FragmentB fragmentB = (FragmentB) manager.findFragmentByTag("fragB");

                if (fragmentB != null) {
                        fragmentB.addTwoNumbers(num1, num2);
                }
        }
Fragment
        public void addTwoNumbers(int x, int y) {

                int result = x + y;
                txvResult.setText("Result : " + result);
        }
Fragments and Backstack
The fragment back stack is not independent of the activity back stack. Think of it as an extra stack of history on top of that of the host activity.
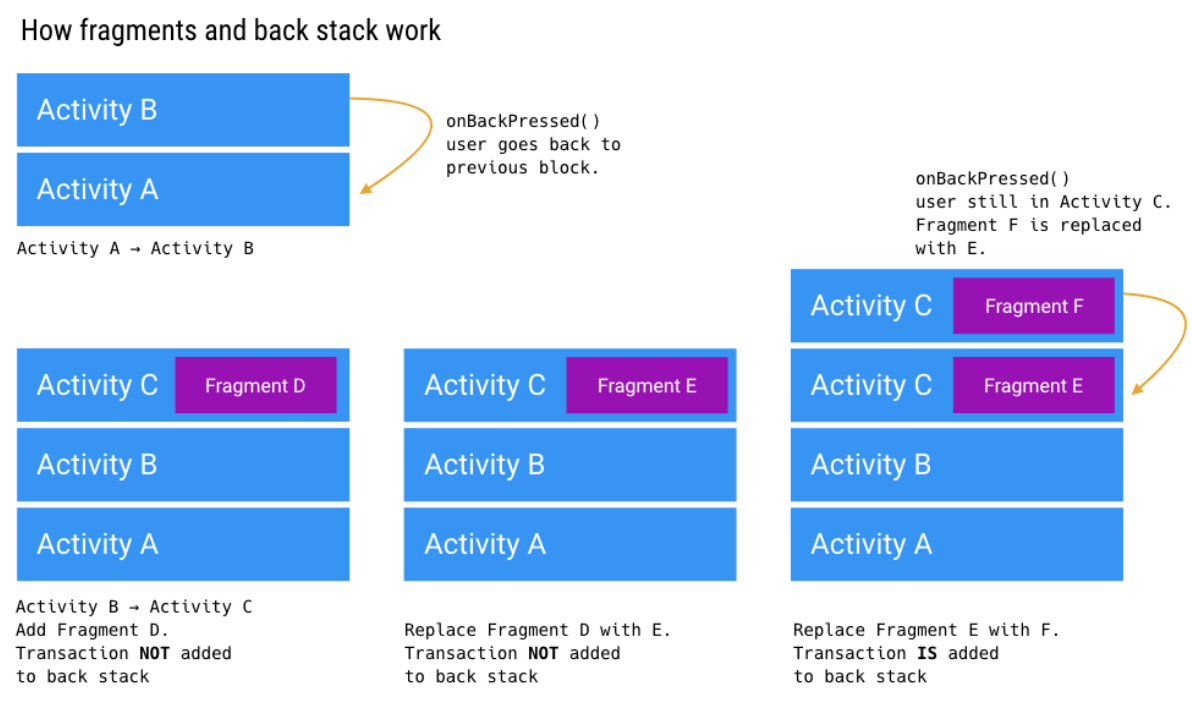 When you navigate between activities, each one gets placed on the activity back stack. Whenever you commit a FragmentTransaction, you have the option to add that transaction to the back stack.
So, what does addToBackStack() do? It adds the replace() to the back stack so that when the user hits the device’s back button it undoes the transaction. In this case, hitting the back button sends the user back to the full list.
The add() transaction for the list omits calling addToBackStack(). This means that the transaction is part of the same history entry as the entire activity. If the user hits the back button from the list, it backs the user out of the app.
Screen Rotation
For fragments
The following DO NOT retain their state
- TextView
- Button
The following DO retain their state (with unique IDs)
- EditText
- CheckBox
- Switch
- RadioButton
In order to fix this we can use the onSaveInstanceState and restore the values when onCreateView is called.
        public View onCreateView(LayoutInflater inflater, ViewGroup container, Bundle savedInstanceState) {

                View view = inflater.inflate(R.layout.fragment_a, container, false);

                Log.i(TAG, "onCreateView()");

                button = (Button) view.findViewById(R.id.button);
                textView = (TextView) view.findViewById(R.id.textView);

                if (savedInstanceState != null) {
                        textView.setText(savedInstanceState.getString("txv_key"));
                        button.setText(savedInstanceState.getString("btn_key"));
                }

                button.setOnClickListener(new View.OnClickListener() {
                        @Override
                        public void onClick(View view) {

                                textView.setText("Dummy Text");
                                button.setText("LOGOUT");

                                score = 47;
                                Toast.makeText(getActivity(), "Score value : " + score, Toast.LENGTH_LONG).show();
                        }
                });

                return view;
        }

...
       @Override
        public void onSaveInstanceState(Bundle outState) {
                super.onSaveInstanceState(outState);
                Log.i(TAG, "onSaveInstanceState()");

                outState.putInt("score_key", score);
                outState.putString("txv_key", textView.getText().toString());
                outState.putString("btn_key", button.getText().toString());
        }