Flutter
Introduction
Why Flutter created in 2017
- Compiles to native, JIT and Ahead of Time
- Fast Development
- Single Code Base
- Uses Dart
Resources is https://github.com/simoales/flutter
Installation
Flutter
You can switch versions of flutter using the channel option where there are options of master, dev, beta etc. See https://github.com/flutter/flutter/wiki/Flutter-build-release-channels
sudo snap install flutter --classic
sudo snap install flutter-gallery
flutter channel dev
flutter upgrade
flutter config --enable-linux-desktop
You will need to specify the path to android studio
flutter config --android-studio-dir="/opt/android-studio-4.1/android-studio"
Android Studio
For Android Studio the flutter SDK will be in /home/(username)/snap/flutter/common/flutter
Flutter doctor
You can run flutter doctor to see if all went well. This is what I got
flutter doctor
[✓] Flutter (Channel dev, 1.25.0-8.0.pre, on Linux, locale en_NZ.UTF-8)
[✓] Android toolchain - develop for Android devices (Android SDK version 30.0.3)
[✓] Linux toolchain - develop for Linux desktop
[!] Android Studio (not installed)
[✓] VS Code (version 1.52.0)
[✓] Connected device (1 available)
Creating a Project
In VS Code run flutter doctor and then flutter new project. Project names must be in lower case. e.g. hello_flutter. This opens a new VS Code with the project. The import contains the widgets to use and the rest just configures the widgets on the screen. I.E. Text is like a <Text /> tag in react or angular.
import 'package:flutter/material.dart';

void main() {
  runApp(Center(
    child: Text("Fred Was Ere",
        textDirection: TextDirection.ltr,
        style: TextStyle(backgroundColor: Colors.blue)),
  ));
}
When familar we can create a project with the flutter cli
flutter create app_widgets
A Bigger Example
So a bigger example might be
import 'package:flutter/material.dart';

void main() {
  runApp(MaterialApp(
    title: "My lovely App",
    home: Scaffold(
      appBar: AppBar(
        title: Text("App Bar Title"),
      ),
      body: Material(
        color: Colors.deepPurple,
        child: Center(
          child: Text(
            "Fred Was Ere",
            textDirection: TextDirection.ltr,
            style: TextStyle(color: Colors.white, fontSize: 36.0),
          ),
        ),
      ),
    ),
  ));
}
Classes
Things are getting a big large so we need to break the code down. We do this by writing our own classes. We can derive a class from StatelessWidget to do this.
class MyWidget extends StatelessWidget {
  @override
  Widget build(BuildContext context) {
    return MaterialApp(
      title: "My lovely App",
      home: Scaffold(
        appBar: AppBar(
          title: Text("App Bar Title"),
        ),
        body: Material(
          color: Colors.deepPurple,
          child: Center(
            child: Text(
              "Fred Was Ere",
              textDirection: TextDirection.ltr,
              style: TextStyle(color: Colors.white, fontSize: 36.0),
            ),
          ),
        ),
      ),
    );
  }
}
Fat Arrow
Dart supports the fat arrow approach so we can so
import './screens/home.dart';

void main() {
  runApp(MyWidget());
}
Can become
import './screens/home.dart';

void main() => runApp(MyWidget());
Adding Logic
No surprises here. We can add functions within the class declaration.
import 'package:flutter/material.dart';

class Home extends StatelessWidget {
  @override
  Widget build(BuildContext context) {
    return Material(
      color: Colors.deepPurple,
      child: Center(
        child: Text(
          sayHello(),
          textDirection: TextDirection.ltr,
          style: TextStyle(color: Colors.white, fontSize: 36.0),
        ),
      ),
    );
  }

  String sayHello() {
    var hello;
    DateTime now = DateTime.now();
    if (now.hour < 12) {
      hello = "Good Morning";
    } else if (now.hour < 18) {
      hello = "Good Afternoon";
    } else {
      hello = "Good Evening";
    }
    return hello;
  }
}
Basic Widgets and Concepts
The basic widgets and Concepts are
- Container
- Text
- Row & Column
- Image
- RaisedButton
- AlertDialog
- Box Constraints
- Size, Margin and Padding
Containers
They are as they sound. It is worth noting the width and height are controlled by the parent. Look at https://flutter.io/layout. To bypass the constraint of the parent you need to wrap your widget in a widget which supports this. E.g. Center widget.
import 'package:flutter/material.dart';

class Home extends StatelessWidget {
  @override
  Widget build(BuildContext context) {
    return Center(
        child: Container(
      width: 192.0,
      height: 96.0,
      alignment: Alignment.center,
      color: Colors.deepOrangeAccent,
      child: Text(
        "Pizza",
        textDirection: TextDirection.ltr,
      ),
    ));
  }
}
Margins And Padding
Margins and Paddings use the EdgeInsets.All and EdgeInsets.Only constructor. So to set a margin we can do.
...
        child: Container(
      width: 192.0,
      height: 96.0,
      margin: EdgeInsets.only(left:50.0),
      padding: EdgeInsets.All(10.0),
...
Fonts
Copy the fonts to a directory. The file pubspec.yaml contains the configurations.
  fonts:
    - family: Oxygen
      fonts:
        - asset: fonts/Oxygen-Regular.ttf
        - asset: fonts/Oxygen-Bold.ttf
          weight: 700
        - asset: fonts/Oxygen-Light.ttf
          weight: 300
Now we can use the font with the Text Widget
...
      child: Text(
        "Pizza",
        textDirection: TextDirection.ltr,
        style: TextStyle(
          fontFamily: 'Oxygen',
          fontWeight: FontWeight.w300,
        ),
...
Rows and Columns
These seem to work the same as flex box.
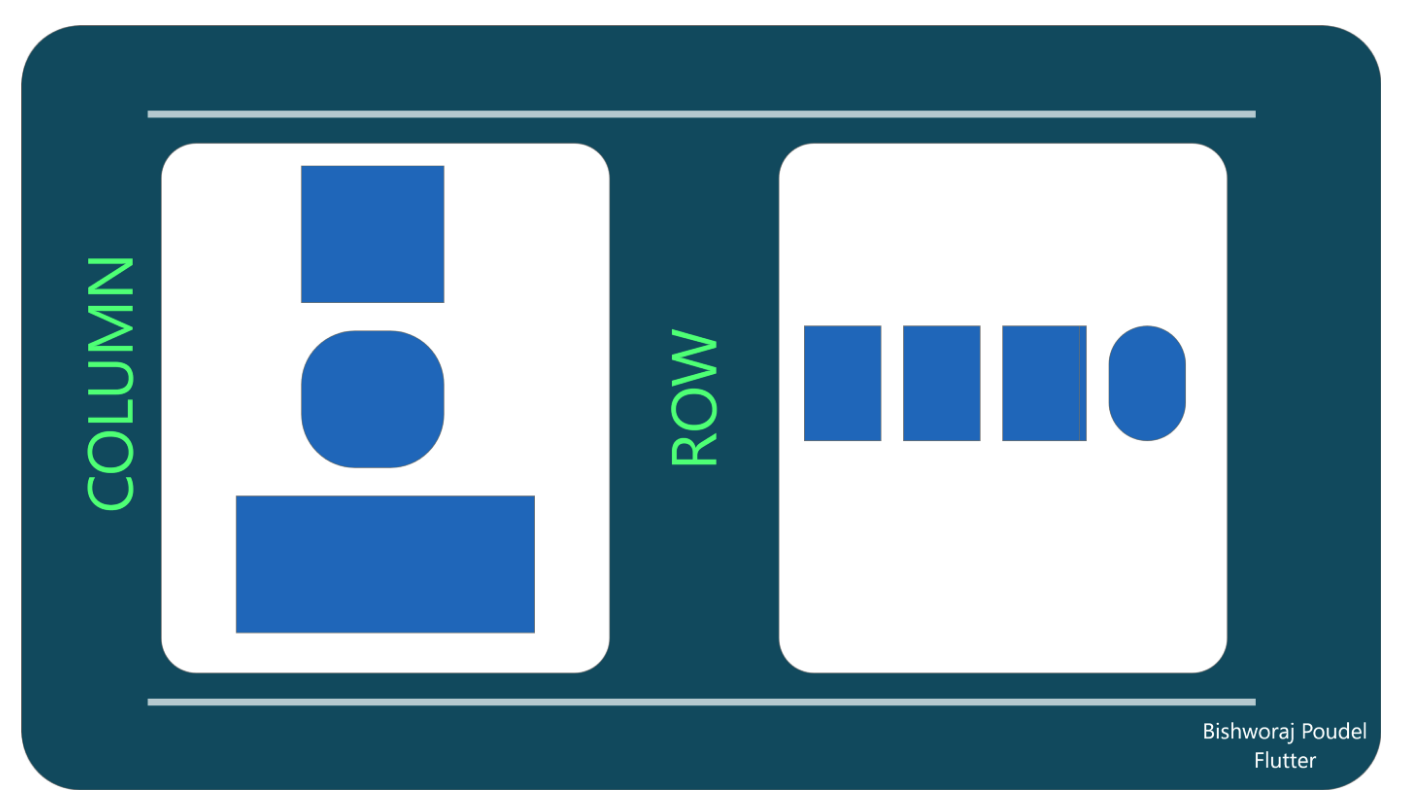
...
        child: Row(
          children: <Widget>[
            Text(
              "Margherita",
              textDirection: TextDirection.ltr,
              style: TextStyle(
                fontFamily: 'Oxygen',
                fontWeight: FontWeight.w300,
              ),
            ),
            Text(
              "Tomato, Mozzarella, Basil",
              textDirection: TextDirection.ltr,
              style: TextStyle(
                fontFamily: 'Oxygen',
                fontWeight: FontWeight.w300,
              ),
            ),
          ],
        ),
...
The result is items which overflow the row because the text exceeds the width of the phone.
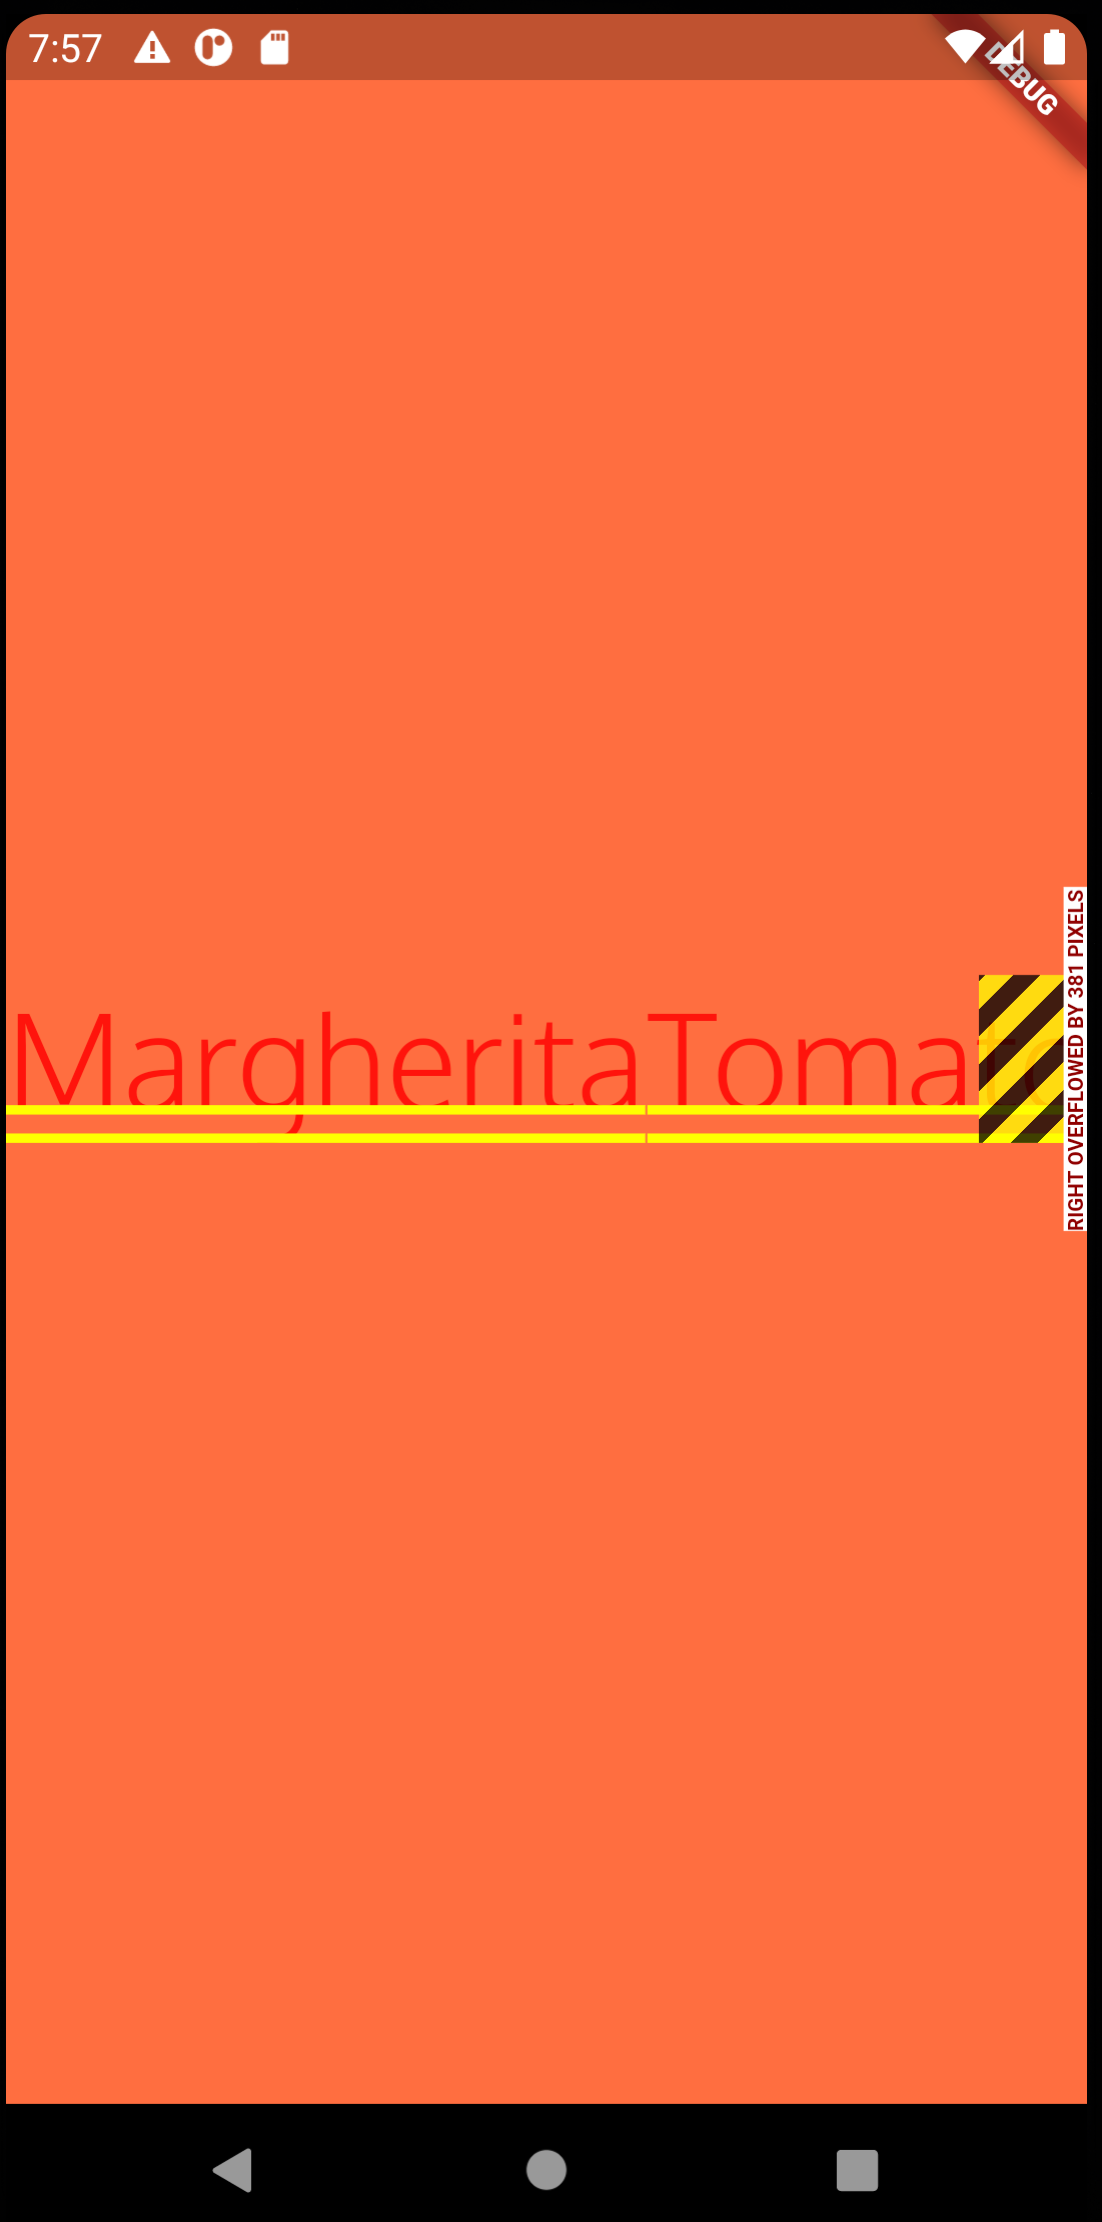
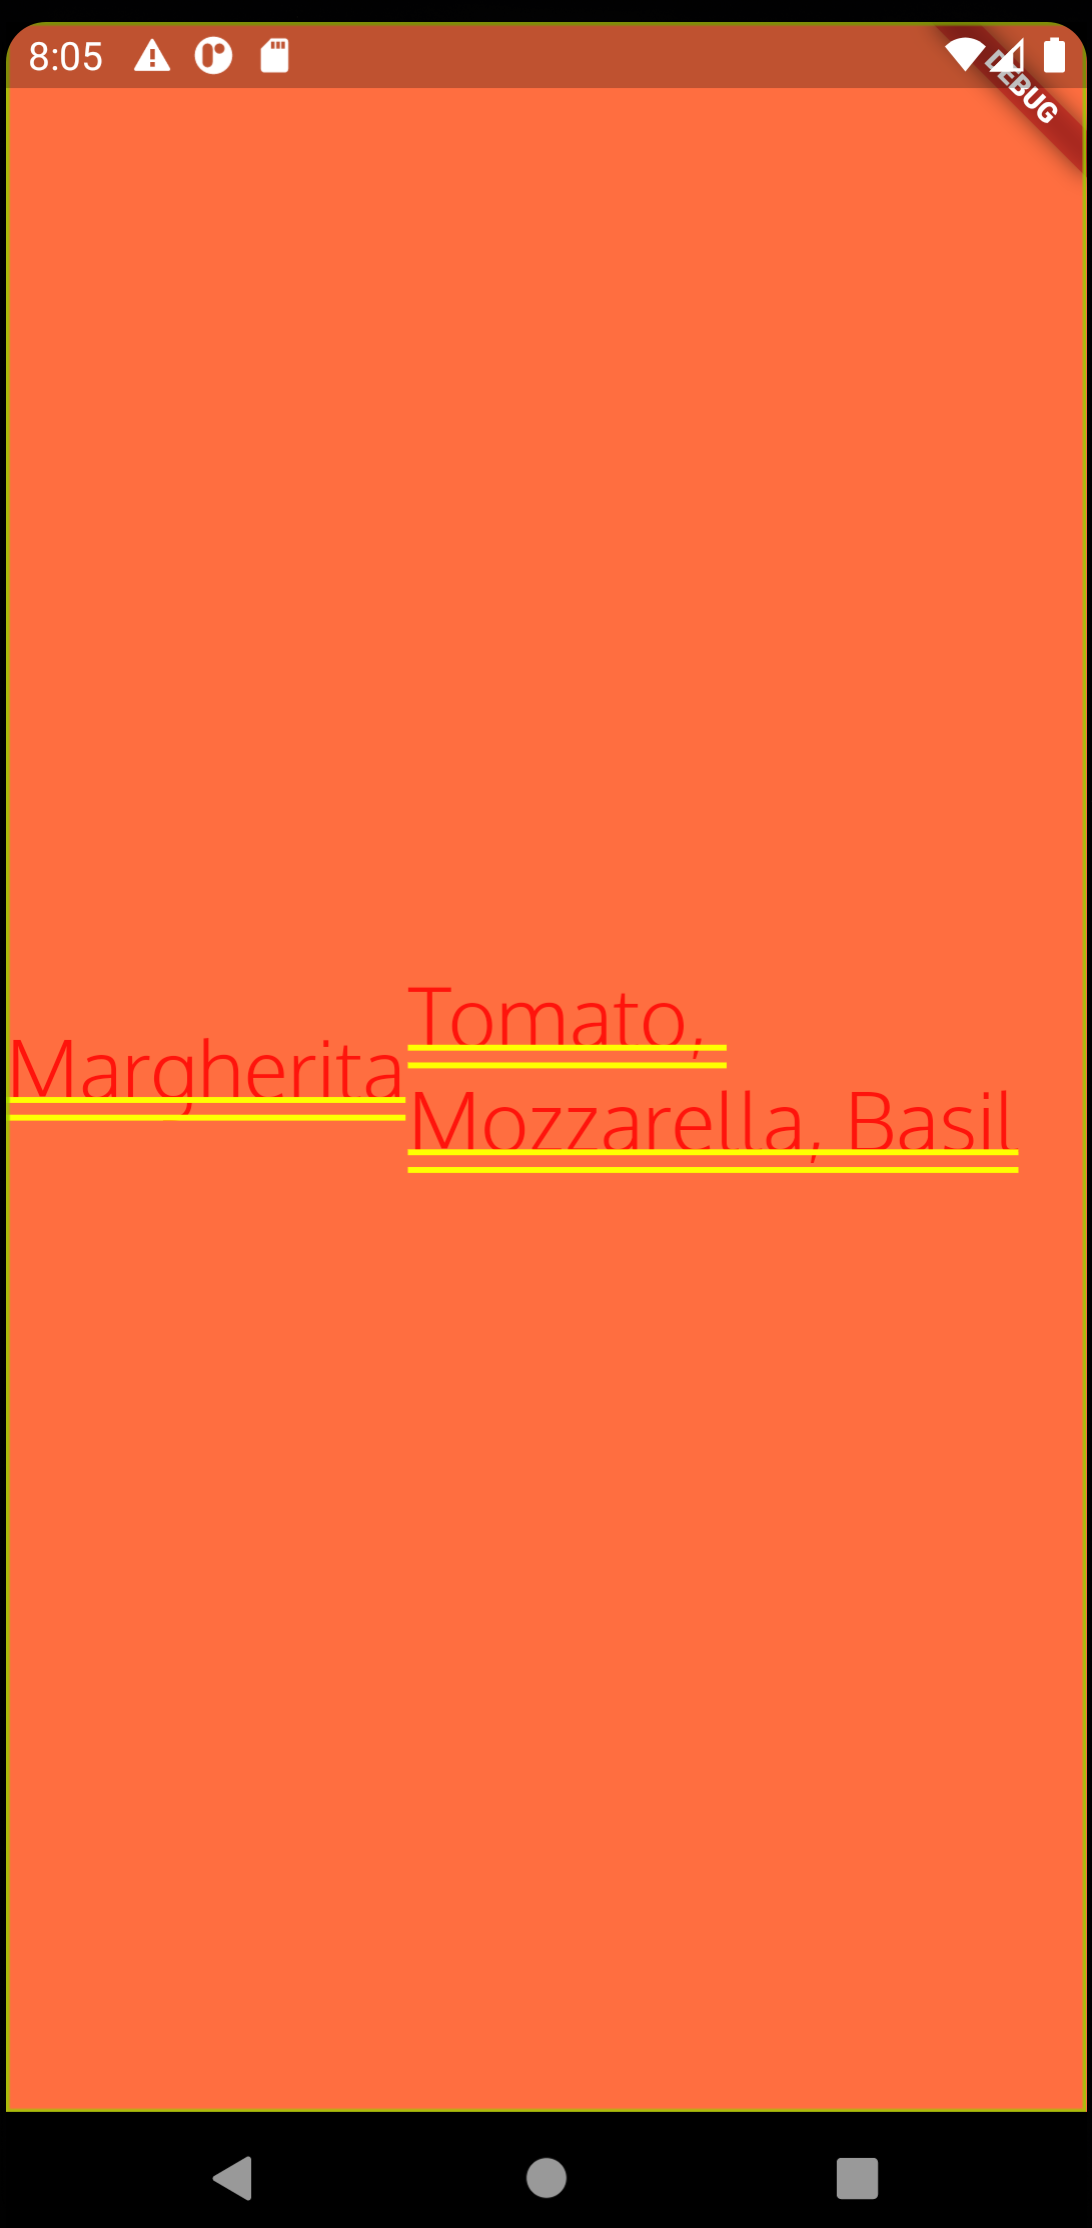
Expanded
Wrapping in Expanded means that the row will wrap like flexbox wrapping.
            Expanded(
              child: Text(
                "Tomato, Mozzarella, Basil",
                textDirection: TextDirection.ltr,
                style: TextStyle(
                  fontSize: 30,
                  fontFamily: 'Oxygen',
                  fontWeight: FontWeight.w300,
                ),
              ),
            ),
Images
To Create an image we can use an asset and like the fonts this is specified in the pubspec.yaml
...
flutter:

  # The following line ensures that the Material Icons font is
  # included with your application, so that you can use the icons in
  # the material Icons class.
  uses-material-design: true

  # To add assets to your application, add an assets section, like this:
  assets:
    - images/pizza.png
...
To use the image we can create a class to hold it and wrap it in a container.
class PizzaImageWidget extends StatelessWidget {
  @override
  Widget build(BuildContext context) {
    AssetImage pizzaAsset = AssetImage('images/pizza.png');
    Image image = Image(image: pizzaAsset, width: 400, height: 400);
    return Container(child: image);
  }
}
Raised Button, Alert and Event Handler
There are now surprises and this is just an example for reference. Not the use of the onPressed function which calls the alert creation function.
class OrderButton extends StatelessWidget {
  @override
  Widget build(BuildContext context) {
    var button = Container(
      margin: EdgeInsets.only(top: 10),
      child: RaisedButton(
        child: Text("Order your Pizza"),
        color: Colors.lightGreen,
        elevation: 5.0,
        onPressed: () {
          order(context);
        },
      ),
    );
    return button;
  }

  void order(BuildContext context) {
    var alert = AlertDialog(
      title: Text("Order Completed"),
      content: Text("Thanks"),
    );
    showDialog(context: context, builder: (BuildContext context) => alert);
  }
}
Interactivity
Introduction
Classes that inherit "StatefulWidget" are immutable. The State is mutable. Using Stateful Widgets
- Create a class that extends Stateful Widget that return state
- Create a state class, with properties that may change
- Implement Build
- Call setState() method to make changes
TextField
Below and example of a TextField
class HelloYou extends StatefulWidget {
  @override
  State<StatefulWidget> createState() => _HelloYouState();
}

class _HelloYouState extends State<HelloYou> {
  String name = '';
  @override
  Widget build(BuildContext context) {
    return Scaffold(
      appBar: AppBar(
        title: Text("Hello"),
        backgroundColor: Colors.blueAccent,
      ),
      body: Container(
        padding: EdgeInsets.all(15),
        child: Column(
          children: <Widget>[
            TextField(
              decoration: InputDecoration(hintText: "Please insert your name"),
              onChanged: (String text) => {
                setState(() => {name = text})
              },
            ),
            Text('Hello' + name + "!")
          ],
        ),
      ),
    );
  }
}
And... and onSumbmitted
It is worthwhile noting that the arrow functions work the same as the ones in javascript except alternatively you can miss out the arrow. The onChange could be written
..
              onChanged: (String text) {
                setState(() {name = text})
              },
..
Note the onSubmitted works the same as onChanged except it waits for the Enter button before being fired
Dropdown button
Not much surprise again except for how to create the list seemed a bit long winded compared to other languages.
            DropdownButton<String>(
              value: _selectedCurrency,
              items: _currencies.map((String value) {
                return DropdownMenuItem<String>(
                    value: value, child: Text(value));
              }).toList(),
              onChanged: (String value) {
                setState(() => {_selectedCurrency = value});
              },
            ),
Menus
Create Menu Names and Enums (Consts)
These are very similar to the dropdown
final List<String> choices = const <String> [
  "Save Todo", "Delete Todo", "Cancel"
]

const menuSave = "SAVE";
const menuDelete = "DELETE";
const menuCancel = "CANCEL";
Create the Menu
And the UI element.
Scaffold(
      appBar: AppBar(
        automaticallyImplyLeading: false,
        title: Text(toDo.title),
        actions: <Widget>[
          PopupMenuButton<String>(
              onSelected: null,
              itemBuilder: (BuildContext context) {
                return choices.map((String choice) {
                  return PopupMenuItem<String>(
                      child: Text(choice), value: choice);
                }).toList();
              })
        ],
      ),
      body: Padding(
...
Drawer
Here is an example of a drawer where we render a side drawer from a list of strings.
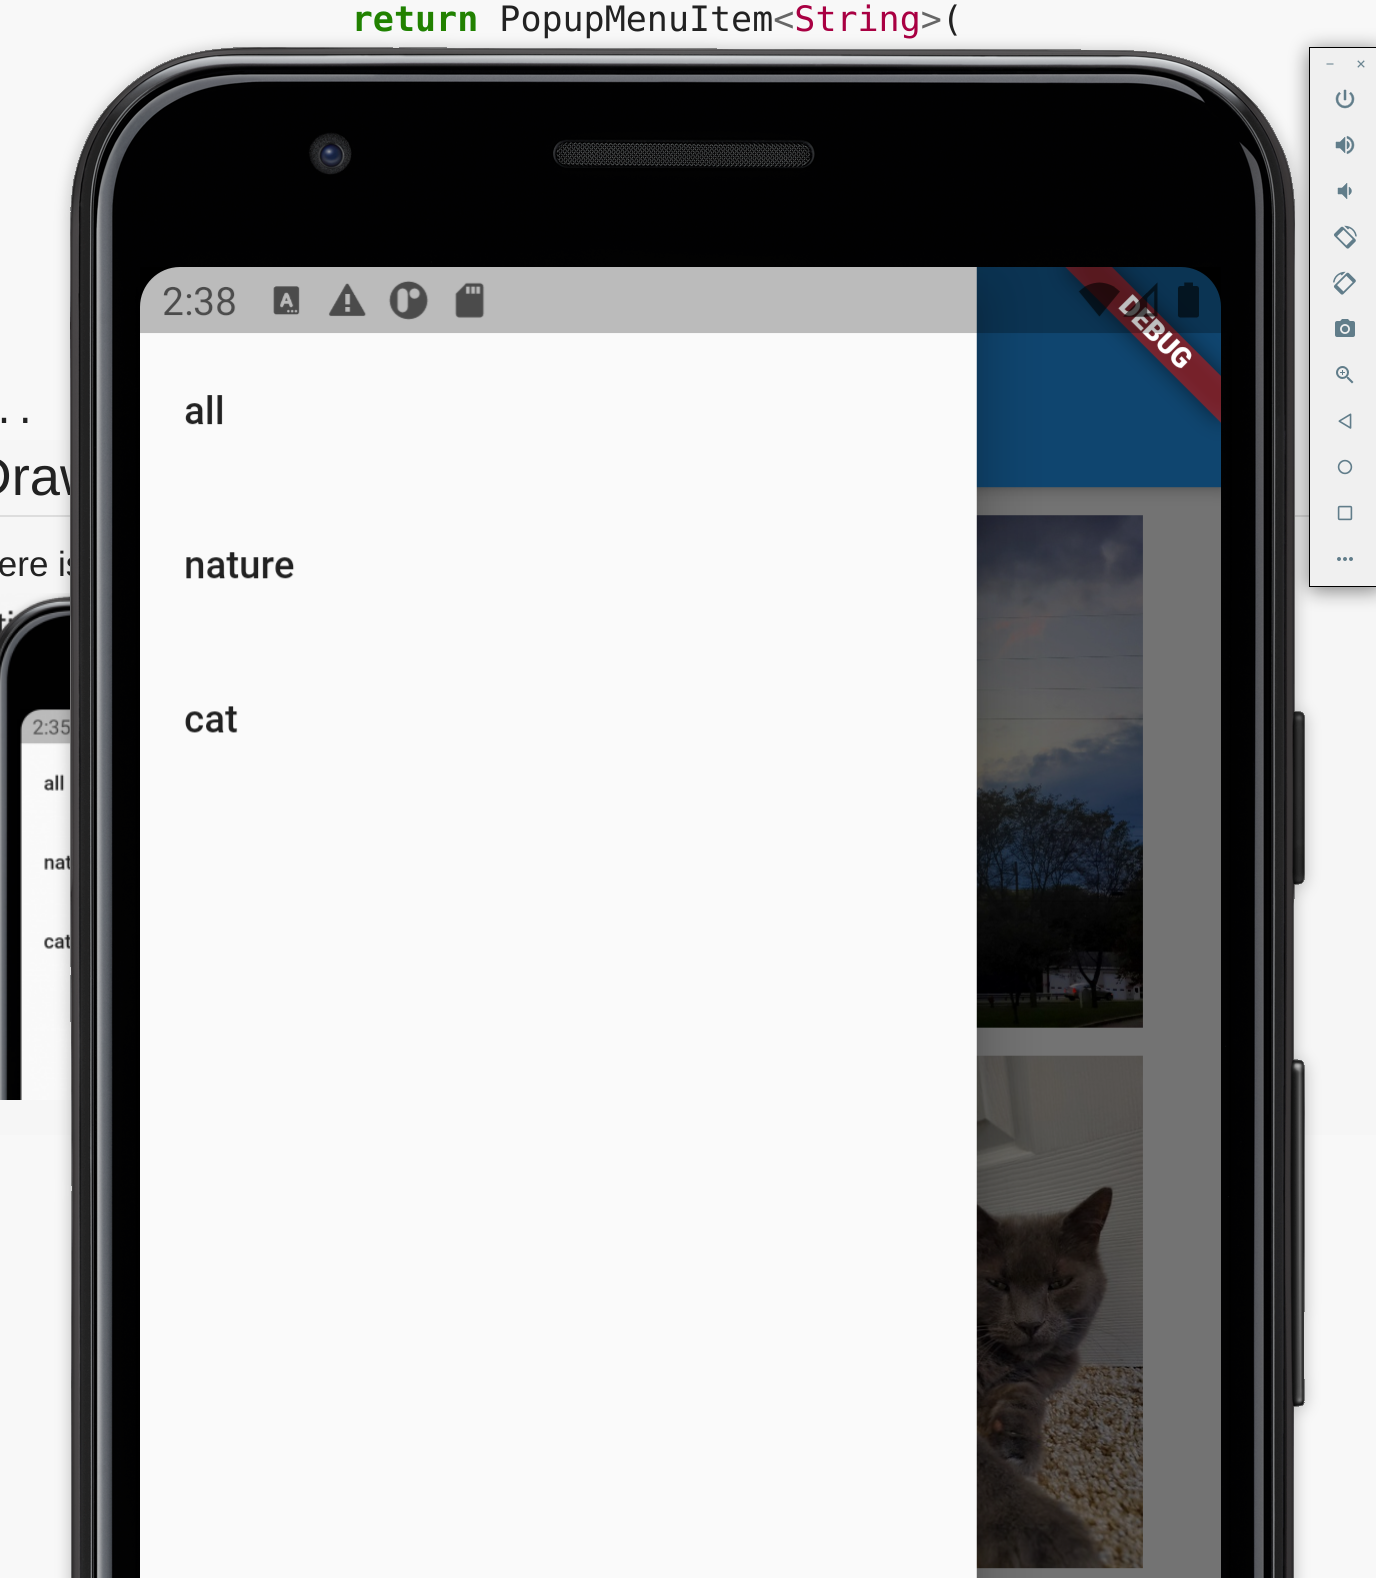 ]
]
      drawer: Drawer(
          child: ListView(
        children: List.of(tags.map((t) => ListTile(
              title: Text(t),
              onTap: () {
                selectTag(t);
                Navigator.of(context).pop();
              },
            ))),
      )),
TextField Controllers
These can be attached to a button to capture the changes in place of onChanged. The usage on onPressed held me up a bit missing the first opening bracket. It compiled but did not work.
...
TextEditingController distanceController = TextEditingController();
...
            TextField(
              controller: priceController,
              decoration: InputDecoration(
                  hintText: "e.g. 1.65",
                  labelText: "Price",
                  labelStyle: textStyle,
                  border: OutlineInputBorder(
                      borderRadius: BorderRadius.circular(5.0))),
              keyboardType: TextInputType.number,
            ),
...

            RaisedButton(
              color: Theme.of(context).primaryColorDark,
              textColor: Theme.of(context).primaryColorLight,
              onPressed: () {
                setState(() {
                  result = _calculate();
                });
              },
              child: Text(
                'Submit',
                textScaleFactor: 1.6,
              ),
            ),
ListView
This code is example code and is spread across the Wiki page.
StateFul Class
class ToDoList extends StatefulWidget {
  @override
  State<StatefulWidget> createState() => ToDoListState ();
}
State Class
Basic unfinished state class. This creates the state attributes. Creates the UI elements and gets the data
class ToDoListState extends State {
  DbHelper helper = DbHelper();
  List<Todo> todos;
  int count = 0;

  @override
  Widget build(BuildContext context) {
    // Get the Data
    if (todos == null) {
      getData();
    }

    // Build UI
    return Scaffold(
      body: todoListItems(),
      floatingActionButton: FloatingActionButton(
        onPressed: null,
        tooltip: "Add New Todo",
        child: Icon(Icons.add),
      ),
    );
  }
Building the ListView Widget
ListView todoListItems() {
    return ListView.builder(
      itemCount: count,
      itemBuilder: (BuildContext context, int position) {
        return Card(
          color: Colors.white,
          elevation: 2.0,
          child: ListTile(
            leading: CircleAvatar(
              backgroundColor: Colors.red,
              child: Text(this.todos[position].id.toString()),
            ),
            title: Text(this.todos[position].title),
            subtitle: Text(this.todos[position].date),
            onTap: () {
              debugPrint("Tapped on" + this.todos[position].id.toString());
            },
          ),
        );
      },
    );
  }
Example Edit/Add Screen
Example of an Edit/Add Class below. The author was keen to point 2 things out
- Wrap the children in a ListView to cope with device rotation
- Use ListTile to make the list use 100% width
import 'package:flutter/cupertino.dart';
import 'package:flutter/material.dart';
import 'package:todo_app/model/todo.dart';

class ToDoListDetail extends StatefulWidget {

  final Todo toDo;
  ToDoListDetail(this.toDo)

  @override
  State<StatefulWidget> createState() => ToDoListDetailState(toDo);
}

class ToDoListDetailState extends State {

  ToDoListDetailState(this.toDo);

  Todo toDo;
  final _priorities = ["High", "Medium", "Low"];
  String priority = "Low";
  TextEditingController titleController  = TextEditingController();
  TextEditingController descriptionController  = TextEditingController();

  @override
  Widget build(BuildContext context) {
    titleController.text = toDo.title;
    descriptionController.text = toDo.description;
    TextStyle textStyle = Theme.of(context).textTheme.headline6;
    return Scaffold(
      appBar: AppBar(
        automaticallyImplyLeading: false,
        title: Text(toDo.title),
      ),
      body: Column(
        children: <Widget>[
          TextField(
            controller: titleController,
            style: textStyle,
            decoration: InputDecoration(
              labelText: "Title",
              labelStyle: textStyle,
              border: OutlineInputBorder(borderRadius: BorderRadius.circular(5.0))
            ),
          ),
          TextField(
            controller: descriptionController,
            style: textStyle,
            decoration: InputDecoration(
              labelText: "Description",
              labelStyle: textStyle,
              border: OutlineInputBorder(borderRadius: BorderRadius.circular(5.0))
            ),
          ),
          DropdownButton(
            items: _priorities.map((String value) {
              return DropdownMenuItem<String>(
                value: value,
                child: Text(value),
              );
          }).toList(),
          style: textStyle,
          value: 'Low',
          onChanged: null,
          )
        ],
      ),
    );
  }
}
Navigation in Flutter has a pop and push method
Revisit of classes
Below is a sample class which demonstrates darts approach to them. We can
- create named constructors
- default arguments to constructors
- Static functions
- Use dynamic types
- Getters and Setters are required (sigh!)
class Todo {
  int _id;
  String _title;
  String _description;
  String _date;
  int _priority;

  int get id => _id;
  String get title => _title;
  String get description => _description;
  String get date => _date;
  int get priority => _priority;

  set title(String value) {
    if (value.length <= 255) {
      _title = value;
    }
  }

  set description(String value) {
    if (value.length <= 255) {
      _description = value;
    }
  }

  set date(String value) => _date = value;

  set priority(int value) {
    if (value > 0 && value <= 3) {
      _priority = value;
    }
  }

  Todo(this._title, this._date, this._priority, [this._description]);
  Todo.withId(this._id, this._title, this._date, this._priority,
      [this._description]);

  Map<String, dynamic> toMap() {
    var map = Map<String, dynamic>();
    map["title"] = _title;
    map["description"] = _description;
    map["priority"] = _priority;
    map["date"] = _date;
    if (_id != null) {
      map["id"] = _id;
    }
    return map;
  }

  Todo.fromObject(dynamic o) {
    this._title = o["title"];
    this._description = o["description"];
    this._priority = o["priority"];
    this._date = o["date"];
    this._id = map["id"];
  }
}
Switch Statements in Dart
Here is an example switch statement
  Color getColorForPriority(int priority) {
    switch (priority) {
      case 1:
        return Colors.red;
      case 2:
        return Colors.orange;
      case 3:
        return Colors.green;
      default:
        return Colors.pink;
    }
  }
Singletons
Lots of waffle.
- Create a private instance
- Create and empty private name constructor
- Use the factory to always return the same instance
For example
class DbHelper {
  static final DbHelper _instance = DbHelper._internal();
  DbHelper._internal();
  factory DbHelper() {
    return _instance;
  }
}
Specifying Packages in Flutter
pubspec.yaml
- sqflite sqllite for flutter
- path_provider helps with ios android path differences
- intl for dates
We specify these in the pubspec.yaml
...
dependencies:
  flutter:
    sdk: flutter
  sqflite: any
  path_provider: any
  intl: ^0.15.7
Importing
You can import them with import and alias it as http
import 'package:http/http.dart' as http
Sqflite
To perform updates there are two approaches
Raw SQL
For example
db.RawQuery("SELECT * FROM mytable)
db.RawInsert("INSERT INTO mytable(col1, col2) VALUES("ABC","1234")
SQL Helpers
This is provided by sqflite
db.update('myTable')
  myMapObject.toMap(),
  where: "$colId = ?",
  whereArgs: [  myMapObject.id]);
Insert Example
Here is an example of an insert using the sqlflite api.
  Future<int> insertToDo(Todo todo) async {
    var db = await this.db;
    var result = await db.insert(tblToDo, todo.toMap())
    return result;
  }
Upate Example
Here is an example of an update using the sqlflite api.
  Future<int> updateToDo(Todo todo) async {
    var db = await this.db;
    var result = await db.update(tblToDo, todo.toMap(), where: "$colId = ?", whereArgs: [todo.id])
    return result;
  }
Delete Example
Here is an example of an delete using the sqlflite raw.
Future<int> deleteToDo(int id) async {
    var db = await this.db;
    var result = await db.rawDelete("DELETE from $tblToDo WHERE id = $id")
    return result;
}
Select Example
Here is an example of select using the sqlflite raw.
  Future<List> getToDos(Todo todo) async {
    var db = await this.db;
    var result = await db.rawQuery("SELECT * FROM $tblToDo order by $colPriority ASC")
    return result;
  }
Count Example
Here is an example of counting the records using the sqlflite firstIntValue. It is probably worthwhile checking the docs for helper functions like this.
Future<int> getCount(Todo todo) async {
    var db = await this.db;
    var result = Sqflite.firstIntValue(await db.rawQuery("SELECT COUNT(*) FROM $tblToDo"));
    return result;
  }
Async and Dart
Future (Promise)
A Future represents a means for getting a value sometime in the future
Future<List> getToDos() {
  // Secondary Thread
}

todosFuture = getTodos().then((result) {
  // Main thread
}
You can check a Future's Uncompleted or Completed.
Async and Await
You can chain the calls to ensure the right order but this looks messy
  foo() {
    var response1 = pretendHTTPRequest();
    response1.then((value1) => {
      print('Now HTTP complete');
      var response2 = pretendDatabaseRequest(response1);
      response2.then((value2) => {
        print(response2');
      });
    });
  }
As per javascript. The async and await keywords allow you to write asyncronous code that looks like synchronous code.
  foo() {
    var response1 = await pretendHTTPRequest();
    var response2 = await pretendDatabaseRequest();
    print(response2)
}
Errors can be handled as if synchronous
  foo() {
    try {
       var response1 = await pretendHTTPRequest();
       var response2 = await pretendDatabaseRequest();
       print(response2)
    } cactch(e) {
       print('An error occurred')
    }
}
Http Requests
We can perform requests using the http package. The Read will read only the contents where as get will get the contents and the response.
void useHttpRead() async {
  var contents = await http.read('http://127.0.0.1:5000/program');
}

void useHttpGet(int program_id) async {
  var response = await http.get(
       'http://127.0.0.1:5000/program/$program_id');
}
So an example of in an app might be
  var httpClient = HttpClient();
  var request = await httpClient.getUrl('http://10.0.2.2:5000/fiveohoh')
  var response = await request.close();
  var decoded = response.transform(utf8.decoder);
  setState(() {
    if(response.statusCode == 500) {
      _content = "Server Error";
    }
  });
So an example of post might be
  var request = await http.post(
      'http://10.0.2.2:5000/profile',
      body: userProfile.toJson(),
      headers: {'Content-t  ype', 'application/json'}
  );
Another example using the httpClient
final client = HttpClient();
final request = await client.postUrl(Uri.parse("https://jsonplaceholder.typicode.com/posts"));
request.headers.set(HttpHeaders.contentTypeHeader, "application/json; charset=UTF-8");
request.write('{"title": "Foo","body": "Bar", "userId": 99}');

final response = await request.close();

response.transform(utf8.decoder).listen((contents) {
  print(contents);
});
Json
Introduction
Flutter provides two types of json parsing
- Manual Serialization
- Automatic Serialization
Manual Serialization
Manual not sure I need to explain more
class UserProfile {
   Map<String, dynamic> userMap = {...};
   var data = jsonEncode(userMap);
}
Automatic Serialization
You need to use these packages
- json_annotation to use this in the pubspec.yaml as it is not the default.
- json_serializable is required to generate the code (dev)
- build_runner to invoke the code generator (dev)
To setup you need to configure the class to have a <class>.g.dart> part where class is the name of the class derrrrr
import 'package:jsons_annotation/json_annotation.dart';

part 'userprofile.g.dart';

@JsonSerializable() {
class UserProfile {
//...
}
At the command line run
flutter pub run build_runner build
The automated process give some benefits. you can rename the fields to snake case or field_name, add a JSON key with @JsonKey on a property and include based on null with the decoratoor @JsonKey(includeIfNull: false)
Deserialization
Once again we can do this manually or automatically. An example of manual is provided below. The factory constructor return a, wait for it, instance of the class.
class UserProfile {
   factory UserProfile.fromJson(String json) {
      var userMap = jsonDecode('"laastName": "Jones", "loyaltyPoints": 100}');
      var userProfile = UserProfile()
        userMap['lastName'] as String,
         userMap['loyaltyPoints'] as int;
      );
   }
}
Http Authentication
Basic Authorization contains the username and password encode with base64.
{ Authorization: Basic username:password }
So in dart we can do
var credentials = 'username:password';
var bytes = utf8.encode(credentials)
var b64 = base64.encode(bytes);
State
Local State
Stateless
There are two types of these. Stateless and Stateless with state passed in. Below is the example of an injected Stateless Widget.
class GalleryPage extends StatelessWidget {
  final String title;
  final List<String> urls;

  GalleryPage({this.title, this.urls});

  @override
  Widget build(BuildContext context) {
    return Scaffold(
        appBar: AppBar(title: Text(this.title)),
        body: GridView.count(
            primary: false,
            crossAxisCount: 2,
            children: List.of(urls.map((url) => Photo(url: url)))));
  }
}
Stateful
This has it's own state but we use the setState(() => {}) to tell the framework to rerender. I have provided just the state component. Note that is extends the class Photo using State<Photo> which was not indicated in the previous course. Also it is an example of capturing the gestures. We can capture others such as double tap, long press etc.
class PhotoState extends State<Photo> {
  String url;
  int index = 0;

  PhotoState({this.url});

  onTap() {
    setState(() {
      index >= urls.length - 1 ? index = 0 : index++;
    });
    url = urls[index];
  }

  @override
  Widget build(BuildContext context) {
    return Container(
        padding: EdgeInsets.only(top: 10),
        child: GestureDetector(
          child: Image.network(url),
          onTap: onTap,
        ));
  }
}
Lifting up State
When we write an app we can have the individual components manage there own state but in modern apps there is now a tendency to lift up state that is to say the events fired in the bottom component are received by the app and the state is changed and then reflected by prop changes
class Photo extends StatelessWidget {
  final PhotoState state;
  final bool selectable;

  final Function onLongPress;
  final Function onSelect;

  Photo({this.state, this.selectable, this.onLongPress, this.onSelect});

  @override
  Widget build(BuildContext context) {
    List<Widget> children = [
      GestureDetector(
          child: Image.network(state.url),
          onLongPress: () => onLongPress(state.url))
    ];

    if (selectable) {
      children.add(Positioned(
          left: 20,
          top: 0,
          child: Theme(
              data: Theme.of(context)
                  .copyWith(unselectedWidgetColor: Colors.grey[200]),
              child: Checkbox(
                onChanged: (value) {
                  onSelect(state.url, value);
                },
                value: state.selected,
                activeColor: Colors.white,
                checkColor: Colors.black,
              ))));
    }

    return Container(
        padding: EdgeInsets.only(top: 10),
        child: Stack(alignment: Alignment.center, children: children));
  }
}
The stateless widget has onLongPress and onSelect passed along with the data to render. The state is held in the parent.
Inherited Widgets
Instead of passing a ton of props we can but them in an Inherited Widget and pass this to the components. This holds all of the data and methods for managing state.
class MyInheritedWidget extends InheritedWidget {
  final AppModel model;

  MyInheritedWidget({Key key, @required Widget child, @required this.model})
      : super(key: key, child: child);

  static AppModel of(BuildContext context) {
    return context
        .dependOnInheritedWidgetOfExactType<MyInheritedWidget>()
        .model;
  }

  @override
  bool updateShouldNotify(_) => true;
}
We create the model within the Stateless Widget. This can be achieved by wrapping the body element in a Builder and passing the innercontext to the Inherited Widget object. For me, this looks a bit hairy
class GalleryPage extends StatelessWidget {
  final String title;
  final AppModel model;

  GalleryPage({this.title, this.model});

  @override
  Widget build(BuildContext context) {
    return Scaffold(
      appBar: AppBar(title: Text(this.title)),
      body: Builder(builder: (BuildContext innerContext) {
        return GridView.count(
            primary: false,
            crossAxisCount: 2,
            children: List.of(model.photoStates
                .where((ps) => ps.display ?? true)
                .map((ps) => Photo(
                    state: ps, model: MyInheritedWidget.of(innerContext)))));
      }),
      drawer: Drawer(
          child: ListView(
        children: List.of(model.tags.map((t) => ListTile(
              title: Text(t),
              onTap: () {
                model.selectTag(t);
                Navigator.of(context).pop();
              },
            ))),
      )),
    );
  }
}
This can then be passed to the components.
class Photo extends StatelessWidget {
  final PhotoState state;
  final AppModel model;

  Photo({this.state, this.model});

  @override
  Widget build(BuildContext context) {
    List<Widget> children = [
      GestureDetector(
          child: Image.network(state.url),
          onLongPress: () => model.toggleTagging(state.url))
    ];

    if (model.isTagging) {
      children.add(Positioned(
          left: 20,
          top: 0,
          child: Theme(
              data: Theme.of(context)
                  .copyWith(unselectedWidgetColor: Colors.grey[200]),
              child: Checkbox(
                onChanged: (value) {
                  model.onPhotoSelect(state.url, value);
                },
                value: state.selected,
                activeColor: Colors.white,
                checkColor: Colors.black,
              ))));
    }

    return Container(
        padding: EdgeInsets.only(top: 10),
        child: Stack(alignment: Alignment.center, children: children));
  }
}
ScopedModel
This is very similar approach to the inherited widget but regarded as a clean approach.We need to use a new package called scoped_model
App
Creates and instance of model inside a scoped model
class App extends StatelessWidget {
  @override
  Widget build(BuildContext context) {
    return ScopedModel<AppModel>(
        model: AppModel(),
        child: MaterialApp(
            title: 'Photo Viewer',
            home: ScopedModelDescendant<AppModel>(
                builder: (context, child, model) =>
                    GalleryPage(title: "Image Gallery", model: model))));
  }
}
Model
Provides the function and data required for the app and a method to access the static AppModel
class AppModel extends Model {
  bool isTagging = false;

  List<PhotoState> photoStates = List.of(urls.map((url) => PhotoState(url)));

  Set<String> tags = {"all", "nature", "cat"};

  static AppModel of(BuildContext context) => ScopedModel.of<AppModel>(context);

  void toggleTagging(String url) {
...
    notifyListeners();
  }

  void onPhotoSelect(String url, bool selected) {
...
    notifyListeners();
  }

  void selectTag(String tag) {
...
    notifyListeners();
  }
}
GalleryPage
class GalleryPage extends StatelessWidget {
  final String title;
  final AppModel model;

  GalleryPage({this.title, this.model});

  @override
  Widget build(BuildContext context) {
    return Scaffold(
      appBar: AppBar(title: Text(this.title)),
      body: GridView.count(
          primary: false,
          crossAxisCount: 2,
          children: List.of(model.photoStates
              .where((ps) => ps.display ?? true)
              .map((ps) => Photo(state: ps, model: AppModel.of(context))))),
      drawer: Drawer(
...
       )),
    );
  }
}
Photo
This receives the model which contains the callbacks for updates
class Photo extends StatelessWidget {
  final PhotoState state;
  final AppModel model;

  Photo({this.state, this.model});

  @override
  Widget build(BuildContext context) {
    List<Widget> children = [
      GestureDetector(
          child: Image.network(state.url),
          onLongPress: () => model.toggleTagging(state.url))
    ];

    if (model.isTagging) {
...
    }

    return Container(
        padding: EdgeInsets.only(top: 10),
        child: Stack(alignment: Alignment.center, children: children));
  }
}
Provider
For provider we need to add the package provider. This approach wraps the top component and then you can get what you need from the context. There are two key methods, watch when you need to be notified of the change and read when you need access but do not need to be notified of the change.
Main
void main() {
  runApp(ChangeNotifierProvider(create: (_) => AppModel(), child: App()));
}
App
Much more simplified as the state is in the context.
class App extends StatelessWidget {
  @override
  Widget build(BuildContext context) {
    return MaterialApp(
        title: 'Photo Viewer', home: GalleryPage(title: "Image Gallery"));
  }
}
Model
Again more simplified as the state is in the context.
class AppModel with ChangeNotifier {
  bool isTagging = false;
  List<PhotoState> photoStates = List.of(urls.map((url) => PhotoState(url)));
  Set<String> tags = {"all", "nature", "cat"};

  void toggleTagging(String url) {
...
    notifyListeners();
  }

  void onPhotoSelect(String url, bool selected) {
...
}

  void selectTag(String tag) {
...
  }
}
GalleryPage
Where we need access to the state we use either watch or read
class GalleryPage extends StatelessWidget {
  final String title;

  GalleryPage({this.title});

  @override
  Widget build(BuildContext context) {
    return Scaffold(
      appBar: AppBar(title: Text(this.title)),
      body: GridView.count(
          primary: false,
          crossAxisCount: 2,
          children: List.of(context
              .watch<AppModel>()
              .photoStates
              .where((ps) => ps.display ?? true)
              .map((ps) => Photo(state: ps)))),
      drawer: Drawer(
          child: ListView(
        children: List.of(context.watch<AppModel>().tags.map((t) => ListTile(
              title: Text(t),
              onTap: () {
                context.read<AppModel>().selectTag(t);
                Navigator.of(context).pop();
              },
            ))),
      )),
    );
  }
}
Photo
Again where we need access to the state we use either watch or read
class Photo extends StatelessWidget {
  final PhotoState state;

  Photo({this.state});

  @override
  Widget build(BuildContext context) {
    List<Widget> children = [
      GestureDetector(
          child: Image.network(state.url),
          onLongPress: () => context.read<AppModel>().toggleTagging(state.url))
    ];

    if (context.watch<AppModel>().isTagging) {
      children.add(Positioned(
          left: 20,
          top: 0,
          child: Theme(
              data: Theme.of(context)
                  .copyWith(unselectedWidgetColor: Colors.grey[200]),
              child: Checkbox(
                onChanged: (value) {
                  context.read<AppModel>().onPhotoSelect(state.url, value);
                },
                value: state.selected,
                activeColor: Colors.white,
                checkColor: Colors.black,
              ))));
    }

    return Container(
        padding: EdgeInsets.only(top: 10),
        child: Stack(alignment: Alignment.center, children: children));
  }
}
Summary
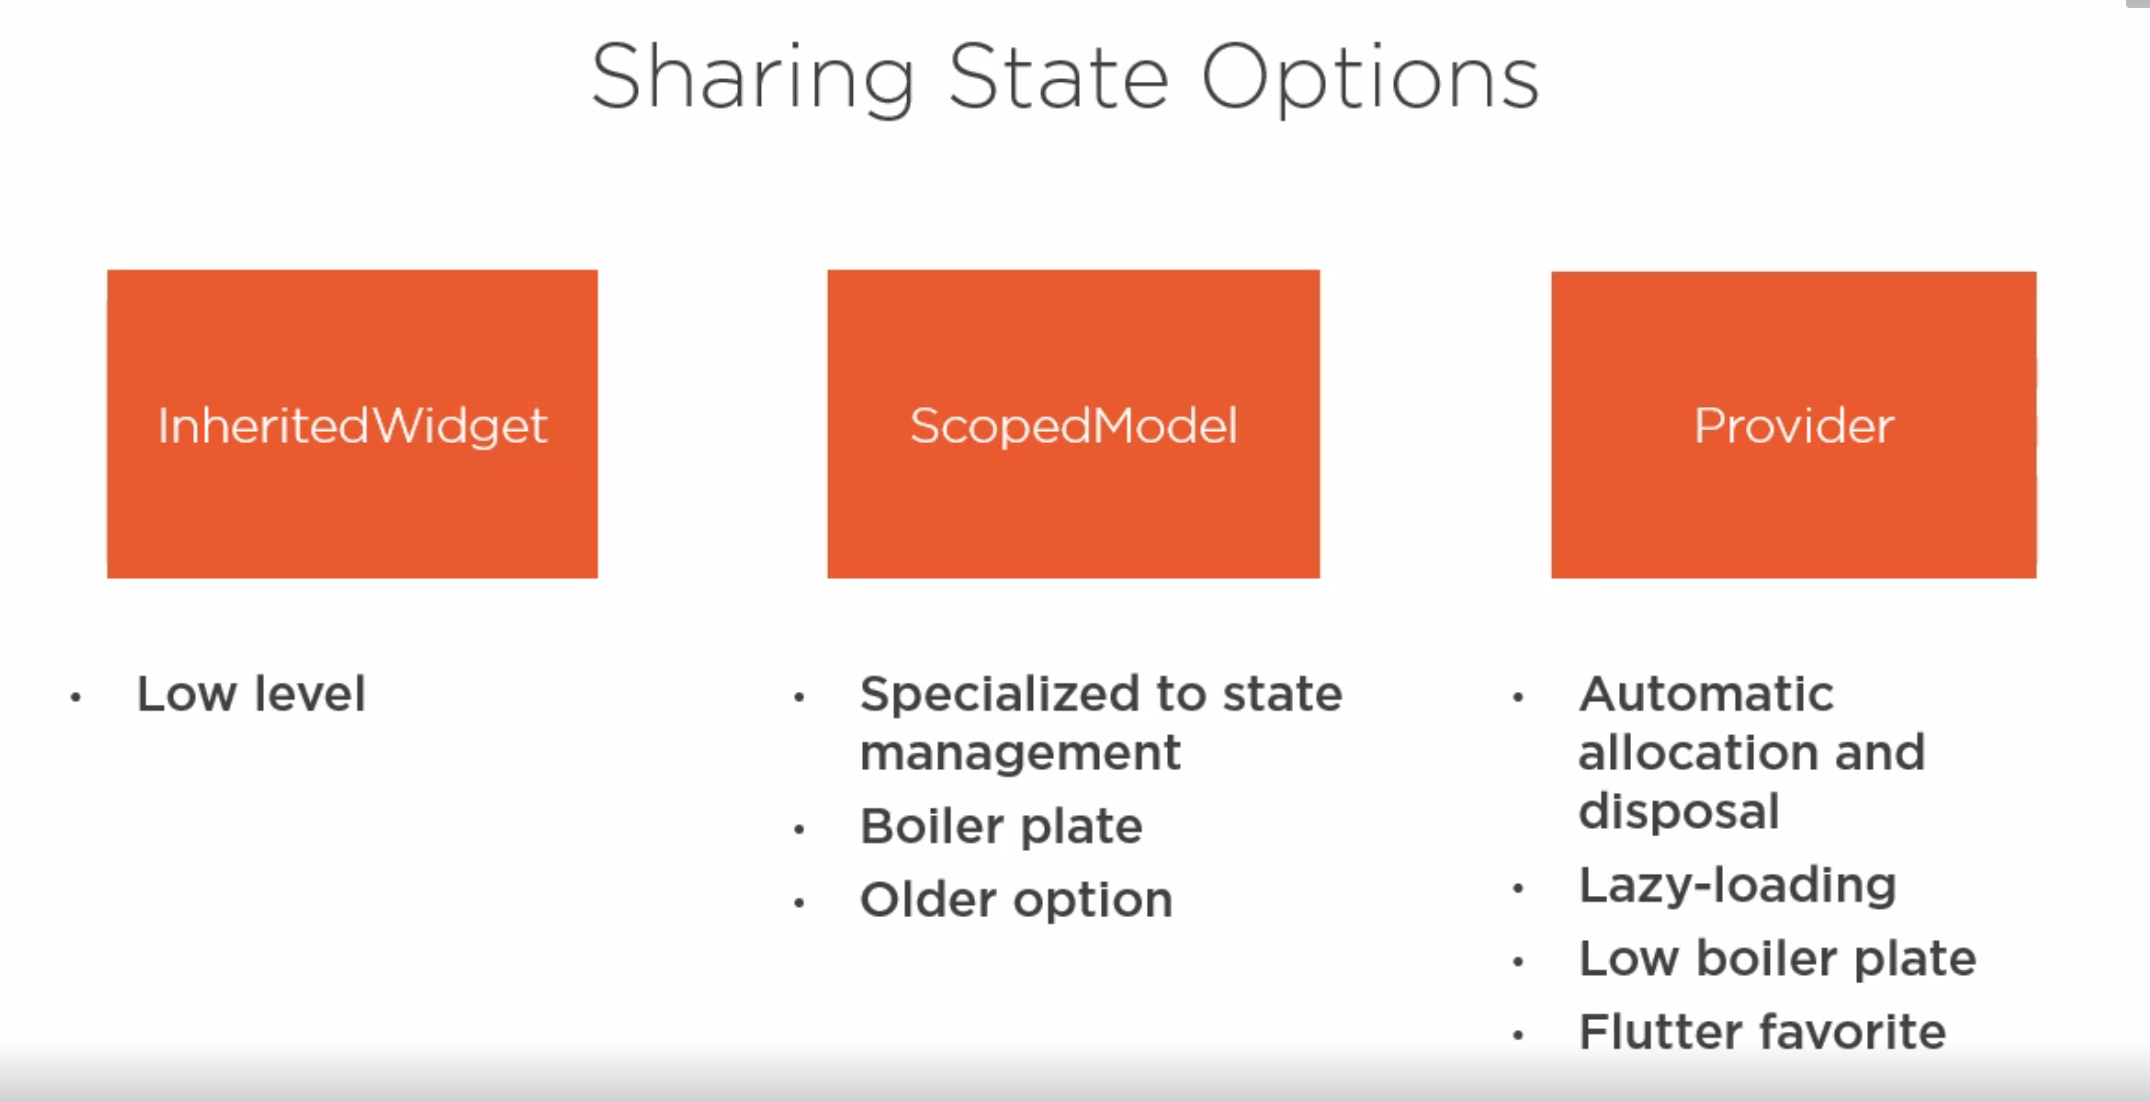
Below is the summary of the approaches. Sounds like providers all the way. The downside I guess is the amount of memory possibly passed although it is lazy loaded.
Separating UI and Logic (BLoC Pattern)
Streams and Sinks
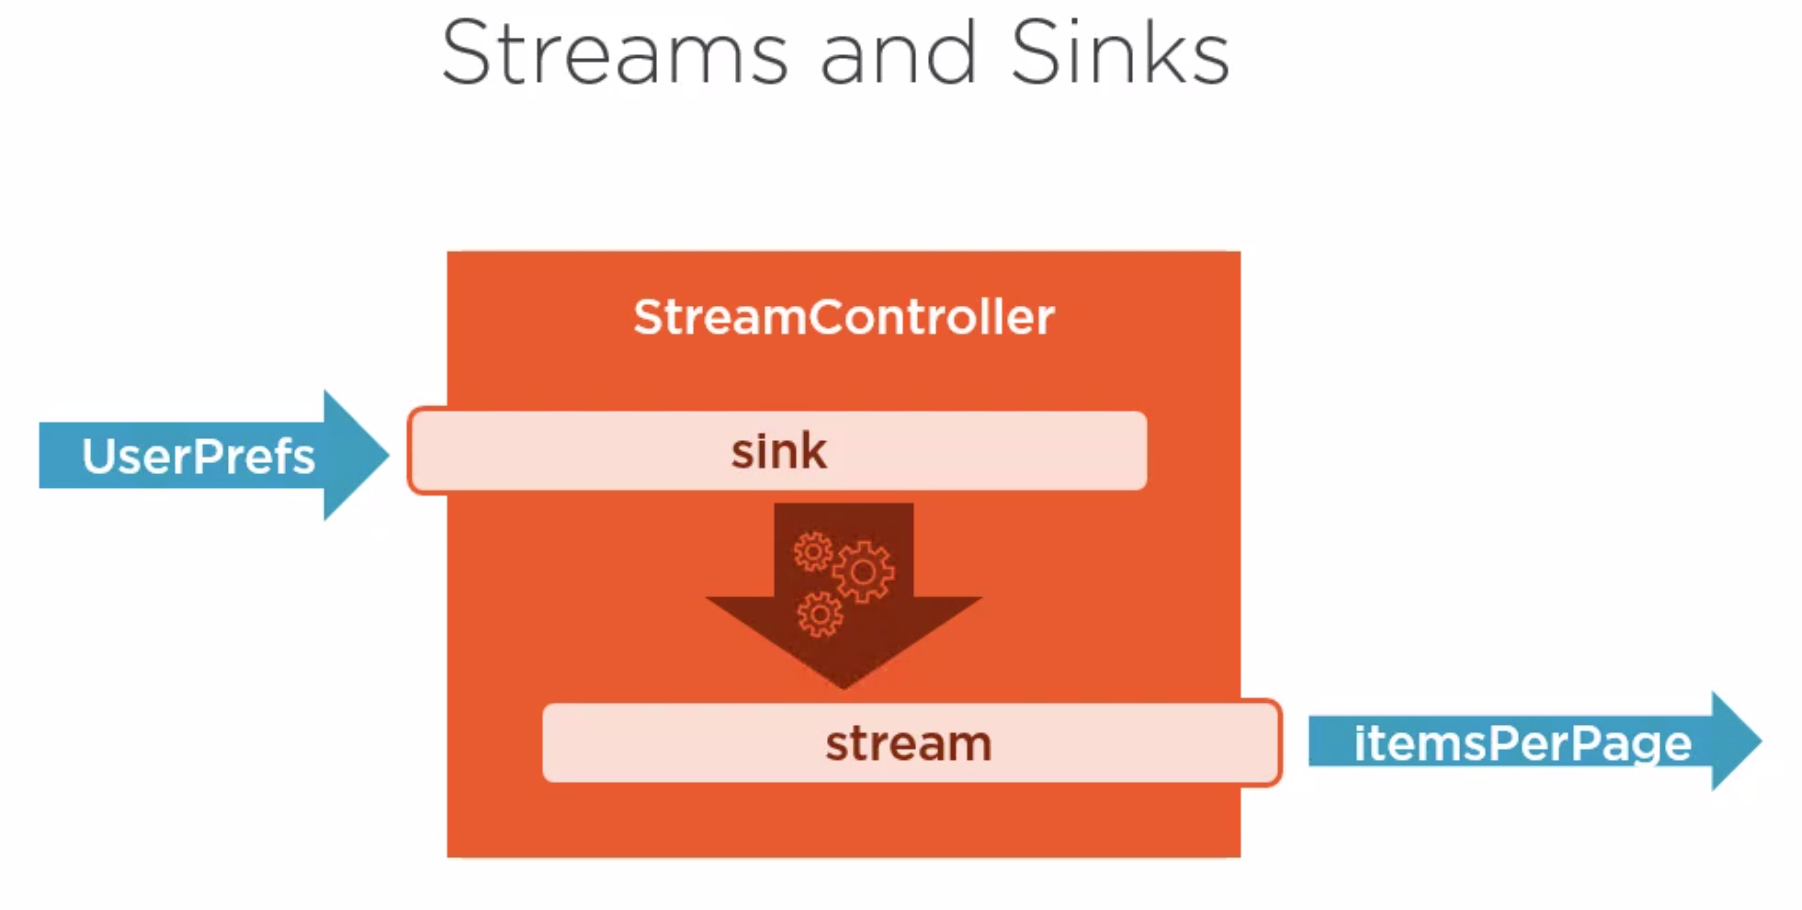
Hmm sounds like Rxjs. StreamContollers receive data, tranform and send out.
Example
This show the onPressed adding data to the stream and the constructor creating a listener to listen for changes.
import 'package:flutter/material.dart';
import 'dart:async';

void main() {
  runApp(App());
}

class App extends StatefulWidget {
  @override
  AppState createState() => AppState();
}

class AppState extends State<App> {
  int counter = 0;

  StreamController<int> counterController = StreamController();

  AppState() {
    counterSink.stream.listen((value) {
      setState(() {
        counter = value;
      });
    });
  }

  @override
  Widget build(BuildContext context) {
    return MaterialApp(
        title: 'Fun with Streams',
        home: Column(
          children: [
            Text('$counter'),
            RaisedButton(
                child: Text('Press me!'),
                onPressed: () => counterController.add(counter + 1))
          ],
        ));
  }
}
BLoCs Business Logic Components
Introduction
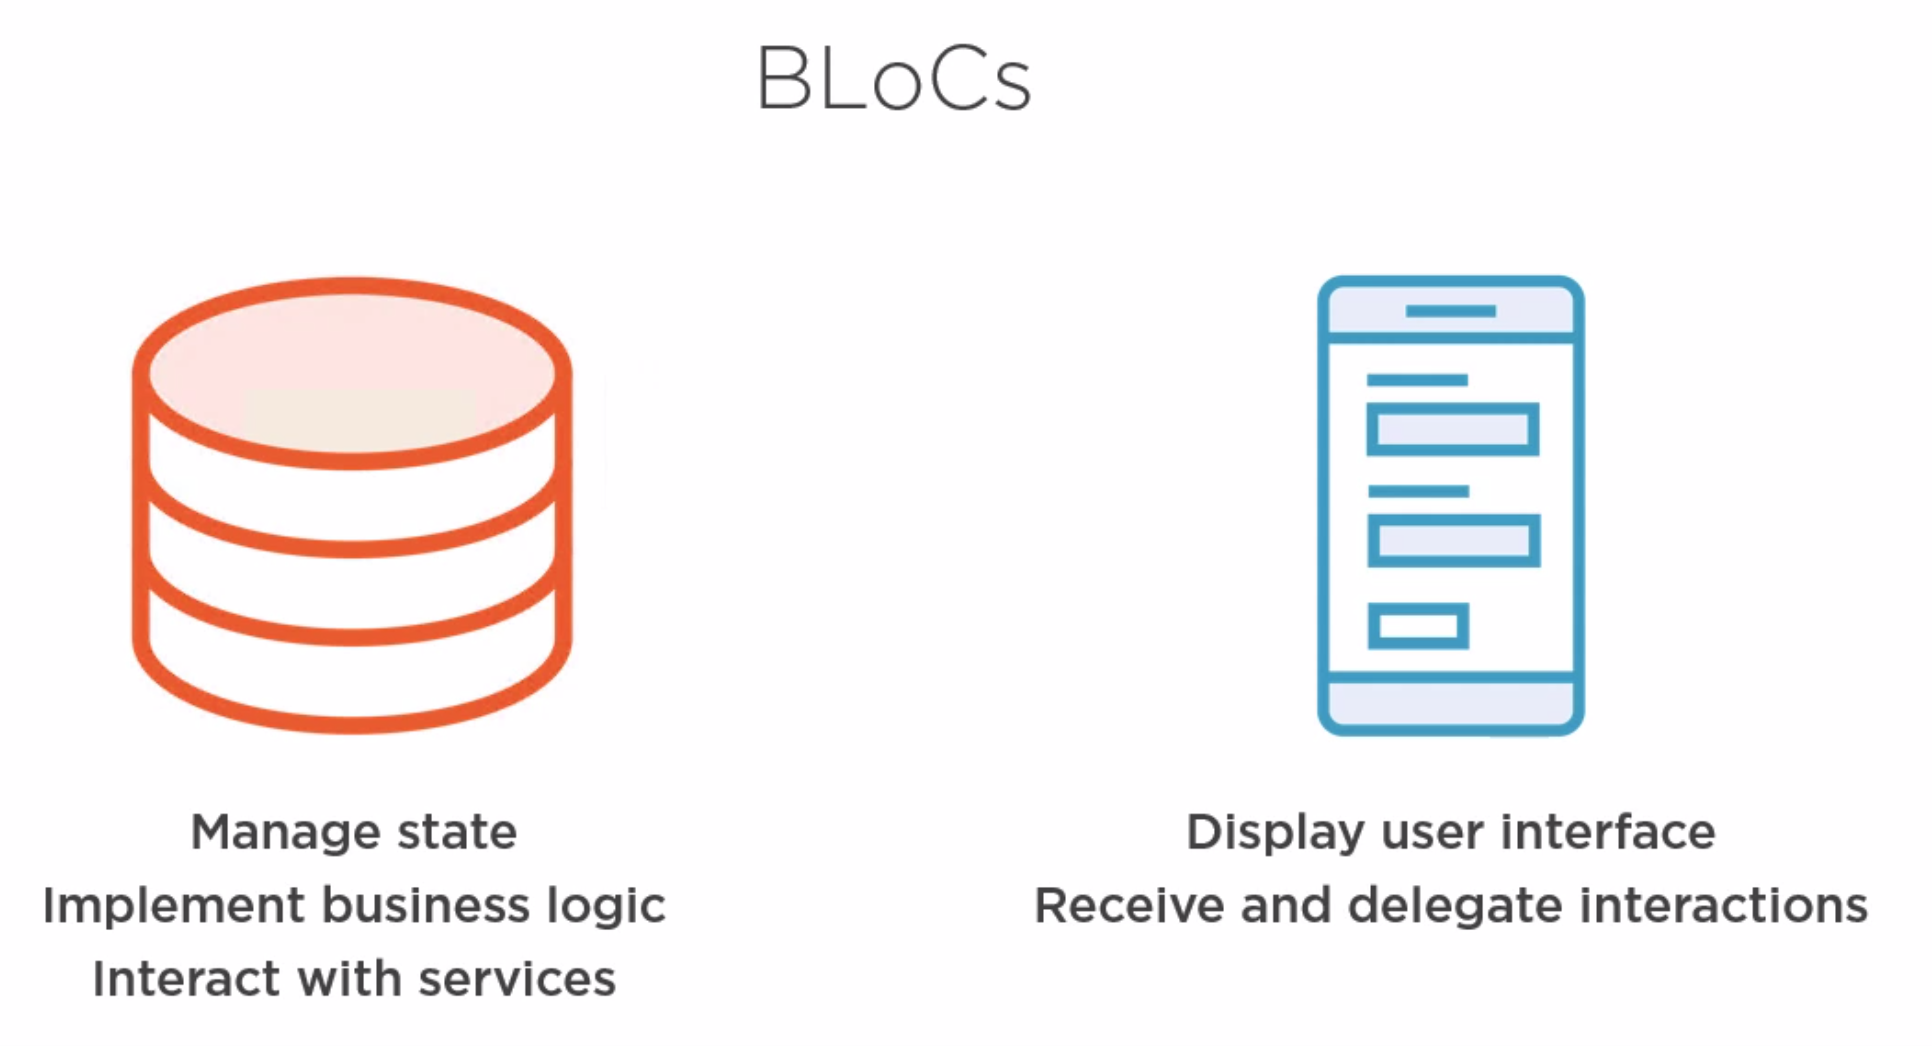
We should try and separate the Business logic from the UI. The UI should be responsible for displaying data receiving and delegating user interactions. BLoC Design Guidelines
- Inputs and output are simple Streams/Sinks only
- Dependencies are injected and Platform agnostic
- No platform branching (no if android etc)
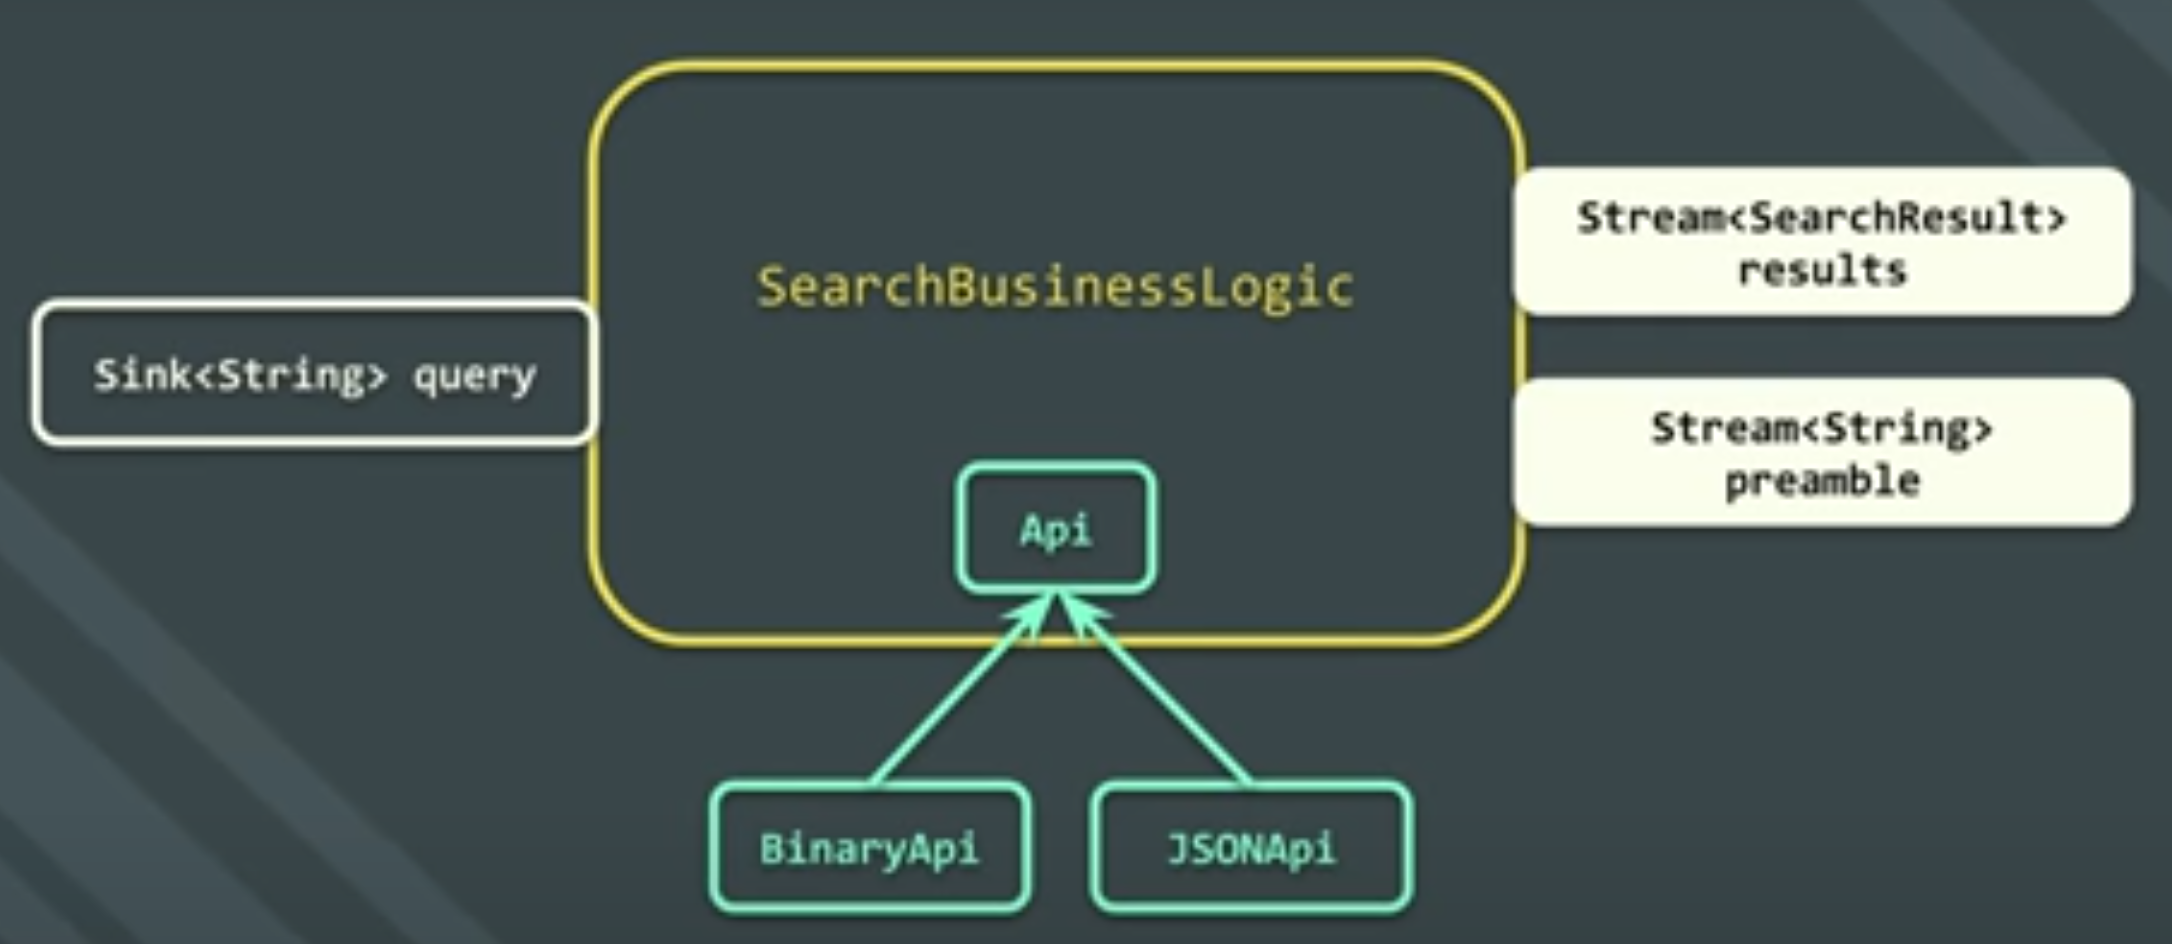
 A video on this is at https://www.youtube.com/watch?v=PLHln7wHgPE
This is a screenshot from the talk which summarizes the pattern.
Final Solution
The final solution looked at pulling the business logic out of the components and adding Sinks and Stream to support the BLoC pattern
import 'dart:async';

import 'package:flutter/material.dart';
import 'package:flutter/rendering.dart';

void main() {
  AppModel model = AppModel();
  runApp(App(model: model));
}

const List<String> urls = [
  "https://live.staticflickr.com/65535/50489498856_67fbe52703_b.jpg",
  "https://live.staticflickr.com/65535/50488789068_de551f0ba7_b.jpg",
  "https://live.staticflickr.com/65535/50488789118_247cc6c20a.jpg",
  "https://live.staticflickr.com/65535/50488789168_ff9f1f8809.jpg"
];

class App extends StatelessWidget {
  AppModel model;

  App({@required this.model});

  @override
  Widget build(BuildContext context) {
    return MaterialApp(
        title: 'Photo Viewer',
        home: GalleryPage(title: "Image Gallery", model: model));
  }
}

class PhotoState {
  String url;
  bool selected;
  bool display;
  Set<String> tags = {};

  PhotoState(this.url, {selected = false, display = true, tags});
}

class AppModel {
  Stream<bool> get isTagging => _taggingController.stream;
  Stream<List<PhotoState>> get photoStates => _photoStateController.stream;

  Set<String> tags = {"all", "nature", "cat"};

  bool _isTagging = false;
  List<PhotoState> _photoStates = List.of(urls.map((url) => PhotoState(url)));

  StreamController<bool> _taggingController = StreamController.broadcast();
  StreamController<List<PhotoState>> _photoStateController =
      StreamController.broadcast();

  AppModel() {
    _photoStateController.onListen = () {
      _photoStateController.add(_photoStates);
    };
    _taggingController.onListen = () {
      _taggingController.add(_isTagging);
    };
  }

  void toggleTagging(String url) {
    _isTagging = !_isTagging;
    _photoStates.forEach((element) {
      if (_isTagging && element.url == url) {
        element.selected = true;
      } else {
        element.selected = false;
      }
    });
    _taggingController.add(_isTagging);
    _photoStateController.add(_photoStates);
  }

  void onPhotoSelect(String url, bool selected) {
    _photoStates.forEach((element) {
      if (element.url == url) {
        element.selected = selected;
      }
    });
    _photoStateController.add(_photoStates);
  }

  void selectTag(String tag) {
    if (_isTagging) {
      if (tag != "all") {
        _photoStates.forEach((element) {
          if (element.selected) {
            element.tags.add(tag);
          }
        });
      }
      toggleTagging(null);
    } else {
      _photoStates.forEach((element) {
        element.display = tag == "all" ? true : element.tags.contains(tag);
      });
      _photoStateController.add(_photoStates);
    }
  }
}

class GalleryPage extends StatelessWidget {
  final String title;
  final AppModel model;

  GalleryPage({this.title, this.model});

  @override
  Widget build(BuildContext context) {
    return Scaffold(
      appBar: AppBar(title: Text(this.title)),
      body: StreamBuilder<List<PhotoState>>(
          initialData: [],
          stream: model.photoStates,
          builder: (context, snapshot) {
            return GridView.count(
                primary: false,
                crossAxisCount: 2,
                children: List.of((snapshot.data ?? [])
                    .where((ps) => ps.display ?? true)
                    .map((ps) => Photo(state: ps, model: model))));
          }),
      drawer: Drawer(
          child: ListView(
        children: List.of(model.tags.map((t) => ListTile(
              title: Text(t),
              onTap: () {
                model.selectTag(t);
                Navigator.of(context).pop();
              },
            ))),
      )),
    );
  }
}

class Photo extends StatelessWidget {
  final PhotoState state;
  final AppModel model;

  Photo({this.state, this.model});

  @override
  Widget build(BuildContext context) {
    return StreamBuilder<bool>(
        initialData: false,
        stream: model.isTagging,
        builder: (context, snapshot) {
          List<Widget> children = [
            GestureDetector(
                child: Image.network(state.url),
                onLongPress: () => model.toggleTagging(state.url))
          ];

          if (snapshot.data) {
            children.add(Positioned(
                left: 20,
                top: 0,
                child: Theme(
                    data: Theme.of(context)
                        .copyWith(unselectedWidgetColor: Colors.grey[200]),
                    child: Checkbox(
                      onChanged: (value) {
                        model.onPhotoSelect(state.url, value);
                      },
                      value: state.selected,
                      activeColor: Colors.white,
                      checkColor: Colors.black,
                    ))));
          }

          return Container(
              padding: EdgeInsets.only(top: 10),
              child: Stack(alignment: Alignment.center, children: children));
        });
  }
}
=Further Options
There are other options
- github.com/felangel/bloc
- MobX
- GetX
- Redux