I was unemployed, a bit bored, and looking for something new to mess with. My wife uses WordPress for a bunch of things and kept saying all the calendar options were either rubbish or paid. I had not touched much PHP since before the century, so... why not.
Starting out
I started with PHP. In my head, it was still this 1990s thing people used when they did not know JavaScript. Kind of Visual Basic vibes, with OO sprinkled on top. I do not usually gravitate to untyped languages, except TypeScript sneaking in through the back door and pretending it belongs there.
Approach
My plan was simple: build a calendar outside WordPress, then crowbar it in. With any language, I first hunt down a linter and quality checks, plus code coverage. I was moving fast, but I still wanted proof that PHP could do this properly in case I ever had to do it for real work.
Setting up Environment
Back in the day I built packages manually (usually with zip), so finding Composer put me in a good mood instantly. It feels a lot like npm: install stuff, remove stuff, and composer.json acting like package.json.
With a package manager in hand, I installed:
        "captainhook/captainhook": "^5.28",
        "friendsofphp/php-cs-fixer": "^3.94",
        "phpstan/phpstan": "^2.1",
        "squizlabs/php_codesniffer": "^4.0",
        "symplify/phpstan-rules": "^14.9",
        "phpunit/phpunit": "^13.0"
- captainhook - manages the checks at check-in
- php-cs-fixer - is the linter
- phpstan - checks for code quality
- phpunit - provides a unit test framework and coverage
I am a big code-coverage fan because it keeps quality from quietly drifting downhill. Here is what you get with PHP.
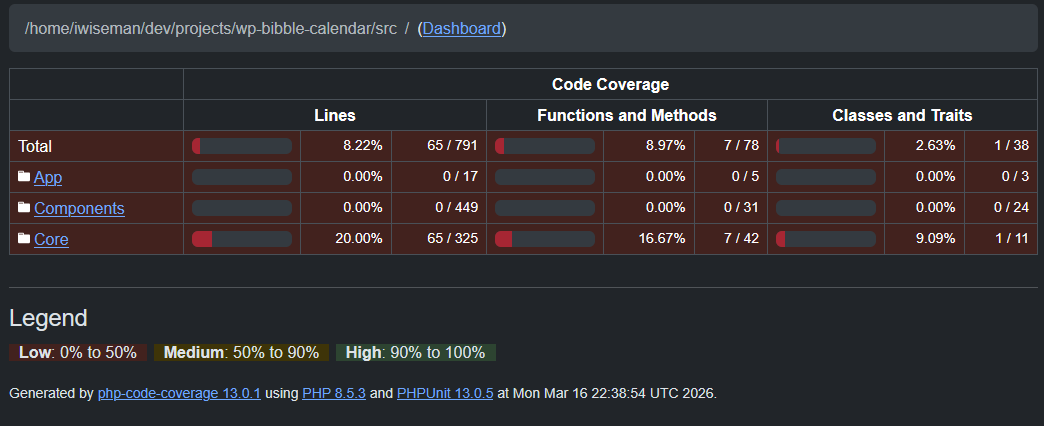
The dashboard is a nice touch too (not shown).
Setting all this up took a while, but first run, first scars, and I got there in the end. You can see the example on my Gitea: gitea
Setting Up Autoload
In the old old days, you would do this:
require_once __DIR__ . '/../../../constants/days.php';
That worked for includes, but then autoload showed up. There are caveats, sure, but if you stick to classes, you no longer require require (yes, still funny). It feels a bit like C#: add namespaces, then pull in what you need with use.
<?php

declare(strict_types=1);

namespace Components\Pages\MonthView;

use Core\Domain\Constants\Days;

class DayCell
{
...
        $weekdayLabel = ($rowIndex === 0)
            ? '<div class=\'month-view-header-month\'>' . Days::SHORT[$weekday] . '</div>'
            : '';
...
}
Why Round Peg
I do not think PHP is amazing for frontend development. You can build the GUI in PHP, and I did, but it felt clunky to me. Maybe I am being unfair and there is a nicer pattern, but I still ended up needing JavaScript anyway for buttons and interactions.
<?php

declare(strict_types=1);

namespace Components\Toolbar;

use App\RequestState;
use Components\Html\Html;

class Toolbar
{
    // public static function render(string $currentView, int $year, int $month, int $day): Html
    public static function render(RequestState $state): Html
    {
        return new Html(
            '<div class="toolbar" id="wp-bibble-calendar-toolbar"
                    data-event-modal-docked="false">
                <div class="toolbar-controls-left">
                    ' . Label::render() . '
                    ' . TodayButton::render($state->view) . '
                    ' . ViewNav::render($state->view, $state->year, $state->month, $state->day) . '
                    <div id="month-year-dropdown-behaviour"></div>
                </div>
                <div class="toolbar-controls-right">
                    ' . SettingsButton::render() . '
                    ' . ViewDropdown::render($state->view, $state->year, $state->month, $state->day) . '
                    <div id="view-dropdown-behaviour"></div>
                    ' . DockedViewToggle::render($state->view, $state->year, $state->month, $state->day) . '
                </div>
            </div>'
        );
    }
}
Next WordPress
To make sure I understood WordPress well enough, I started writing the plugin.
Making the plugin
This is the file that kicks things off when the plugin runs. Like any new thing, I read docs, copied a bit, broke a bit, then carried on. It turned out to be way easier than expected. You include autoload.php, add a shortcode function to spin up your class, and register an action to load CSS.
<?php
/**
 * Plugin Name: BBM Calendar
 * Description: Custom calendar plugin for your site.
 * Version: 0.1.0
 * Author: Iain (Bill) Wiseman
 * License: GPL2
 */

require __DIR__ . '/vendor/autoload.php';

add_shortcode('bbm_calendar', function () {

    // Build RequestState
    $view  = $_GET['view']  ?? 'month';
    $year  = isset($_GET['year'])  ? (int)$_GET['year']  : (int)date('Y');
    $month = isset($_GET['month']) ? (int)$_GET['month'] : (int)date('n');
    $day   = isset($_GET['day'])   ? (int)$_GET['day']   : (int)date('j');

    $state = new \App\RequestState($view, $year, $month, $day);

    // Bootstrap
    $bootstrap = new \App\Bootstrap(__DIR__ . '/calendar-settings.json');
    ['settings' => $settings, 'calendar' => $calendar, 'router' => $router] = $bootstrap->run();

    // Wrap everything like standalone
    return '<div class="wp-bibble-calendar">' .
        \Components\Toolbar\Toolbar::render($state) .
        \Components\Toolbar\AddEventButton::render() .
        $router->render($state) .
        \Components\Modals\CalendarEventModal::render() .
        '</div>';
});


add_action('wp_enqueue_scripts', function () {
    $base = plugin_dir_url(__FILE__);

    wp_enqueue_style('bbm-calendar-style', $base . 'css/style.css');
    wp_enqueue_style('bbm-calendar-day', $base . 'css/day_view.css');
    wp_enqueue_style('bbm-calendar-week', $base . 'css/week_view.css');
    wp_enqueue_style('bbm-calendar-month', $base . 'css/month_view.css');
    wp_enqueue_style('bbm-calendar-toolbar', $base . 'css/toolbar.css');
    wp_enqueue_style('bbm-calendar-modal', $base . 'css/calendar_event_modal.css');

    wp_enqueue_script('bbm-month-year-dropdown', $base . 'js/MonthYearDropdown.js', [], false, true);
    wp_enqueue_script('bbm-view-dropdown', $base . 'js/ViewDropdown.js', [], false, true);
    wp_enqueue_script('bbm-calendar-modal-js', $base . 'js/CalendarEventModal.js', [], false, true);
});
Building plugin
I needed to bundle the code and, like it was still the 90s, zip felt like the easiest option. I got the robot to draft this, then cleaned it up.
#!/bin/bash
set -e

# Clean build folder
rm -rf build
mkdir -p build/bbm-calendar

# Copy plugin bootstrap
cp wp-content/plugins/bbm-calendar/bbm-calendar.php build/bbm-calendar/

# Copy PHP source code
cp -r src build/bbm-calendar/

# Copy vendor folder
cp -r vendor build/bbm-calendar/

# Copy settings file
cp calendar-settings.json build/bbm-calendar/ 2>/dev/null || true

# Copy CSS (from standalone public/css)
mkdir -p build/bbm-calendar/css
cp public/css/*.css build/bbm-calendar/css/

# Copy JS bundle (ONLY main.js)
mkdir -p build/bbm-calendar/js
cp public/js/main.js build/bbm-calendar/js/

# Zip it
cd build
zip -r bbm-calendar.zip bbm-calendar
Run the script and you get a zip file. Copy it into WordPress under wp-content/plugins/, unzip it, fix permissions/ownership, and you are good to go.
Preact
I had never heard of Preact before, but the robot pointed me at it. I already knew React, so it felt like a low-risk adventure.
Getting Started with Preact
Getting started was simple.
npm create vite@latest my-preact-app -- --template preact
Getting it to My PHP
My first question was: how do I jam this into the PHP app? Did I need webpack and a whole dist-copy dance? As usual, my faithful robot pointed me at esbuild, which did most of the heavy lifting. esbuild runs in the PHP project and builds the code for you. You still need to copy files across, of course (next section).
Here is esbuild.config.ts:
import { build } from 'esbuild'
import type { Plugin, OnResolveArgs, OnResolveResult } from 'esbuild'

const cdn = 'https://esm.sh/'

const preactCDNPlugin: Plugin = {
  name: 'preact-cdn',
  setup(build) {
    build.onResolve({ filter: /^preact(\/.*)?$/ }, (args: OnResolveArgs): OnResolveResult => {
      return {
        path: cdn + args.path,
        external: true,
      }
    })
  },
}

build({
  entryPoints: ['assets/ts/main.tsx'],
  outdir: 'public/js',
  bundle: true,
  format: 'esm',
  jsx: 'automatic',
  jsxImportSource: 'preact',
  plugins: [preactCDNPlugin],
})
It looks a bit scary at first glance, but with robot backup I got it working. The important bits are entryPoints and outdir. Then you create a tiny npm project (package.json):
{
  "scripts": {
    "build": "tsx esbuild.config.ts"
  },
  "devDependencies": {
    "esbuild": "^0.27.4",
    "preact": "^10.29.0",
    "prettier": "^3.8.1",
    "tsx": "^4.21.0",
    "typescript-eslint": "^8.57.2"
  },
  "prettier": "./configs/prettier.json"
}
And run
npm run build
Copying the Preact Code
After copying TypeScript back and forth a few times, I got bored, so Robot-and-I wrote a script. It copies most of the Preact app into the PHP app under assets/ts and public/css. main.tsx is slightly different, so we back it up and restore it.
#!/bin/bash

# Delete all of the directories in assets/ts but not the files in assets/ts
find assets/ts -mindepth 1 -type d -exec rm -rf {} +

# Backup the main.tsx file
cp -r assets/ts/main.tsx /tmp

cp -r ../wp-preact-app/src/* assets/ts/
# Restore the main.tsx file
cp -r /tmp/main.tsx assets/ts/main.tsx

# Delete the css under public/css
rm -rf public/css/*

# Copy the css from the preact app to the public/css folder
cp -r ../wp-preact-app/public/css/* public/css/

# Copy the app.css from the preact app to the public/css folder
cp ../wp-preact-app/src/app.css public/css/app.css

# In assets/ts/app.css, replace
# @import '../public/css/day-view.css';
# With
#
# @import "../../public/css/day-view.css";
# For all import statements in assets/ts/app.css
echo "Updating import statements in assets/ts/app.css..."
sed -E -i "s|@import[[:space:]]+(['\"])\.\./public/css/([^'\"]+)\1;|@import \1../../public/css/\2\1;|g" assets/ts/app.css
The plan was to build one simple control, copy it into the PHP app, and maybe replace a few gnarly components. But it was so painless that I ended up using it for basically all GUI work. I started rebuilding the Google Calendar-style UI in Preact so I could instantiate it from main.tsx.
So the workflow became:
- Build GUI (Preact App)
- Run copy-preact.sh (PHP App)
- Run npm run build (PHP App)
- Build Plugin ./build-plugin.sh (PHP App)
- Copy zip to wordpress server and unzip
Integrating Preact with PHP
The bit I have not covered yet is how PHP actually runs the Preact code. We copy main.js from esbuild into the build directory when ./copy-preact.sh runs, but we still need to wire it in. I started with one giant PHP file that had two jobs:
- Handle the backend. e.g. getEvents, postEvents, deleteEvents
- Handle the frontend. Instantiate the UI
Bootstrap
I spent a lot of time on this bit, but I think it came out alright. I started with standalone PHP just to prove it could work, then created bootstrap.php to wire up all the moving pieces.
Here is the essence (full code is in Gitea):
<?php

...

final class Bootstrap
{
    public function __construct(private string $settingsPath)
    {
        error_log('Bootstrap created: ' . spl_object_id($this));
    }

    public function run(): BootstrapResult
    {
        $this->loadDotEnv(\dirname($this->settingsPath) . '/.env');

        $settingsSource = new FileSettingsSource($this->settingsPath);
        $settings = new SettingsService($settingsSource);

        // Build the service stack
        $dbConfig = $settings->getDbConnection();

        // MySQL repository (for testing)
        $dsn = \sprintf(
            'mysql:host=%s;port=%d;dbname=%s;charset=utf8mb4',
            $dbConfig['host'],
            $dbConfig['port'],
            $dbConfig['database']
        );

        $db = new \PDO(
            $dsn,
            $dbConfig['username'],
            $dbConfig['password'],
            [
                \PDO::ATTR_ERRMODE => \PDO::ERRMODE_EXCEPTION,
                \PDO::ATTR_DEFAULT_FETCH_MODE => \PDO::FETCH_ASSOC,
            ]
        );

        // Repository
        $repository = new RepositoryCalendarEventMysql($db, $settings->getCurrentUserId());

        // Service
        $service = new ServiceCalendarEvent($repository, $settings);

        // Controller
        $controller = new CalendarEventController($service);

        // Build the router
        $router = new ApiRouter($controller);

        return new BootstrapResult(
            settings: $settings,
            eventSource: $eventSource,
            router: $router
        );
    }

...
}
This basically gives you settings and the API router.
Take one Kernel Into the Shower not me
In index.php, we separate the two jobs the app needs to do.
<?php

declare(strict_types=1);

use App\Bootstrap;
use Core\Kernels\ApiKernel;
use Core\Kernels\HtmlKernel;

require __DIR__ . '/vendor/autoload.php';

// Bootstrap
$bootstrap = new Bootstrap(__DIR__ . '/calendar-settings.json');
$bootstrapResult = $bootstrap->run();

// Extract path
$path = parse_url($_SERVER['REQUEST_URI'], \PHP_URL_PATH);
if (!is_string($path)) {
    $path = '';
}

// API?
if (str_starts_with($path, '/api/')) {
    (new ApiKernel($bootstrapResult))->handle($path);
    exit;
}

// HTML?
(new HtmlKernel())->handle($path);
Hopefully this hangs together without too much squinting. There were a few potholes along the way, but the split ended up clean: REST API in ApiKernel, GUI concerns in HtmlKernel.
The Backend
I will not go super deep here because it is a classic Router -> Controller -> Service -> Repository setup. We take the request path and push it through the router, pretty similar to ExpressJS. I had to sprinkle in some CORS handling, but that was mostly it.
Backend Flow At A Glance
Fast way to read this stack:
Router: picks endpoint + methodController: translates HTTP to app actionsService: business rules live hereRepository: talks to the database
flowchart LR
    A[HTTP Request<br/>method + path + body] --> B[ApiKernel]
    B --> C[ApiRouter]
    C --> D[CalendarEventController]
    D --> E[ServiceCalendarEvent]
    E --> F[RepositoryCalendarEventMysql]
    F --> G[(MySQL)]

    %% Return path
    G --> F
    F --> E
    E --> D
    D --> C

    %% Final response
    C --> H[JSON Response]
    H --> A
| Layer | Job | Keeps Things Clean By |
|---|---|---|
| Router | Maps request to handler | No business logic in route wiring |
| Controller | Validates/parses request data | Keeps HTTP stuff out of services |
| Service | Applies app rules | Central place for behavior |
| Repository | Runs DB queries | Keeps SQL out of app logic |
class ApiKernel
{
    public function __construct(private BootstrapResult $bootstrapResult)
    {
    }

    public function handle(string $path): void
    {
        $method = $_SERVER['REQUEST_METHOD'];

        error_log("ApiKernel::handle called with method: $method, path: $path");

        $raw = file_get_contents('php://input') ?: '';
        $body = json_decode($raw, true) ?? [];

        // Use the router created in Bootstrap
        $router = $this->bootstrapResult->router;

        $response = $router->dispatch($method, $path, $body);

        header('Content-Type: application/json');
        echo json_encode($response);
    }
}
The Frontend
This was the fun bit for me. I was still not 100% sure it would work in WordPress, but I liked where it was heading and genuinely enjoyed building it.
There is not much magic here: templates did the job. I had not really used them in PHP, but that is half the fun with projects like this. Here is HtmlKernel for context. Super simple, which suits me perfectly.
class HtmlKernel
{
    public function __construct()
    {
    }

    public function handle(string $path): void
    {
        $state = new RequestState(
            $_GET['view'] ?? 'month',
            (int) ($_GET['year'] ?? date('Y')),
            (int) ($_GET['month'] ?? date('n')),
            (int) ($_GET['day'] ?? date('j'))
        );

        // Render template
        include __DIR__ . '/../../templates/calendar-page.php';
    }
}
We include a template and, as the name suggests, pass the view and the starting date.
<!DOCTYPE html>
<html>
<head>
    <link rel="stylesheet" href="public/css/app.css">
    <link href="https://fonts.googleapis.com/css2?family=Material+Symbols+Outlined" rel="stylesheet">
</head>
<body>

<div id="bibble-calendar-root"></div>

<script>
    window.BIBBLE_CALENDAR = {
        initialDate: "<?php echo $state->year . '-' . $state->month . '-' . $state->day; ?>",
        initialView: "<?php echo $state->view; ?>",
    };
</script>

<script type="module" src="public/js/main.js"></script>

</body>
</html>
The template creates a global object, and that gives the Preact app what it needs to render the page.
Standalone main.tsx
It we look at the main.tsx in the PHP standalone you will see this. The global object is read and passed to the App.tsx
const root = document.getElementById('bibble-calendar-root')
if (!root) throw new Error('Root element #app not found')

const { initialDate, initialView } = (window as any).BIBBLE_CALENDAR

if (isCalendarView(initialView)) {
  console.log('Initial view from server:', initialView)
} else {
  console.warn('Invalid initial view from server:', initialView, "Defaulting to 'month'")
}

render(
  <SettingsProvider>
    <App initialDate={new Date(initialDate)} initialView={isCalendarView(initialView) ? initialView : 'month'} />
  </SettingsProvider>,
  root
)
Wordpress
Things are a tad different for the wordpress end of the deal. In the plugin script we do this.
add_action('wp_enqueue_scripts', static function (): void {
...
    wp_register_script(
        'bbm-calendar-main',
        $base . 'js/main.js',
        [],
        false,
        true
    );

    wp_script_add_data('bbm-calendar-main', 'type', 'module');
    wp_enqueue_script('bbm-calendar-main');

    $post = get_post();
    $postContent = ($post instanceof WP_Post) ? $post->post_content : '';

    if (is_singular() && has_shortcode($postContent, BBM_CALENDAR_SHORTCODE)) {
        $view = $_GET['view'] ?? 'month';
        $year = (int) ($_GET['year'] ?? date('Y'));
        $month = (int) ($_GET['month'] ?? date('n'));
        $day = (int) ($_GET['day'] ?? date('j'));

        wp_localize_script('bbm-calendar-main', 'BIBBLE_CALENDAR', [
            'initialDate' => "$year-$month-$day",
            'initialView' => $view,
        ]);
    }
});
What WordPress Is Actually Doing Here
wp_localize_script is one of those WordPress functions that looks like it should be about translation, but in reality it’s a sneaky little bridge between PHP and JavaScript. It takes a PHP array and turns it into a global JS object before your script runs.
So this call:
wp_localize_script('bbm-calendar-main', 'BIBBLE_CALENDAR', [
    'initialDate' => "$year-$month-$day",
    'initialView' => $view,
]);
produces something like this in the page:
<script>
  var BIBBLE_CALENDAR = {
    initialDate: '2025-04-04',
    initialView: 'month',
  }
</script>
This is the WordPress equivalent of the standalone version’s:
<script>
    window.BIBBLE_CALENDAR = { ... };
</script>